
- Home
- Aquatics
- Water Sports and Activities
- Sports and Activities
- Water Skiing and Wakeboarding

Whether you're a crafty vet on the water looking to take your skills to the next level or a recreational rider interested in doing some eye-opening tricks for fun, Water Skiing and Wakeboarding is your guide to tearing up the water.
Ben Favret's 25 years of competitive experience have produced numerous gold medals at all levels of competition. In Water Skiing and Wakeboarding, Favret teaches you how to perfect the skills and turn some heads—and do it safely. In this comprehensive guide, you'll learn
· how to select and fit your equipment,
· conditioning both on land and in the water,
· skills for mastering the slalom course,
· essential techniques for wakeboarding,
· the secrets to tricks and jumps used by the pros, and
· how to compete and win.
Hit the water and ride like the pros. Most important, have fun while doing it. Let Water Skiing and Wakeboarding be your one-stop resource to endless fun and an exhilarating experience on the water!
Chapter 1. Skiing and Wakeboarding Equipment
Chapter 2. Physical Conditioning
Chapter 3. Fundamental Movements and Boat Motion
Chapter 4. Slalom Skiing
Chapter 5. Wakeboarding
Chapter 6. Trick Skiing
Chapter 7. Jump Skiing
Chapter 8. Off- and On-Water Practice
Chapter 9. Competing
Chapter 10. A Lifetime of Fun
Ben Favret has won championships at every level in his 25 years of competitive slalom water skiing. He has established himself as one of the world’s most-respected and best-known competitors by winning gold medals in multiple regional, national, Pan American, world, and professional competitions. He is also the current U.S. men’s masters record holder and ranked number 1 in the world by the IWSF 35-45 age division.
Over the years, Favret has coached and trained numerous skiers to victory as the top slalom instructor at Bennett’s Water Ski School and now at his own private site in Orlando, Florida. He was the lead author of Human Kinetics’ The Complete Guide to Water Skiing, which is considered by many to be the bible of water skiing. He has also written over 30 articles in top water ski publications, conducted numerous equipment tests and evaluations, and served on the United States Olympic Committee Athlete Advisory Council and as a board member of USA Water Skiing.
Favret graduated from the University of Alabama with a degree in marketing. He resides in Windermere, Florida.
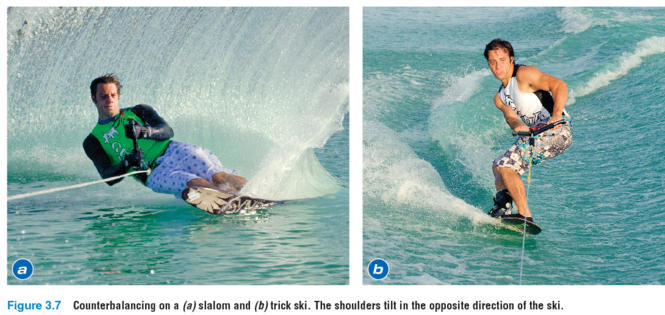
Two key balancing movements for successful skiing
The two types of balancing movements are counterbalancing and fore–aft balancing.
Balancing With Counter and Fore-and-Aft Movements
Brent Larsen, coach and father of the world record-setting trickers Britt and Tawn, emphatically believes that water skiing should be defined as balance in motion. Balance is the skill required to keep the body in equilibrium when it is acted on by external forces; it directly affects our ability to perform other movements properly. Balance addresses how the body's central mass moves in dynamic relation to more specialized peripheral movements of the extremities—the hands, arms, legs, ankles, head, fingers, and toes. Other forces that affect balance may be the result of deliberate actions on the skier's or boarder's part (tipping, counteracting), or a reaction to disturbances (change in boat motion, rope stretch, ski setup, and wind and water conditions).
The two types of balancing movements are counterbalancing and fore-aft balancing. Both of these are initiated by, and interact with, tipping the skis or board as well as how the entire foot is positioned in relation to the surface. The need to sense the sometimes very subtle changes in position is why good foot beds and good foot contact with the ski or board are so critical. Either a forward or backward weight shift (weight on your toes or heels) or side-to-side movement (weight on the inside or outside of your foot) changes your balance point in relation to your upper body. Feeling and working the entire foot and positioning your upper body in relation to those movements are balancing movements.
Counterbalancing is simply the side-to-side tilting of the upper body at the waist in the direction opposite the turn or change in direction as shown in figure 3.7. If you have trouble turning with speed or keeping the skis or board on edge through the turn, you should concentrate on learning how to make proper counterbalancing movements. The signature of good counterbalancing is a still or calm upper body with the hips, legs, knees, and ankles moving side to side under the torso.
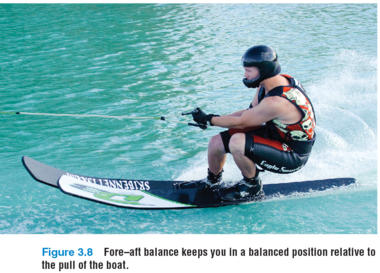
Fore-aft balance movements are in response to the location of the hips relative to the feet. Think of your feet on the skis or board as being between your hips and the boat (see figure 3.8). This position or body alignment requires an overall body tension. A break down in that alignment and tension is often one of the first signs that you are getting tired. Rather than focusing on moving the hips to maintain fore-aft balance, focus on moving the feet. Fore-aft balance is most critical during the initiation of a change of direction and just before the rope is reloaded and stretched. The movement is initiated by the foot nearer the boat and acts to center the body over the skis or board. Fore-aft movement combined with flexing and extending create what is called upper-body/lower-body separation in snow skiing; the same principle applies on the water. Keep your upper body calm and keep your movement below the hips.
Tips for edging through a wake
You want to use the energy of the wake to push you up into the air rather than try to jump off the top of the wake.
Edging Through the Wake
If you are a surfer, then you know about waves. A wake is similar to a wave in the ocean. Surfers need to understand the dynamics of the ocean, tides, and winds to know how waves are created and when and where to surf. Similarly, wakeboarders need to understand the dynamics of a wake to get air. As a boat travels across a flat lake, it displaces water, which creates a wake. The heavier the boat, the bigger the wake because more energy is pushing the water. As a result, there is more force, or energy, to propel you higher. You want to use the energy of the wake to push you up into the air rather than try to jump off the top of the wake. By learning this skill correctly, you use less energy on the takeoff and have more control and strength for more complex moves once you are in the air.
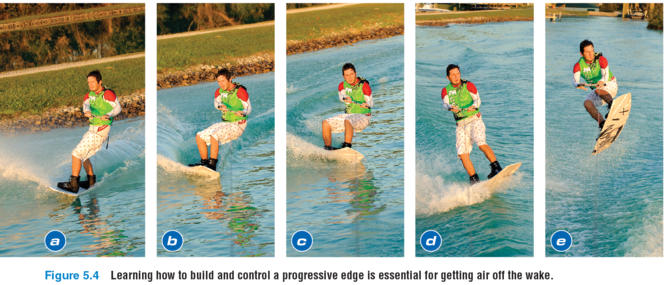
Getting “big air” begins by learning how to create energy as you approach the wake. Progressive tipping for edging is the most important skill for every wakeboarder to master. Start by gradually edging, or tipping, the board first on the heel side (see figure 5.4). Edging the board into and up the wake creates the energy needed for pushing against the force of the wake. As you hit the wake, you release that energy by simply extending your knees, thus pushing the board against the energy of the wake. The key is to increase your edge pressure, or tip angle, as you get closer to the top of the wake. When done correctly, you get pushed into the air proportional to the energy you create with your edge up the wake. Creating the correct body position, alignment, and stacking against the boat as you approach the wake both heel side and toe side takes time to master and is a skill that you should work on consistently.
The following steps break edging down move by move:
- Edge out beside the boat 10 to 15 feet (3 to 4.6 m) and make a slow, smooth tip of the board, letting the board move under the rope until you feel the boat start to pull you back toward the wake.
- Maintain the tipped edge of the board as you approach the wake, and gently increase the tip edge. You will pick up speed as you tip the edge of the board. Think about continuously turning the board in an arc toward the wake while showing more of the base of your board to the boat.
- Continue to build up your edge tipping and increase your knee flexion and counterrotation away from the boat to the top of the wake. You will feel an increased pull in your hands as you climb the wake. Be sure to keep the handle down at your waist. Many riders mistakenly think that to get height, they must edge as hard as they can, as long as they can, and generate speed into the wake. There is no doubt that a hard, fast edge, or tip, will develop a lot of speed and give you distance, but it won't give you any height. Such an approach uses too much force early in the arc toward the wake and does not generate lift from the wake.
- As you ride up the wake on edge, extend your knees! Stay in dynamic balance in relation to the slope of the wake and the pull of the rope, typically slightly away from the boat. Keep the handle by your waist, and move your hips toward the handle. Extend your chest and head up. In this position you can resist the force of the wake pushing up on you by pushing down against it. Imagine that you are trying to break the board in half at the crest of the wake.
- The release of the energy you created with a proper tipping edge into the wake and your leg extension will result in what most describe as a pop or lift off the wake, similar to a double bounce on a trampoline as the wake's force reacts to your downward energy.
- Keep your eyes open to spot the landing, and then absorb it with your knees and ankles to quickly establish edge control and continue out on edge away from the boat.
A common error when trying a progressive edge tip is to stop tipping the board or to flatten out. If you stop tipping the board at the wake, you reduce the energy stored in the board. The result is that the force created by edging at the wake is lost. Always focus on driving your energy down against the wake so that the wake pushes you up with more force and you get more air.
Learn more advanced jump maneuvers
Skiers who take the time and learn to ride their skis end up improving the quickest.
Three-Quarter Cut
With all the right gear, the ability to control your speed, and solid technique riding your skis, you may believe you can go farther. You may even be able to see the 100-foot (31 m) buoy just in front of you when you land your current single-wake jumps. This is the most dangerous point in your jumping career because you have just enough talent, strength, and ability to hurt yourself if you push beyond your limits. In fact, some top coaches keep their students jumping with a single-wake cut for a full season or more to ensure that they can control their skis and speed. This may seem like a long time, but the skiers who take the time and learn to ride their skis end up improving the quickest.
The next phase is learning to jump from a wider position known as the three-quarter cut. The three-quarter cut should begin as nothing more than an extended version of the single-wake cut. The difference is that you start from a slightly wider position—10 feet (3 m) outside the right wake rather than the left wake. Keep the boat speed and path the same as those you used for your single cuts (28-30 mph, or 45-48 km/h). The same principles of progressive edging and controlled speed apply, except now timing is more involved.
To help adjust to the new timing without the worry of going over the ramp, do the no-jump jumping drill with one small addition. Set out two buoys about 12 feet (3.7 m) apart and away from the ramp. These buoys represent the ramp. On a jump course, use the second set of timing buoys to simulate the ramp. (If you do not have a jump course set up, run the boat in a straight line about 50 feet, or 15 meters, outside the buoy closest to the boat.) Pull out 10 feet (3 m) outside the wake, assume the correct body position, and focus on the left buoy, which represents the top left corner of the ramp. Don't worry about the wakes; let the boat slowly pull you over them as you set a soft edge. As you come off the second wake, you should be near the same position you have been taking on your single cut. Drop your hip and edge up and through to the middle of the buoys.
Try this until you are comfortable, confident, and in control of your body position, skis, and speed. Once you feel you are ready, take it to the ramp with confidence, concentrating on holding your edge as you drop your hip off the wake into the ramp. Stay calm and be smart, and you will soon be jumping 100 feet (30 m) or more.
Once you get solid at jumping from this wider position, move out a little farther to about 20 feet (6 m) outside the wakes and go through the same process. Now do the same thing from 30 feet (9 m). The farther you move out, the more speed you will carry into the base of the ramp, and the more critical body position and timing will be. You should be able to generate 80 to 90 percent of your maximum distance from a three-quarter cut, so you should spend a great deal of time mastering this technique. Take the time needed to become aware of your location in relation to the boat and the ramp. Develop a sense of timing and stay safe and in control of your speed and position. If things aren't right, then pass!
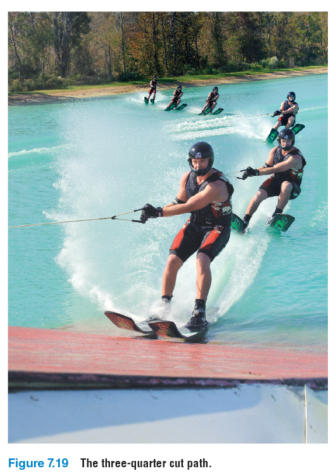
Up until now you have been running the boat between, or splitting, the jump course buoys. As you learn to take a stronger edge and ski across the course more, you will arrive at the ramp earlier. You can keep your turn at the same location and get back into a full cutting position by beginning to move the boat out wider toward the right-hand side of the course. Move it out in 1- or 2-foot (31 or 61 cm) increments until you find a spot that is comfortable for you to take a full, strong edge into the ramp as shown in figure 7.19.
No matter how much you practice, some approaches to the ramp won't be quite right. In these instances, you need to pass on the jump for safety. You pass by letting go of the handle when you realize this will not be a safe jump and ski around the left side of the ramp. Avoid hitting any portion of the ramp by hopping over the corner if need be. If you are early into the ramp, pass. If you are late into the ramp, pass. If you are on your heels, pass. If your skis are behind you, pass. If you don't have confidence, pass. Do not try to salvage a bad start or edge. By learning to pass, you will stay safe and practice good habits of edging and turning slowly.
Because passing on purpose teaches bad habits, you should pass on a jump only when safety is an issue. The secret to good jumping is learning to edge through the ramp. When you pass, you usually stop pulling just after the wakes and let go of the handle and ski around the ramp. This is the opposite of what you want to practice doing. If your approach is unsafe and you don't feel confident, you should pass, but be sure to take the jump when things are good so you can gain experience and confidence with each jump.
Double Cut
As stated earlier, you should be able to achieve nearly all of your distance from a three-quarter cut. The rest comes from the double cut. The purpose of the double cut is to position the skier out wider to create more angle across the wakes and generate more speed into the ramp. The increased angle and speed equal greater distance. The trade-off is consistency. The wider you get on the boat, the more critical the timing of the turn and cut becomes.
To perform the double cut, you must learn how to make the counter cut. The counter cut is different from the cut to the ramp. Because its only purpose is to position you wider on the boat, a more leveraged position, similar to that used in slalom, is called for. The timing of the turn for the counter cut is assisted by the 500- and 600-foot (152 and 183 m) buoys. You pull out to the left side of the boat and use a snowplow position (as with snow skiing, point the tips of your skis together to slow down quickly) to control your speed for the turn. Once your skis are turned, apply pressure to the left ski and pull through the wakes across the course and up alongside the boat. When you have achieved your maximum width, you need to pull the handle up and across your body. This extra action gives you additional speed and advances you farther up on the boat.
As you glide down the lake, you prepare for the next phase of the double cut, the turn. The double-cut turn is different from the three-quarter-cut turn. Because you are farther up alongside the boat, you cannot make the same turn without creating slack in the rope or dropping back to a narrower position. You must learn the S turn to solve this problem (see figure 7.21). The S turn begins by letting your left arm extend out during the glide. As you glide, rotate your left hip away from the boat. This action edges you away from the ramp and keeps the rope tight. Now shift your weight to your right ski and make a slow rotation with your right hip back to the handle. At this stage it is critical that you maintain your forward water speed and ski through the turn as you do in slalom skiing. This will help you avoid creating pull from the boat until you are fully rotated and set in an aligned position that allows you to hold the acceleration of the boat.
Your eyes should be fixed across the course and not on the ramp, your knees should be flexed, and the handle must be down and in near your body. Set your edge and hold your direction across the wakes as you have been doing with the three-quarter cut. It will be slightly more difficult to hold the edge because of the increased angle. If you are having trouble, back up or spend more time practicing the drills you learned in the earlier sections.
A slow rotation toward the ramp while keeping your speed as high as possible is key. This sounds easy, but when you are looking across the course and see the side curtain of the ramp, you have a tendency to rush everything. You can overcome this by using a cut and pass drill, in which you make a turn and cut as if you were actually going to hit the ramp but let go at the last possible second and safely go around the ramp. This helps you learn the timing of your turn without worrying about the ramp. Use this drill to see the new perspective of the ramp and boat and make any adjustments.
Two key balancing movements for successful skiing
The two types of balancing movements are counterbalancing and fore–aft balancing.
Balancing With Counter and Fore-and-Aft Movements
Brent Larsen, coach and father of the world record-setting trickers Britt and Tawn, emphatically believes that water skiing should be defined as balance in motion. Balance is the skill required to keep the body in equilibrium when it is acted on by external forces; it directly affects our ability to perform other movements properly. Balance addresses how the body's central mass moves in dynamic relation to more specialized peripheral movements of the extremities—the hands, arms, legs, ankles, head, fingers, and toes. Other forces that affect balance may be the result of deliberate actions on the skier's or boarder's part (tipping, counteracting), or a reaction to disturbances (change in boat motion, rope stretch, ski setup, and wind and water conditions).
The two types of balancing movements are counterbalancing and fore-aft balancing. Both of these are initiated by, and interact with, tipping the skis or board as well as how the entire foot is positioned in relation to the surface. The need to sense the sometimes very subtle changes in position is why good foot beds and good foot contact with the ski or board are so critical. Either a forward or backward weight shift (weight on your toes or heels) or side-to-side movement (weight on the inside or outside of your foot) changes your balance point in relation to your upper body. Feeling and working the entire foot and positioning your upper body in relation to those movements are balancing movements.
Counterbalancing is simply the side-to-side tilting of the upper body at the waist in the direction opposite the turn or change in direction as shown in figure 3.7. If you have trouble turning with speed or keeping the skis or board on edge through the turn, you should concentrate on learning how to make proper counterbalancing movements. The signature of good counterbalancing is a still or calm upper body with the hips, legs, knees, and ankles moving side to side under the torso.
Fore-aft balance movements are in response to the location of the hips relative to the feet. Think of your feet on the skis or board as being between your hips and the boat (see figure 3.8). This position or body alignment requires an overall body tension. A break down in that alignment and tension is often one of the first signs that you are getting tired. Rather than focusing on moving the hips to maintain fore-aft balance, focus on moving the feet. Fore-aft balance is most critical during the initiation of a change of direction and just before the rope is reloaded and stretched. The movement is initiated by the foot nearer the boat and acts to center the body over the skis or board. Fore-aft movement combined with flexing and extending create what is called upper-body/lower-body separation in snow skiing; the same principle applies on the water. Keep your upper body calm and keep your movement below the hips.
Tips for edging through a wake
You want to use the energy of the wake to push you up into the air rather than try to jump off the top of the wake.
Edging Through the Wake
If you are a surfer, then you know about waves. A wake is similar to a wave in the ocean. Surfers need to understand the dynamics of the ocean, tides, and winds to know how waves are created and when and where to surf. Similarly, wakeboarders need to understand the dynamics of a wake to get air. As a boat travels across a flat lake, it displaces water, which creates a wake. The heavier the boat, the bigger the wake because more energy is pushing the water. As a result, there is more force, or energy, to propel you higher. You want to use the energy of the wake to push you up into the air rather than try to jump off the top of the wake. By learning this skill correctly, you use less energy on the takeoff and have more control and strength for more complex moves once you are in the air.
Getting “big air” begins by learning how to create energy as you approach the wake. Progressive tipping for edging is the most important skill for every wakeboarder to master. Start by gradually edging, or tipping, the board first on the heel side (see figure 5.4). Edging the board into and up the wake creates the energy needed for pushing against the force of the wake. As you hit the wake, you release that energy by simply extending your knees, thus pushing the board against the energy of the wake. The key is to increase your edge pressure, or tip angle, as you get closer to the top of the wake. When done correctly, you get pushed into the air proportional to the energy you create with your edge up the wake. Creating the correct body position, alignment, and stacking against the boat as you approach the wake both heel side and toe side takes time to master and is a skill that you should work on consistently.
The following steps break edging down move by move:
- Edge out beside the boat 10 to 15 feet (3 to 4.6 m) and make a slow, smooth tip of the board, letting the board move under the rope until you feel the boat start to pull you back toward the wake.
- Maintain the tipped edge of the board as you approach the wake, and gently increase the tip edge. You will pick up speed as you tip the edge of the board. Think about continuously turning the board in an arc toward the wake while showing more of the base of your board to the boat.
- Continue to build up your edge tipping and increase your knee flexion and counterrotation away from the boat to the top of the wake. You will feel an increased pull in your hands as you climb the wake. Be sure to keep the handle down at your waist. Many riders mistakenly think that to get height, they must edge as hard as they can, as long as they can, and generate speed into the wake. There is no doubt that a hard, fast edge, or tip, will develop a lot of speed and give you distance, but it won't give you any height. Such an approach uses too much force early in the arc toward the wake and does not generate lift from the wake.
- As you ride up the wake on edge, extend your knees! Stay in dynamic balance in relation to the slope of the wake and the pull of the rope, typically slightly away from the boat. Keep the handle by your waist, and move your hips toward the handle. Extend your chest and head up. In this position you can resist the force of the wake pushing up on you by pushing down against it. Imagine that you are trying to break the board in half at the crest of the wake.
- The release of the energy you created with a proper tipping edge into the wake and your leg extension will result in what most describe as a pop or lift off the wake, similar to a double bounce on a trampoline as the wake's force reacts to your downward energy.
- Keep your eyes open to spot the landing, and then absorb it with your knees and ankles to quickly establish edge control and continue out on edge away from the boat.
A common error when trying a progressive edge tip is to stop tipping the board or to flatten out. If you stop tipping the board at the wake, you reduce the energy stored in the board. The result is that the force created by edging at the wake is lost. Always focus on driving your energy down against the wake so that the wake pushes you up with more force and you get more air.
Learn more advanced jump maneuvers
Skiers who take the time and learn to ride their skis end up improving the quickest.
Three-Quarter Cut
With all the right gear, the ability to control your speed, and solid technique riding your skis, you may believe you can go farther. You may even be able to see the 100-foot (31 m) buoy just in front of you when you land your current single-wake jumps. This is the most dangerous point in your jumping career because you have just enough talent, strength, and ability to hurt yourself if you push beyond your limits. In fact, some top coaches keep their students jumping with a single-wake cut for a full season or more to ensure that they can control their skis and speed. This may seem like a long time, but the skiers who take the time and learn to ride their skis end up improving the quickest.
The next phase is learning to jump from a wider position known as the three-quarter cut. The three-quarter cut should begin as nothing more than an extended version of the single-wake cut. The difference is that you start from a slightly wider position—10 feet (3 m) outside the right wake rather than the left wake. Keep the boat speed and path the same as those you used for your single cuts (28-30 mph, or 45-48 km/h). The same principles of progressive edging and controlled speed apply, except now timing is more involved.
To help adjust to the new timing without the worry of going over the ramp, do the no-jump jumping drill with one small addition. Set out two buoys about 12 feet (3.7 m) apart and away from the ramp. These buoys represent the ramp. On a jump course, use the second set of timing buoys to simulate the ramp. (If you do not have a jump course set up, run the boat in a straight line about 50 feet, or 15 meters, outside the buoy closest to the boat.) Pull out 10 feet (3 m) outside the wake, assume the correct body position, and focus on the left buoy, which represents the top left corner of the ramp. Don't worry about the wakes; let the boat slowly pull you over them as you set a soft edge. As you come off the second wake, you should be near the same position you have been taking on your single cut. Drop your hip and edge up and through to the middle of the buoys.
Try this until you are comfortable, confident, and in control of your body position, skis, and speed. Once you feel you are ready, take it to the ramp with confidence, concentrating on holding your edge as you drop your hip off the wake into the ramp. Stay calm and be smart, and you will soon be jumping 100 feet (30 m) or more.
Once you get solid at jumping from this wider position, move out a little farther to about 20 feet (6 m) outside the wakes and go through the same process. Now do the same thing from 30 feet (9 m). The farther you move out, the more speed you will carry into the base of the ramp, and the more critical body position and timing will be. You should be able to generate 80 to 90 percent of your maximum distance from a three-quarter cut, so you should spend a great deal of time mastering this technique. Take the time needed to become aware of your location in relation to the boat and the ramp. Develop a sense of timing and stay safe and in control of your speed and position. If things aren't right, then pass!
Up until now you have been running the boat between, or splitting, the jump course buoys. As you learn to take a stronger edge and ski across the course more, you will arrive at the ramp earlier. You can keep your turn at the same location and get back into a full cutting position by beginning to move the boat out wider toward the right-hand side of the course. Move it out in 1- or 2-foot (31 or 61 cm) increments until you find a spot that is comfortable for you to take a full, strong edge into the ramp as shown in figure 7.19.
No matter how much you practice, some approaches to the ramp won't be quite right. In these instances, you need to pass on the jump for safety. You pass by letting go of the handle when you realize this will not be a safe jump and ski around the left side of the ramp. Avoid hitting any portion of the ramp by hopping over the corner if need be. If you are early into the ramp, pass. If you are late into the ramp, pass. If you are on your heels, pass. If your skis are behind you, pass. If you don't have confidence, pass. Do not try to salvage a bad start or edge. By learning to pass, you will stay safe and practice good habits of edging and turning slowly.
Because passing on purpose teaches bad habits, you should pass on a jump only when safety is an issue. The secret to good jumping is learning to edge through the ramp. When you pass, you usually stop pulling just after the wakes and let go of the handle and ski around the ramp. This is the opposite of what you want to practice doing. If your approach is unsafe and you don't feel confident, you should pass, but be sure to take the jump when things are good so you can gain experience and confidence with each jump.
Double Cut
As stated earlier, you should be able to achieve nearly all of your distance from a three-quarter cut. The rest comes from the double cut. The purpose of the double cut is to position the skier out wider to create more angle across the wakes and generate more speed into the ramp. The increased angle and speed equal greater distance. The trade-off is consistency. The wider you get on the boat, the more critical the timing of the turn and cut becomes.
To perform the double cut, you must learn how to make the counter cut. The counter cut is different from the cut to the ramp. Because its only purpose is to position you wider on the boat, a more leveraged position, similar to that used in slalom, is called for. The timing of the turn for the counter cut is assisted by the 500- and 600-foot (152 and 183 m) buoys. You pull out to the left side of the boat and use a snowplow position (as with snow skiing, point the tips of your skis together to slow down quickly) to control your speed for the turn. Once your skis are turned, apply pressure to the left ski and pull through the wakes across the course and up alongside the boat. When you have achieved your maximum width, you need to pull the handle up and across your body. This extra action gives you additional speed and advances you farther up on the boat.
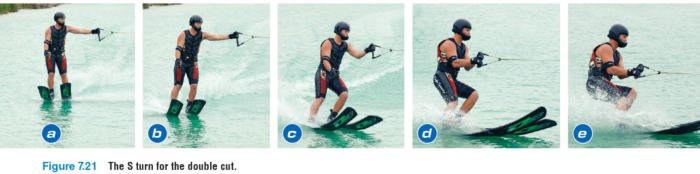
As you glide down the lake, you prepare for the next phase of the double cut, the turn. The double-cut turn is different from the three-quarter-cut turn. Because you are farther up alongside the boat, you cannot make the same turn without creating slack in the rope or dropping back to a narrower position. You must learn the S turn to solve this problem (see figure 7.21). The S turn begins by letting your left arm extend out during the glide. As you glide, rotate your left hip away from the boat. This action edges you away from the ramp and keeps the rope tight. Now shift your weight to your right ski and make a slow rotation with your right hip back to the handle. At this stage it is critical that you maintain your forward water speed and ski through the turn as you do in slalom skiing. This will help you avoid creating pull from the boat until you are fully rotated and set in an aligned position that allows you to hold the acceleration of the boat.
Your eyes should be fixed across the course and not on the ramp, your knees should be flexed, and the handle must be down and in near your body. Set your edge and hold your direction across the wakes as you have been doing with the three-quarter cut. It will be slightly more difficult to hold the edge because of the increased angle. If you are having trouble, back up or spend more time practicing the drills you learned in the earlier sections.
A slow rotation toward the ramp while keeping your speed as high as possible is key. This sounds easy, but when you are looking across the course and see the side curtain of the ramp, you have a tendency to rush everything. You can overcome this by using a cut and pass drill, in which you make a turn and cut as if you were actually going to hit the ramp but let go at the last possible second and safely go around the ramp. This helps you learn the timing of your turn without worrying about the ramp. Use this drill to see the new perspective of the ramp and boat and make any adjustments.
Related Books


