
- Home
- Strength Training and Conditioning
- Sports and Activities
- Other Sports and Activities
- Fitness and Health
- Maximum Interval Training

Are you ready to challenge yourself, and turn up the intensity of your workouts? Are you ready for a proven program that burns fat, increases muscle, and sculpts the physique you’ve always wanted? If so, then Maximum Interval Training is for you!
Maximum Interval Training combines high-intensity exercises and nontraditional equipment with a variety of modalities and training options to stimulate muscle growth, avoid plateaus, and produce results.
You’ll find step-by-step instructions, expert advice, and photo depictions of 147 exercises as well as ready-to-use programs for power, strength, endurance, quickness, agility, tactical training, and total-body conditioning. But rest assured that it won’t be more of the same. You’ll test your limits with a regimen of sprints, medicine balls, heavy ropes, kettlebells, sandbags, body-weight exercises, and suspension training.
Train with maximum intensity for maximum results!
Part I Maximum Interval Conditioning
Chapter 1 Advantages of Maximum Interval Training
Chapter 2 Equipment Options and Safety Considerations
Part II Maximum Interval Exercises
Chapter 3 Body-Weight Training
Chapter 4 Sprinting
Chapter 5 Medicine Balls
Chapter 6 Heavy Ropes
Chapter 7 Suspension Training
Chapter 8 Kettlebells
Chapter 9 Sandbags
Chapter 10 Other Training Formats
Part III Design of Maximum Interval Programs
Chapter 11 Testing Considerations and Variables
Chapter 12 Protocols for Measuring Fitness and Performance Parameters
Chapter 13 Interpreting Results and Setting Goals
Chapter 14 Creating a Personalized Program
Chapter 15 Using Periodization to Push Performance to the Next Level
Part IV Maximum Interval Performance Programs
Chapter 16 Power and Strength
Chapter 17 Explosiveness
Chapter 18 Endurance
Chapter 19 Quickness and Agility
Chapter 20 Tactical Training
Chapter 21 Total-Body Conditioning
John Cissik, MS, CSCS,*D, NSCA-CPT,*D is the president and owner of Human Performance Services, LLC (HPS), which helps athletics professionals solve their strength and conditioning needs. He coaches youth baseball, basketball, and Special Olympics sports and runs fitness classes for children with special needs. He has written 10 books and more than 70 articles on strength and speed training that have been featured in Muscle & Fitness, Iron Man, and track and field and coaching publications. He is also the author of Human Kinetics’ Speed for Sports Performance DVD series. Cissik specializes in education, strength training for baseball, basketball, track and field, and speed and agility training. He has worked with athletes from high school to Olympic levels. In addition to his role at HPS, he is the director of fitness and recreation at Texas Woman’s University. John is certified by the National Strength and Conditioning Association as a strength and conditioning specialist and personal trainer and by the National Academy of Sports Medicine as a personal trainer and corrective exercise specialist. He has held level I and level II certifications from USA Track and Field and was certified with the former U.S. Weightlifting Federation.
Jay Dawes is an assistant professor in the department of health sciences at the University of Colorado at Colorado Springs. Before joining UCCS, Dawes was an assistant professor of kinesiology at Texas A&M at Corpus Christi and the director of education for the National Strength and Conditioning Association. Jay has worked as a strength and performance coach, personal trainer, educator, and postrehabilitation specialist for more than 15 years. A frequent presenter both nationally and internationally on topics related to health, fitness, and human performance, Dawes received his PhD from Oklahoma State University in the School of Applied Health and Educational Psychology with an emphasis in health and human performance. He is certified by the National Strength and Conditioning Association as a strength and conditioning specialist and personal trainer, by the American College of Sports Medicine as a health fitness specialist, and by USA Weightlifting as a club coach. He became a fellow of the NSCA in 2009.
“Coach John Cissik is one of the most knowledgeable and insightful men in the strength and conditioning world. In Maximum Interval Training he outlines techniques for using methods such as interval training, kettlebells, and periodization to make your performance soar.”
Steve Holman-- Editor in Chief Iron Man Magazine
“If you are seeking serious results through proven methods, this is the book for you! Whether you train others or are your own lab experiment, this book is an amazing resource for optimizing performance.”
Shawn Windle-- Indiana Pacers Head Strength Coach and Assistant Athletic Trainer
“Maximum Interval Training offers superior guidance on high-intensity training involving heavy ropes, sandbags, medicine balls, body-weight resistance, sprinting, and kettlebells. Readers will benefit from John Cissik’s expert advice, insight, and instruction.”
Glynis Nunn-Cearns-- Executive Director Australian Track and Field Coaches Association
Guidelines for Total-Body Conditioning
No approach to training is perfect, and this caution is certainly true when using maximum interval training as your workout program. This section gives you some things to keep in mind when putting together your program.
No approach to training is perfect, and this caution is certainly true when using maximum interval training as your workout program. This section gives you some things to keep in mind when putting together your program. By understanding these limitations, you will be able to overcome them and keep your workouts effective.
Total-Body Conditioning Must Follow the Principles of Exercise
A frequent mistake made when using maximum interval training as the primary method of working out is failing to observe the principles of exercise. Recall that chapter 14 listed the following principles of exercise: specificity, overload, progression, muscle balance, and individualization. All these principles need to be applied to a maximum interval-training program.
Total-Body Conditioning Must Be Organized Carefully
Total-body conditioning needs to be organized so that it is easy to move between exercises and tools with a minimal break in the activity. For example, let's say that a workout includes the following exercises: kettlebell two-handed swing, medicine ball chest pass, 20-meter sprint, suspension chest press, and suspension knees to chest. The kettlebell exercise is performed in one place; in other words, you don't change your location while you perform it. But after tossing the medicine ball, you have to go get it to continue performing the repetitions. If you keep moving away from your starting point with each rep, you could get pretty far away. Then you have to perform the sprint, perform the chest press, and then take time to adjust the suspension trainer to perform the knees to chest exercise. All this could result in too much downtime to have an effective workout.
A better approach would be to organize the training session as follows. First, perform the kettlebell two-handed swing. Second, perform the medicine ball chest pass, but after the first toss, toss it back to the start line for the second toss. Continue tossing it back and forth, first away from the start line and then back toward the start line. Make the last toss toward the start line. Third, sprint the 20 meters. Fourth, after the sprint perform push-ups instead of the chest press. No equipment is necessary, so you can perform the exercise anywhere. Fifth, sprint back to the suspension trainer and perform the knees to chest exercise. These modifications are an example of how to organize training to maximize what you have access to while minimizing things that waste your time.
Long-Term Programs
The long-term program presented in this chapter is meant to keep you interested, give you lots of variety, increase your fitness level, and force your body to adapt to the training. The long-term program consists of several mesocycles, each of which builds on the one that came before. After you have completed all the steps, you should start the whole program over again. The mesocycles are called Get in Shape, Build Those Muscles, Use Those Muscles, and Train Like an Athlete.
Get in Shape
The Get in Shape mesocycle lasts four weeks. It involves training three times a week, ideally with a day off after each training session. The training revolves around total-body circuit training with sprints, total-body exercises (like heavy ropes slams), and cardiovascular exercises mixed in between the circuits. This fast, high-volume training is designed to burn a lot of calories and improve your endurance. This training also lays the foundation for the future steps.
Table 21.6 shows a week of workouts for this part of training. Note that each workout is a little different in terms of the exercises, the amount of time spent performing each exercise, and the activity to be performed during "recovery." All the workouts are designed so that minimal changes to equipment are required. The first day involves heavy ropes and bodyweight exercises, so all the exercises can be performed in the same location. The second day involves alternating between suspension-training exercises and medicine ball exercises. The third day involves alternating between sandbags and kettlebells.

Click here to go the exercise finder, which will link you to each exercise found in part II.
Build Those Muscles
This four-week mesocycle builds on the fitness base developed in the previous mesocycle. The training is a little heavier. It incorporates both a circuit approach and a set approach, and it uses a combination of total-body exercises and core exercises as recovery tools. This mesocycle develops the ligaments, tendons, and bones, so it helps prevent future injuries from training in the next two cycles.
Table 21.7 shows a week of workouts for this part of training. The first thing to notice is that training occurs on four days each week with one day off. Days 1 and 4 are focused on lower-body training, and days 2 and 5 are focused on upper-body training. Days 4 and 5 use a set format. For each of these exercises, three sets should be performed.

Click here to go the exercise finder, which will link you to each exercise found in part II.
Use Those Muscles
This mesocycle takes the fitness base developed in the first mesocycle and the muscle and soft-tissue development from the second and trains you how to apply those improvements. This mesocycle focuses more on developing strength and power, and it places greater emphasis on total-body movements than the previous two mesocycles did. Weights are heavier, volume is lower, and the set approach receives greater emphasis.
Table 21.8 shows a sample week of workouts from this mesocycle. Note that the workouts occur on only three days a week. The workouts are total body and heavier in nature, so a day off should be scheduled after each workout for recovery. A set approach is used for each workout. Three sets of each exercise should be performed.

Save
Learn more about Maximum Interval Training.
Heavy Ropes Unstable Wave
Besides offering the normal benefits of the wave, this variation requires you to develop balance to perform the exercise. This variation also develops the muscles of the ankle, foot, and shin, which will have to work hard to keep you standing.
Intended Uses
Besides offering the normal benefits of the wave, this variation requires you to develop balance to perform the exercise. This variation also develops the muscles of the ankle, foot, and shin, which will have to work hard to keep you standing. With practice, this is an appropriate conditioning exercise.
Prerequisites
- Have consistent, good technique on the two-handed wave exercise.
- Performance of the two-handed wave for a minimum of three months.
- Ability to perform the one-legged wave with consistent, good technique.
Steps
- Secure the heavy rope and take a one-handed grip on each end of the rope.
- Stand so that you are holding the ends of the rope at the sides.
- Set the back.
- Step onto the unstable surface.
- Pushing the hips back, move into a quarter squat.
- While maintaining the quarter squat, lift the arms and ropes up until the arms are parallel to the floor.
- Maintaining the squat, lift one arm up and drive the other arm down toward the floor. Reverse directions (a-b).
- Continue alternating for the desired time and then switch legs.
Key Points
- Keep the back set throughout the exercise.
- Get your balance before performing the wave.
- Keep your weight on your heel throughout.


Learn more about Maximum Interval Training.
Suspension Training
Suspension training involves a little more in terms of setup, adjustment, and basic positions than the other exercise modes covered in this book. Recognizing this requirement helps ensure a safe, successful experience.
Getting Started
Suspension training involves a little more in terms of setup, adjustment, and basic positions than the other exercise modes covered in this book. Recognizing this requirement helps ensure a safe, successful experience. With that in mind, this part of the chapter covers how to secure and adjust the suspension trainer, the basic grips that are used, and the basic positions used in the exercises.
Securing and Adjusting
The suspension trainer needs to be secured to an object. The object that it is secured to should be able to handle your body's weight without moving or breaking. For example, a tree limb may be tall enough, but if the limb isn't big enough it will break when you try to perform a chest press or push-up. A pull-up bar or a set of monkey bars is ideal for securing a suspension trainer, but a door or small tree limb is not because it may not be able to handle the weight of your body.
Suspension trainers generally have a strap with some sort of carabiner. The carabiner is on one end of the strap, and the rest of the suspension trainer is attached to the other end. The carabiner and strap are looped around the object that the trainer is to be attached to, and the carabiner is then attached to the strap (figure 7.1).
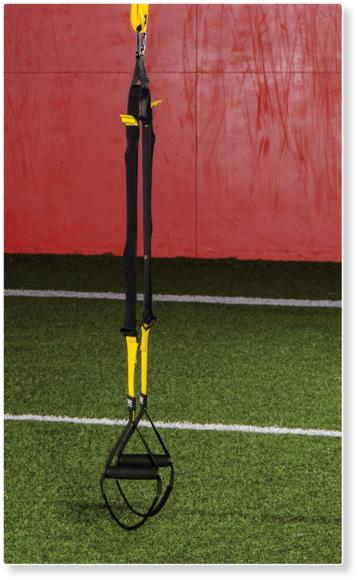
Suspension trainer with strap and carabiner.
If you want the suspension trainer to be farther off the ground, the strap can be looped around the object it is being attached to multiple times to draw up the suspension trainer. If you want the suspension trainer to be closer to the ground, the strap can be looped around the object that it is being attached to fewer times, which will result in the trainer being lower to the ground. Some exercises should have the trainer higher, some are better if the trainer is lower, and several are best when the trainer is in between. The positioning depends on the exercise and the desired difficulty level.
The handles on most suspension trainers also adjust up or down. Generally, this is done with a buckle that unlocks the strap attached to the handle. After the buckle is released, the handle can be adjusted upward or downward (figure 7.2). This mechanism provides another way to make the trainer closer to the ground or farther from it.
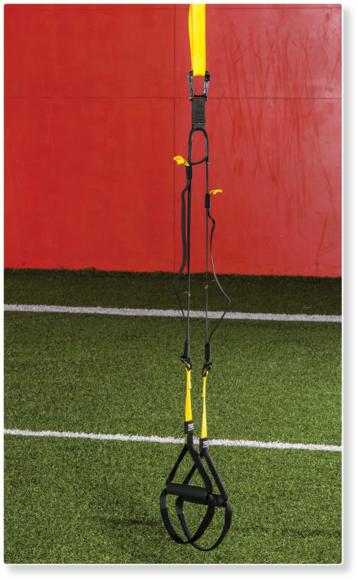
Suspension trainer with adjustable handle.
Grips
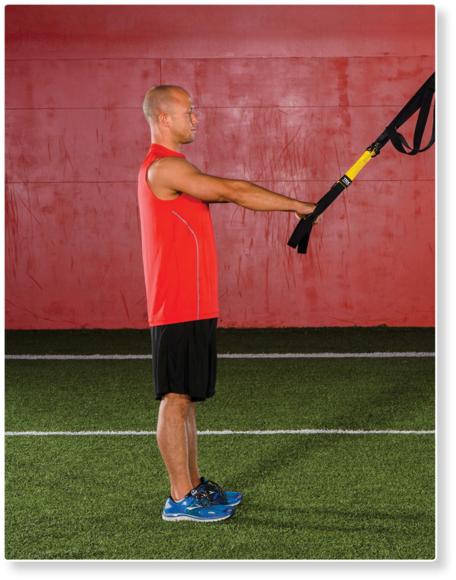
Four basic grip types are used for suspension trainer exercises. For each grip, the thumb and fingers should be wrapped around the handles. The first grip type is the prone grip, sometimes referred to as an overhand grip (figure 7.3). For the prone grip, the palm faces away from the body or down. So a push-up or a chest press is an example of a prone grip. The second grip type is the supine grip, sometimes called an underhand grip (figure 7.4). For the supine grip, the palms face up or toward the body. An example of this is a biceps curl. The third grip type is the neutral grip (figure 7.5), in which the palms face in toward the body (and toward each other).
The fourth grip type is used for one-handed exercises. A one-handed exercise may use a supine, prone, or neutral grip. The big difference here is that the suspension trainer has to be set up to perform a one-handed exercise. To perform a one-handed exercise, one of the handles is drawn through the other handle (see figure 7.6). After the handle is drawn through, it is used to perform the exercises.
Prone grip (overhand).
Supine grip (underhand).
Foundational Exercises
Every exercise listed in this section should be a mainstay of a maximum interval-training program using the suspension trainer, regardless of your fitness level and experience. Besides their value in enhancing fitness, these exercises have a number of purposes. First, they teach positions, grips, and fundamental movement patterns. Second, they develop your balance and knowledge of your body in space. Finally, they develop many of the stabilizing muscles that support exercise with suspension trainers.
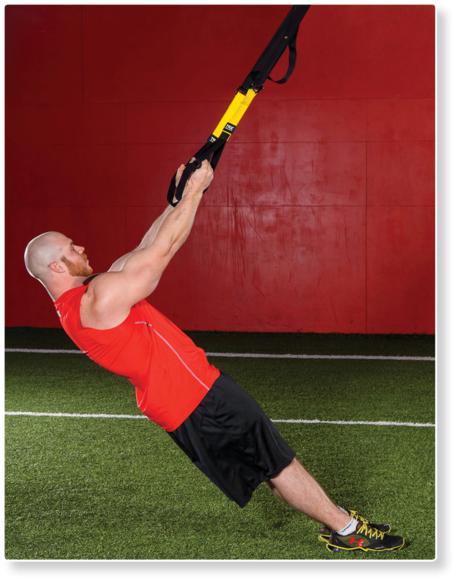
Suspension Chest Press
Intended Uses
The chest press develops the muscles of the chest, shoulders, and triceps. The core helps to stabilize the body during this exercise, so it is trained as well. This exercise is rhythmic in nature and can be used for conditioning.
Prerequisites
- Ability to adjust the straps to the appropriate position.
- Ability to perform exercise from the prone standing position.
Steps
- Grip the handles with a prone grip.
- Assume the prone standing position (a).
- From that position, lower yourself toward the handles by flexing your elbows and allowing the handles to move away from each other (b).
- From the bottom position, reverse direction until your arms are extended.
- Repeat for the desired number of repetitions.
Key Points
- Maintain a straight line from the heels to the shoulders during this exercise.
- The handles begin the exercise close together, and they move apart as you lower the body toward them.
- During this exercise, you lower the body toward the handles and then push it away from them.

Learn more about Maximum Interval Training.
Five Key Variables for a Comprehensive Training Program
Several key training variables must be addressed, manipulated, and successfully integrated to create an effective, comprehensive training program. The interplay of these variables can have a profound impact on the results you get.
Program Variables
Several key training variables must be addressed, manipulated, and successfully integrated to create an effective, comprehensive training program. The interplay of these variables can have a profound impact on the results you get. The variables must be balanced according to your needs, whether the primary goal is reducing fat, improving health and fitness, or enhancing sport performance. These concepts must be fully understood to optimize training results.
Five major variables must be considered when designing a training program:
- Intensity
- Volume
- Rest
- Recovery
- Muscle balance
Intensity
Intensity refers to the quality and difficulty of the exercise. An inverse relationship exists between the intensity of an exercise and its volume (sets × repetitions). Intense exercise sessions are stressful and can be extremely fatiguing, so you must reduce the volume of training because fatigue will limit the number of quality repetitions that you will be able to perform. You will also need more rest and recovery after intense training sessions when compared with less intense sessions.
In a traditional strength-training workout, intensity is prescribed according to a percentage of the maximum weight (a percentage of one-repetition maximum, or 1RM) or maximum number of repetitions that you can lift at a certain weight (called a repetition maximum, or RM). For example, if you can squat 300 pounds (136 kg), then training at 70 percent of the 1RM would mean working out with 210 pounds (95 kg). On the other hand, if you wanted to train at your 10RM, you would work with a weight that you could lift a maximum of 10 times.
People are typically instructed to perform plyometric, speed, and agility drills at maximal intensity. In other words, with these types of training, athletes train at or close to their maximum speed and power. The intent of these exercises is to teach athletes how to be more explosive, so training at less than maximal intensity doesn't develop this ability.
With maximum interval training, intensity is calibrated a little differently. Here the focus is on helping you become resistant to the effects of fatigue. This type of training is not the most effective training approach to increase strength, power, or maximal speed. The selected intensity should allow you to complete the desired volume of exercise with good form and technique.
Volume
The volume is the quantity of the work that is being done. With strength training it is usually the number of repetitions multiplied by the number of sets. For example, performing three sets of 10 repetitions produces a volume of 30. But when performing maximum interval training, volume can be expressed in a number of ways. It can also be expressed in terms of time, distance, number of jumps, number of throws, and so on. For example, when performing kettlebell swings for 30 seconds, volume can be quantified by time. Volume can also be expressed in terms of distance, such as sprinting for 40 meters. Or it can reflect the number of repetitions, such as performing 20 crunches.
The greater the volume is, the lower the training intensity should be. Besides having an inverse relationship with intensity, volume is a powerful stimulus for various types of adaptations from training. For example, low volume is appropriate for activities that require a great deal of technique, speed, and power. Moderate volumes are good for developing hypertrophy. Higher volumes help enhance resistance to fatigue.
Rest
Rest refers to the time taken after each set of an exercise. Longer rest periods allow you to achieve greater training intensity. For example, if you train with heavy weights, you should allow at least three to five minutes of rest after each set to recover. You could then lift a greater amount of weight each set. Rest can also be important for the transferability of training. For instance, if you play a sport that typically has 10 to 20 seconds of rest after each play, you can design your training program to mimic those work and rest periods.
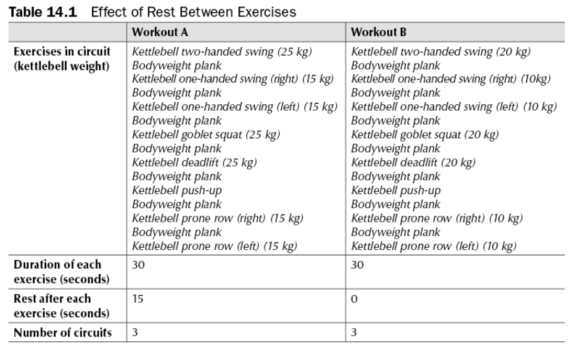
With maximum interval-training workouts, rest periods have a large effect on the difficulty of the training. Consider the sample workouts in table 14.1. Both workouts involve the same exercises, the same number of times through the circuit, and the same volume of training. The difference is that the athlete rests for 15 seconds after each exercise in workout A but does not rest after each exercise in workout B. As a result, the athlete can handle more weight on the kettlebells and will feel less fatigued when performing workout A than when performing workout B. Note: The italicized exercises are in part II. Refer to the exercise finder for more information.\
Click here to go the exercise finder, which will link you to each exercise found in part II.
Recovery
Recovery refers to the time between exercise sessions. This period is important because it is when all the adaptations that we are training for occur. Failure to allow adequate recovery can eventually lead to a state of overtraining and injury. Although training every day is possible, special care must be taken to ensure that the activities are organized so that the same muscles, physical abilities, and qualities are not trained on successive days.
Table 14.2 shows two sample weeks of workouts. In the figure, workout A involves lower-body strength training and the power clean on Monday, sprints on Tuesday, plyometrics on Wednesday, lower-body strength training and the power snatch on Thursday, and sprint-based conditioning on Friday. On the surface this plan looks like an appropriate distribution of the workload across the week. The reality is that workout A involves a great deal of lower-body work Monday through Friday, so the schedule does not optimize recovery.
Workout B in table 14.2 takes a different approach. Monday involves total-body strength training with very heavy weights. Tuesday is focused on power training. Wednesday is a day off. Thursday involves lower-body strength training combined with sprints. Friday uses upper-body strength training, kettlebells, and core exercises for conditioning. In workout B the training sessions are distributed to allow the body a chance to recover.

Click here to go the exercise finder, which will link you to each exercise found in part II.
Training needs to be organized so that the muscles and energy systems get a chance to recover. In general, the 48-hour rule (i.e., rest a muscle group 48 hours before training it again) is a good one to follow. To help conceptualize the concept of recovery, table 14.3 describes the relationship between energy systems, qualities, and training. The table shows that certain types of training essentially train the same energy systems and require the same qualities. For example, strength, power, acceleration, maximum velocity, and even agility training all link up well and are considered compatible. On the other hand, hypertrophy training, speed endurance, and conditioning all link up. Using this example, strength and acceleration work would complement each other if they were done on the same day, but strength and speed endurance would not. This table provides some guidance on how to organize training so that the body has a chance to recover.

Muscle Balance
Several important concepts are related to muscle balance. First, you should train all the muscles around a joint, whatever the type or purpose of your training. Failing to do this creates strength imbalances around the joint that can set you up for injury in the long term. For example, if you perform a pushing exercise like a chest press on a suspension trainer, you should balance that out with a pulling exercise like the suspension trainer row. Similarly, a number of total-body, kettlebell, heavy ropes, sprinting, and medicine ball exercises should be incorporated over time into a program to help ensure that you achieve muscle balance.
Second, you should perform an equivalent amount of work on opposite movements. For example, if you perform three sets of pushing movements, you should perform three sets of pulling movements. This approach prevents one side of the body from being overdeveloped.
Third, these concepts apply to nontraditional examples as well. They are not limited to weight room exercises. For example, if you are pushing a weighted sled as part of your workout, you would also want to spend some time walking backward and pulling it.
Save
Learn more about Maximum Interval Training.
Guidelines for Total-Body Conditioning
No approach to training is perfect, and this caution is certainly true when using maximum interval training as your workout program. This section gives you some things to keep in mind when putting together your program.
No approach to training is perfect, and this caution is certainly true when using maximum interval training as your workout program. This section gives you some things to keep in mind when putting together your program. By understanding these limitations, you will be able to overcome them and keep your workouts effective.
Total-Body Conditioning Must Follow the Principles of Exercise
A frequent mistake made when using maximum interval training as the primary method of working out is failing to observe the principles of exercise. Recall that chapter 14 listed the following principles of exercise: specificity, overload, progression, muscle balance, and individualization. All these principles need to be applied to a maximum interval-training program.
Total-Body Conditioning Must Be Organized Carefully
Total-body conditioning needs to be organized so that it is easy to move between exercises and tools with a minimal break in the activity. For example, let's say that a workout includes the following exercises: kettlebell two-handed swing, medicine ball chest pass, 20-meter sprint, suspension chest press, and suspension knees to chest. The kettlebell exercise is performed in one place; in other words, you don't change your location while you perform it. But after tossing the medicine ball, you have to go get it to continue performing the repetitions. If you keep moving away from your starting point with each rep, you could get pretty far away. Then you have to perform the sprint, perform the chest press, and then take time to adjust the suspension trainer to perform the knees to chest exercise. All this could result in too much downtime to have an effective workout.
A better approach would be to organize the training session as follows. First, perform the kettlebell two-handed swing. Second, perform the medicine ball chest pass, but after the first toss, toss it back to the start line for the second toss. Continue tossing it back and forth, first away from the start line and then back toward the start line. Make the last toss toward the start line. Third, sprint the 20 meters. Fourth, after the sprint perform push-ups instead of the chest press. No equipment is necessary, so you can perform the exercise anywhere. Fifth, sprint back to the suspension trainer and perform the knees to chest exercise. These modifications are an example of how to organize training to maximize what you have access to while minimizing things that waste your time.
Long-Term Programs
The long-term program presented in this chapter is meant to keep you interested, give you lots of variety, increase your fitness level, and force your body to adapt to the training. The long-term program consists of several mesocycles, each of which builds on the one that came before. After you have completed all the steps, you should start the whole program over again. The mesocycles are called Get in Shape, Build Those Muscles, Use Those Muscles, and Train Like an Athlete.
Get in Shape
The Get in Shape mesocycle lasts four weeks. It involves training three times a week, ideally with a day off after each training session. The training revolves around total-body circuit training with sprints, total-body exercises (like heavy ropes slams), and cardiovascular exercises mixed in between the circuits. This fast, high-volume training is designed to burn a lot of calories and improve your endurance. This training also lays the foundation for the future steps.
Table 21.6 shows a week of workouts for this part of training. Note that each workout is a little different in terms of the exercises, the amount of time spent performing each exercise, and the activity to be performed during "recovery." All the workouts are designed so that minimal changes to equipment are required. The first day involves heavy ropes and bodyweight exercises, so all the exercises can be performed in the same location. The second day involves alternating between suspension-training exercises and medicine ball exercises. The third day involves alternating between sandbags and kettlebells.
Click here to go the exercise finder, which will link you to each exercise found in part II.
Build Those Muscles
This four-week mesocycle builds on the fitness base developed in the previous mesocycle. The training is a little heavier. It incorporates both a circuit approach and a set approach, and it uses a combination of total-body exercises and core exercises as recovery tools. This mesocycle develops the ligaments, tendons, and bones, so it helps prevent future injuries from training in the next two cycles.
Table 21.7 shows a week of workouts for this part of training. The first thing to notice is that training occurs on four days each week with one day off. Days 1 and 4 are focused on lower-body training, and days 2 and 5 are focused on upper-body training. Days 4 and 5 use a set format. For each of these exercises, three sets should be performed.
Click here to go the exercise finder, which will link you to each exercise found in part II.
Use Those Muscles
This mesocycle takes the fitness base developed in the first mesocycle and the muscle and soft-tissue development from the second and trains you how to apply those improvements. This mesocycle focuses more on developing strength and power, and it places greater emphasis on total-body movements than the previous two mesocycles did. Weights are heavier, volume is lower, and the set approach receives greater emphasis.
Table 21.8 shows a sample week of workouts from this mesocycle. Note that the workouts occur on only three days a week. The workouts are total body and heavier in nature, so a day off should be scheduled after each workout for recovery. A set approach is used for each workout. Three sets of each exercise should be performed.
Save
Learn more about Maximum Interval Training.
Heavy Ropes Unstable Wave
Besides offering the normal benefits of the wave, this variation requires you to develop balance to perform the exercise. This variation also develops the muscles of the ankle, foot, and shin, which will have to work hard to keep you standing.
Intended Uses
Besides offering the normal benefits of the wave, this variation requires you to develop balance to perform the exercise. This variation also develops the muscles of the ankle, foot, and shin, which will have to work hard to keep you standing. With practice, this is an appropriate conditioning exercise.
Prerequisites
- Have consistent, good technique on the two-handed wave exercise.
- Performance of the two-handed wave for a minimum of three months.
- Ability to perform the one-legged wave with consistent, good technique.
Steps
- Secure the heavy rope and take a one-handed grip on each end of the rope.
- Stand so that you are holding the ends of the rope at the sides.
- Set the back.
- Step onto the unstable surface.
- Pushing the hips back, move into a quarter squat.
- While maintaining the quarter squat, lift the arms and ropes up until the arms are parallel to the floor.
- Maintaining the squat, lift one arm up and drive the other arm down toward the floor. Reverse directions (a-b).
- Continue alternating for the desired time and then switch legs.
Key Points
- Keep the back set throughout the exercise.
- Get your balance before performing the wave.
- Keep your weight on your heel throughout.
Learn more about Maximum Interval Training.
Suspension Training
Suspension training involves a little more in terms of setup, adjustment, and basic positions than the other exercise modes covered in this book. Recognizing this requirement helps ensure a safe, successful experience.
Getting Started
Suspension training involves a little more in terms of setup, adjustment, and basic positions than the other exercise modes covered in this book. Recognizing this requirement helps ensure a safe, successful experience. With that in mind, this part of the chapter covers how to secure and adjust the suspension trainer, the basic grips that are used, and the basic positions used in the exercises.
Securing and Adjusting
The suspension trainer needs to be secured to an object. The object that it is secured to should be able to handle your body's weight without moving or breaking. For example, a tree limb may be tall enough, but if the limb isn't big enough it will break when you try to perform a chest press or push-up. A pull-up bar or a set of monkey bars is ideal for securing a suspension trainer, but a door or small tree limb is not because it may not be able to handle the weight of your body.
Suspension trainers generally have a strap with some sort of carabiner. The carabiner is on one end of the strap, and the rest of the suspension trainer is attached to the other end. The carabiner and strap are looped around the object that the trainer is to be attached to, and the carabiner is then attached to the strap (figure 7.1).
Suspension trainer with strap and carabiner.
If you want the suspension trainer to be farther off the ground, the strap can be looped around the object it is being attached to multiple times to draw up the suspension trainer. If you want the suspension trainer to be closer to the ground, the strap can be looped around the object that it is being attached to fewer times, which will result in the trainer being lower to the ground. Some exercises should have the trainer higher, some are better if the trainer is lower, and several are best when the trainer is in between. The positioning depends on the exercise and the desired difficulty level.
The handles on most suspension trainers also adjust up or down. Generally, this is done with a buckle that unlocks the strap attached to the handle. After the buckle is released, the handle can be adjusted upward or downward (figure 7.2). This mechanism provides another way to make the trainer closer to the ground or farther from it.
Suspension trainer with adjustable handle.
Grips
Four basic grip types are used for suspension trainer exercises. For each grip, the thumb and fingers should be wrapped around the handles. The first grip type is the prone grip, sometimes referred to as an overhand grip (figure 7.3). For the prone grip, the palm faces away from the body or down. So a push-up or a chest press is an example of a prone grip. The second grip type is the supine grip, sometimes called an underhand grip (figure 7.4). For the supine grip, the palms face up or toward the body. An example of this is a biceps curl. The third grip type is the neutral grip (figure 7.5), in which the palms face in toward the body (and toward each other).
The fourth grip type is used for one-handed exercises. A one-handed exercise may use a supine, prone, or neutral grip. The big difference here is that the suspension trainer has to be set up to perform a one-handed exercise. To perform a one-handed exercise, one of the handles is drawn through the other handle (see figure 7.6). After the handle is drawn through, it is used to perform the exercises.
Prone grip (overhand).
Supine grip (underhand).
Foundational Exercises
Every exercise listed in this section should be a mainstay of a maximum interval-training program using the suspension trainer, regardless of your fitness level and experience. Besides their value in enhancing fitness, these exercises have a number of purposes. First, they teach positions, grips, and fundamental movement patterns. Second, they develop your balance and knowledge of your body in space. Finally, they develop many of the stabilizing muscles that support exercise with suspension trainers.
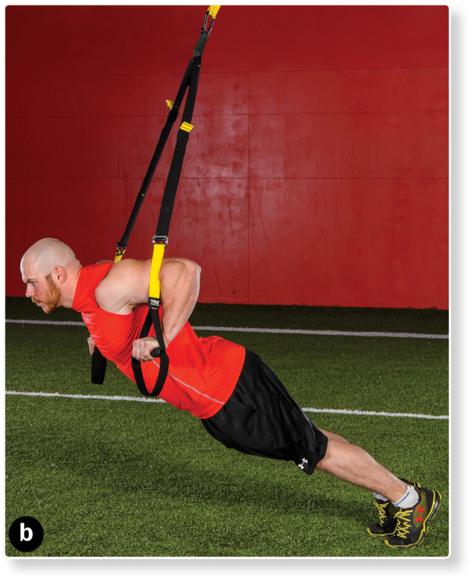
Suspension Chest Press
Intended Uses
The chest press develops the muscles of the chest, shoulders, and triceps. The core helps to stabilize the body during this exercise, so it is trained as well. This exercise is rhythmic in nature and can be used for conditioning.
Prerequisites
- Ability to adjust the straps to the appropriate position.
- Ability to perform exercise from the prone standing position.
Steps
- Grip the handles with a prone grip.
- Assume the prone standing position (a).
- From that position, lower yourself toward the handles by flexing your elbows and allowing the handles to move away from each other (b).
- From the bottom position, reverse direction until your arms are extended.
- Repeat for the desired number of repetitions.
Key Points
- Maintain a straight line from the heels to the shoulders during this exercise.
- The handles begin the exercise close together, and they move apart as you lower the body toward them.
- During this exercise, you lower the body toward the handles and then push it away from them.
Learn more about Maximum Interval Training.
Five Key Variables for a Comprehensive Training Program
Several key training variables must be addressed, manipulated, and successfully integrated to create an effective, comprehensive training program. The interplay of these variables can have a profound impact on the results you get.
Program Variables
Several key training variables must be addressed, manipulated, and successfully integrated to create an effective, comprehensive training program. The interplay of these variables can have a profound impact on the results you get. The variables must be balanced according to your needs, whether the primary goal is reducing fat, improving health and fitness, or enhancing sport performance. These concepts must be fully understood to optimize training results.
Five major variables must be considered when designing a training program:
- Intensity
- Volume
- Rest
- Recovery
- Muscle balance
Intensity
Intensity refers to the quality and difficulty of the exercise. An inverse relationship exists between the intensity of an exercise and its volume (sets × repetitions). Intense exercise sessions are stressful and can be extremely fatiguing, so you must reduce the volume of training because fatigue will limit the number of quality repetitions that you will be able to perform. You will also need more rest and recovery after intense training sessions when compared with less intense sessions.
In a traditional strength-training workout, intensity is prescribed according to a percentage of the maximum weight (a percentage of one-repetition maximum, or 1RM) or maximum number of repetitions that you can lift at a certain weight (called a repetition maximum, or RM). For example, if you can squat 300 pounds (136 kg), then training at 70 percent of the 1RM would mean working out with 210 pounds (95 kg). On the other hand, if you wanted to train at your 10RM, you would work with a weight that you could lift a maximum of 10 times.
People are typically instructed to perform plyometric, speed, and agility drills at maximal intensity. In other words, with these types of training, athletes train at or close to their maximum speed and power. The intent of these exercises is to teach athletes how to be more explosive, so training at less than maximal intensity doesn't develop this ability.
With maximum interval training, intensity is calibrated a little differently. Here the focus is on helping you become resistant to the effects of fatigue. This type of training is not the most effective training approach to increase strength, power, or maximal speed. The selected intensity should allow you to complete the desired volume of exercise with good form and technique.
Volume
The volume is the quantity of the work that is being done. With strength training it is usually the number of repetitions multiplied by the number of sets. For example, performing three sets of 10 repetitions produces a volume of 30. But when performing maximum interval training, volume can be expressed in a number of ways. It can also be expressed in terms of time, distance, number of jumps, number of throws, and so on. For example, when performing kettlebell swings for 30 seconds, volume can be quantified by time. Volume can also be expressed in terms of distance, such as sprinting for 40 meters. Or it can reflect the number of repetitions, such as performing 20 crunches.
The greater the volume is, the lower the training intensity should be. Besides having an inverse relationship with intensity, volume is a powerful stimulus for various types of adaptations from training. For example, low volume is appropriate for activities that require a great deal of technique, speed, and power. Moderate volumes are good for developing hypertrophy. Higher volumes help enhance resistance to fatigue.
Rest
Rest refers to the time taken after each set of an exercise. Longer rest periods allow you to achieve greater training intensity. For example, if you train with heavy weights, you should allow at least three to five minutes of rest after each set to recover. You could then lift a greater amount of weight each set. Rest can also be important for the transferability of training. For instance, if you play a sport that typically has 10 to 20 seconds of rest after each play, you can design your training program to mimic those work and rest periods.
With maximum interval-training workouts, rest periods have a large effect on the difficulty of the training. Consider the sample workouts in table 14.1. Both workouts involve the same exercises, the same number of times through the circuit, and the same volume of training. The difference is that the athlete rests for 15 seconds after each exercise in workout A but does not rest after each exercise in workout B. As a result, the athlete can handle more weight on the kettlebells and will feel less fatigued when performing workout A than when performing workout B. Note: The italicized exercises are in part II. Refer to the exercise finder for more information.\
Click here to go the exercise finder, which will link you to each exercise found in part II.
Recovery
Recovery refers to the time between exercise sessions. This period is important because it is when all the adaptations that we are training for occur. Failure to allow adequate recovery can eventually lead to a state of overtraining and injury. Although training every day is possible, special care must be taken to ensure that the activities are organized so that the same muscles, physical abilities, and qualities are not trained on successive days.
Table 14.2 shows two sample weeks of workouts. In the figure, workout A involves lower-body strength training and the power clean on Monday, sprints on Tuesday, plyometrics on Wednesday, lower-body strength training and the power snatch on Thursday, and sprint-based conditioning on Friday. On the surface this plan looks like an appropriate distribution of the workload across the week. The reality is that workout A involves a great deal of lower-body work Monday through Friday, so the schedule does not optimize recovery.
Workout B in table 14.2 takes a different approach. Monday involves total-body strength training with very heavy weights. Tuesday is focused on power training. Wednesday is a day off. Thursday involves lower-body strength training combined with sprints. Friday uses upper-body strength training, kettlebells, and core exercises for conditioning. In workout B the training sessions are distributed to allow the body a chance to recover.
Click here to go the exercise finder, which will link you to each exercise found in part II.
Training needs to be organized so that the muscles and energy systems get a chance to recover. In general, the 48-hour rule (i.e., rest a muscle group 48 hours before training it again) is a good one to follow. To help conceptualize the concept of recovery, table 14.3 describes the relationship between energy systems, qualities, and training. The table shows that certain types of training essentially train the same energy systems and require the same qualities. For example, strength, power, acceleration, maximum velocity, and even agility training all link up well and are considered compatible. On the other hand, hypertrophy training, speed endurance, and conditioning all link up. Using this example, strength and acceleration work would complement each other if they were done on the same day, but strength and speed endurance would not. This table provides some guidance on how to organize training so that the body has a chance to recover.
Muscle Balance
Several important concepts are related to muscle balance. First, you should train all the muscles around a joint, whatever the type or purpose of your training. Failing to do this creates strength imbalances around the joint that can set you up for injury in the long term. For example, if you perform a pushing exercise like a chest press on a suspension trainer, you should balance that out with a pulling exercise like the suspension trainer row. Similarly, a number of total-body, kettlebell, heavy ropes, sprinting, and medicine ball exercises should be incorporated over time into a program to help ensure that you achieve muscle balance.
Second, you should perform an equivalent amount of work on opposite movements. For example, if you perform three sets of pushing movements, you should perform three sets of pulling movements. This approach prevents one side of the body from being overdeveloped.
Third, these concepts apply to nontraditional examples as well. They are not limited to weight room exercises. For example, if you are pushing a weighted sled as part of your workout, you would also want to spend some time walking backward and pulling it.
Save
Learn more about Maximum Interval Training.
Guidelines for Total-Body Conditioning
No approach to training is perfect, and this caution is certainly true when using maximum interval training as your workout program. This section gives you some things to keep in mind when putting together your program.
No approach to training is perfect, and this caution is certainly true when using maximum interval training as your workout program. This section gives you some things to keep in mind when putting together your program. By understanding these limitations, you will be able to overcome them and keep your workouts effective.
Total-Body Conditioning Must Follow the Principles of Exercise
A frequent mistake made when using maximum interval training as the primary method of working out is failing to observe the principles of exercise. Recall that chapter 14 listed the following principles of exercise: specificity, overload, progression, muscle balance, and individualization. All these principles need to be applied to a maximum interval-training program.
Total-Body Conditioning Must Be Organized Carefully
Total-body conditioning needs to be organized so that it is easy to move between exercises and tools with a minimal break in the activity. For example, let's say that a workout includes the following exercises: kettlebell two-handed swing, medicine ball chest pass, 20-meter sprint, suspension chest press, and suspension knees to chest. The kettlebell exercise is performed in one place; in other words, you don't change your location while you perform it. But after tossing the medicine ball, you have to go get it to continue performing the repetitions. If you keep moving away from your starting point with each rep, you could get pretty far away. Then you have to perform the sprint, perform the chest press, and then take time to adjust the suspension trainer to perform the knees to chest exercise. All this could result in too much downtime to have an effective workout.
A better approach would be to organize the training session as follows. First, perform the kettlebell two-handed swing. Second, perform the medicine ball chest pass, but after the first toss, toss it back to the start line for the second toss. Continue tossing it back and forth, first away from the start line and then back toward the start line. Make the last toss toward the start line. Third, sprint the 20 meters. Fourth, after the sprint perform push-ups instead of the chest press. No equipment is necessary, so you can perform the exercise anywhere. Fifth, sprint back to the suspension trainer and perform the knees to chest exercise. These modifications are an example of how to organize training to maximize what you have access to while minimizing things that waste your time.
Long-Term Programs
The long-term program presented in this chapter is meant to keep you interested, give you lots of variety, increase your fitness level, and force your body to adapt to the training. The long-term program consists of several mesocycles, each of which builds on the one that came before. After you have completed all the steps, you should start the whole program over again. The mesocycles are called Get in Shape, Build Those Muscles, Use Those Muscles, and Train Like an Athlete.
Get in Shape
The Get in Shape mesocycle lasts four weeks. It involves training three times a week, ideally with a day off after each training session. The training revolves around total-body circuit training with sprints, total-body exercises (like heavy ropes slams), and cardiovascular exercises mixed in between the circuits. This fast, high-volume training is designed to burn a lot of calories and improve your endurance. This training also lays the foundation for the future steps.
Table 21.6 shows a week of workouts for this part of training. Note that each workout is a little different in terms of the exercises, the amount of time spent performing each exercise, and the activity to be performed during "recovery." All the workouts are designed so that minimal changes to equipment are required. The first day involves heavy ropes and bodyweight exercises, so all the exercises can be performed in the same location. The second day involves alternating between suspension-training exercises and medicine ball exercises. The third day involves alternating between sandbags and kettlebells.
Click here to go the exercise finder, which will link you to each exercise found in part II.
Build Those Muscles
This four-week mesocycle builds on the fitness base developed in the previous mesocycle. The training is a little heavier. It incorporates both a circuit approach and a set approach, and it uses a combination of total-body exercises and core exercises as recovery tools. This mesocycle develops the ligaments, tendons, and bones, so it helps prevent future injuries from training in the next two cycles.
Table 21.7 shows a week of workouts for this part of training. The first thing to notice is that training occurs on four days each week with one day off. Days 1 and 4 are focused on lower-body training, and days 2 and 5 are focused on upper-body training. Days 4 and 5 use a set format. For each of these exercises, three sets should be performed.
Click here to go the exercise finder, which will link you to each exercise found in part II.
Use Those Muscles
This mesocycle takes the fitness base developed in the first mesocycle and the muscle and soft-tissue development from the second and trains you how to apply those improvements. This mesocycle focuses more on developing strength and power, and it places greater emphasis on total-body movements than the previous two mesocycles did. Weights are heavier, volume is lower, and the set approach receives greater emphasis.
Table 21.8 shows a sample week of workouts from this mesocycle. Note that the workouts occur on only three days a week. The workouts are total body and heavier in nature, so a day off should be scheduled after each workout for recovery. A set approach is used for each workout. Three sets of each exercise should be performed.
Save
Learn more about Maximum Interval Training.
Heavy Ropes Unstable Wave
Besides offering the normal benefits of the wave, this variation requires you to develop balance to perform the exercise. This variation also develops the muscles of the ankle, foot, and shin, which will have to work hard to keep you standing.
Intended Uses
Besides offering the normal benefits of the wave, this variation requires you to develop balance to perform the exercise. This variation also develops the muscles of the ankle, foot, and shin, which will have to work hard to keep you standing. With practice, this is an appropriate conditioning exercise.
Prerequisites
- Have consistent, good technique on the two-handed wave exercise.
- Performance of the two-handed wave for a minimum of three months.
- Ability to perform the one-legged wave with consistent, good technique.
Steps
- Secure the heavy rope and take a one-handed grip on each end of the rope.
- Stand so that you are holding the ends of the rope at the sides.
- Set the back.
- Step onto the unstable surface.
- Pushing the hips back, move into a quarter squat.
- While maintaining the quarter squat, lift the arms and ropes up until the arms are parallel to the floor.
- Maintaining the squat, lift one arm up and drive the other arm down toward the floor. Reverse directions (a-b).
- Continue alternating for the desired time and then switch legs.
Key Points
- Keep the back set throughout the exercise.
- Get your balance before performing the wave.
- Keep your weight on your heel throughout.
Learn more about Maximum Interval Training.
Suspension Training
Suspension training involves a little more in terms of setup, adjustment, and basic positions than the other exercise modes covered in this book. Recognizing this requirement helps ensure a safe, successful experience.
Getting Started
Suspension training involves a little more in terms of setup, adjustment, and basic positions than the other exercise modes covered in this book. Recognizing this requirement helps ensure a safe, successful experience. With that in mind, this part of the chapter covers how to secure and adjust the suspension trainer, the basic grips that are used, and the basic positions used in the exercises.
Securing and Adjusting
The suspension trainer needs to be secured to an object. The object that it is secured to should be able to handle your body's weight without moving or breaking. For example, a tree limb may be tall enough, but if the limb isn't big enough it will break when you try to perform a chest press or push-up. A pull-up bar or a set of monkey bars is ideal for securing a suspension trainer, but a door or small tree limb is not because it may not be able to handle the weight of your body.
Suspension trainers generally have a strap with some sort of carabiner. The carabiner is on one end of the strap, and the rest of the suspension trainer is attached to the other end. The carabiner and strap are looped around the object that the trainer is to be attached to, and the carabiner is then attached to the strap (figure 7.1).
Suspension trainer with strap and carabiner.
If you want the suspension trainer to be farther off the ground, the strap can be looped around the object it is being attached to multiple times to draw up the suspension trainer. If you want the suspension trainer to be closer to the ground, the strap can be looped around the object that it is being attached to fewer times, which will result in the trainer being lower to the ground. Some exercises should have the trainer higher, some are better if the trainer is lower, and several are best when the trainer is in between. The positioning depends on the exercise and the desired difficulty level.
The handles on most suspension trainers also adjust up or down. Generally, this is done with a buckle that unlocks the strap attached to the handle. After the buckle is released, the handle can be adjusted upward or downward (figure 7.2). This mechanism provides another way to make the trainer closer to the ground or farther from it.
Suspension trainer with adjustable handle.
Grips
Four basic grip types are used for suspension trainer exercises. For each grip, the thumb and fingers should be wrapped around the handles. The first grip type is the prone grip, sometimes referred to as an overhand grip (figure 7.3). For the prone grip, the palm faces away from the body or down. So a push-up or a chest press is an example of a prone grip. The second grip type is the supine grip, sometimes called an underhand grip (figure 7.4). For the supine grip, the palms face up or toward the body. An example of this is a biceps curl. The third grip type is the neutral grip (figure 7.5), in which the palms face in toward the body (and toward each other).
The fourth grip type is used for one-handed exercises. A one-handed exercise may use a supine, prone, or neutral grip. The big difference here is that the suspension trainer has to be set up to perform a one-handed exercise. To perform a one-handed exercise, one of the handles is drawn through the other handle (see figure 7.6). After the handle is drawn through, it is used to perform the exercises.
Prone grip (overhand).
Supine grip (underhand).
Foundational Exercises
Every exercise listed in this section should be a mainstay of a maximum interval-training program using the suspension trainer, regardless of your fitness level and experience. Besides their value in enhancing fitness, these exercises have a number of purposes. First, they teach positions, grips, and fundamental movement patterns. Second, they develop your balance and knowledge of your body in space. Finally, they develop many of the stabilizing muscles that support exercise with suspension trainers.
Suspension Chest Press
Intended Uses
The chest press develops the muscles of the chest, shoulders, and triceps. The core helps to stabilize the body during this exercise, so it is trained as well. This exercise is rhythmic in nature and can be used for conditioning.
Prerequisites
- Ability to adjust the straps to the appropriate position.
- Ability to perform exercise from the prone standing position.
Steps
- Grip the handles with a prone grip.
- Assume the prone standing position (a).
- From that position, lower yourself toward the handles by flexing your elbows and allowing the handles to move away from each other (b).
- From the bottom position, reverse direction until your arms are extended.
- Repeat for the desired number of repetitions.
Key Points
- Maintain a straight line from the heels to the shoulders during this exercise.
- The handles begin the exercise close together, and they move apart as you lower the body toward them.
- During this exercise, you lower the body toward the handles and then push it away from them.
Learn more about Maximum Interval Training.
Five Key Variables for a Comprehensive Training Program
Several key training variables must be addressed, manipulated, and successfully integrated to create an effective, comprehensive training program. The interplay of these variables can have a profound impact on the results you get.
Program Variables
Several key training variables must be addressed, manipulated, and successfully integrated to create an effective, comprehensive training program. The interplay of these variables can have a profound impact on the results you get. The variables must be balanced according to your needs, whether the primary goal is reducing fat, improving health and fitness, or enhancing sport performance. These concepts must be fully understood to optimize training results.
Five major variables must be considered when designing a training program:
- Intensity
- Volume
- Rest
- Recovery
- Muscle balance
Intensity
Intensity refers to the quality and difficulty of the exercise. An inverse relationship exists between the intensity of an exercise and its volume (sets × repetitions). Intense exercise sessions are stressful and can be extremely fatiguing, so you must reduce the volume of training because fatigue will limit the number of quality repetitions that you will be able to perform. You will also need more rest and recovery after intense training sessions when compared with less intense sessions.
In a traditional strength-training workout, intensity is prescribed according to a percentage of the maximum weight (a percentage of one-repetition maximum, or 1RM) or maximum number of repetitions that you can lift at a certain weight (called a repetition maximum, or RM). For example, if you can squat 300 pounds (136 kg), then training at 70 percent of the 1RM would mean working out with 210 pounds (95 kg). On the other hand, if you wanted to train at your 10RM, you would work with a weight that you could lift a maximum of 10 times.
People are typically instructed to perform plyometric, speed, and agility drills at maximal intensity. In other words, with these types of training, athletes train at or close to their maximum speed and power. The intent of these exercises is to teach athletes how to be more explosive, so training at less than maximal intensity doesn't develop this ability.
With maximum interval training, intensity is calibrated a little differently. Here the focus is on helping you become resistant to the effects of fatigue. This type of training is not the most effective training approach to increase strength, power, or maximal speed. The selected intensity should allow you to complete the desired volume of exercise with good form and technique.
Volume
The volume is the quantity of the work that is being done. With strength training it is usually the number of repetitions multiplied by the number of sets. For example, performing three sets of 10 repetitions produces a volume of 30. But when performing maximum interval training, volume can be expressed in a number of ways. It can also be expressed in terms of time, distance, number of jumps, number of throws, and so on. For example, when performing kettlebell swings for 30 seconds, volume can be quantified by time. Volume can also be expressed in terms of distance, such as sprinting for 40 meters. Or it can reflect the number of repetitions, such as performing 20 crunches.
The greater the volume is, the lower the training intensity should be. Besides having an inverse relationship with intensity, volume is a powerful stimulus for various types of adaptations from training. For example, low volume is appropriate for activities that require a great deal of technique, speed, and power. Moderate volumes are good for developing hypertrophy. Higher volumes help enhance resistance to fatigue.
Rest
Rest refers to the time taken after each set of an exercise. Longer rest periods allow you to achieve greater training intensity. For example, if you train with heavy weights, you should allow at least three to five minutes of rest after each set to recover. You could then lift a greater amount of weight each set. Rest can also be important for the transferability of training. For instance, if you play a sport that typically has 10 to 20 seconds of rest after each play, you can design your training program to mimic those work and rest periods.
With maximum interval-training workouts, rest periods have a large effect on the difficulty of the training. Consider the sample workouts in table 14.1. Both workouts involve the same exercises, the same number of times through the circuit, and the same volume of training. The difference is that the athlete rests for 15 seconds after each exercise in workout A but does not rest after each exercise in workout B. As a result, the athlete can handle more weight on the kettlebells and will feel less fatigued when performing workout A than when performing workout B. Note: The italicized exercises are in part II. Refer to the exercise finder for more information.\
Click here to go the exercise finder, which will link you to each exercise found in part II.
Recovery
Recovery refers to the time between exercise sessions. This period is important because it is when all the adaptations that we are training for occur. Failure to allow adequate recovery can eventually lead to a state of overtraining and injury. Although training every day is possible, special care must be taken to ensure that the activities are organized so that the same muscles, physical abilities, and qualities are not trained on successive days.
Table 14.2 shows two sample weeks of workouts. In the figure, workout A involves lower-body strength training and the power clean on Monday, sprints on Tuesday, plyometrics on Wednesday, lower-body strength training and the power snatch on Thursday, and sprint-based conditioning on Friday. On the surface this plan looks like an appropriate distribution of the workload across the week. The reality is that workout A involves a great deal of lower-body work Monday through Friday, so the schedule does not optimize recovery.
Workout B in table 14.2 takes a different approach. Monday involves total-body strength training with very heavy weights. Tuesday is focused on power training. Wednesday is a day off. Thursday involves lower-body strength training combined with sprints. Friday uses upper-body strength training, kettlebells, and core exercises for conditioning. In workout B the training sessions are distributed to allow the body a chance to recover.
Click here to go the exercise finder, which will link you to each exercise found in part II.
Training needs to be organized so that the muscles and energy systems get a chance to recover. In general, the 48-hour rule (i.e., rest a muscle group 48 hours before training it again) is a good one to follow. To help conceptualize the concept of recovery, table 14.3 describes the relationship between energy systems, qualities, and training. The table shows that certain types of training essentially train the same energy systems and require the same qualities. For example, strength, power, acceleration, maximum velocity, and even agility training all link up well and are considered compatible. On the other hand, hypertrophy training, speed endurance, and conditioning all link up. Using this example, strength and acceleration work would complement each other if they were done on the same day, but strength and speed endurance would not. This table provides some guidance on how to organize training so that the body has a chance to recover.
Muscle Balance
Several important concepts are related to muscle balance. First, you should train all the muscles around a joint, whatever the type or purpose of your training. Failing to do this creates strength imbalances around the joint that can set you up for injury in the long term. For example, if you perform a pushing exercise like a chest press on a suspension trainer, you should balance that out with a pulling exercise like the suspension trainer row. Similarly, a number of total-body, kettlebell, heavy ropes, sprinting, and medicine ball exercises should be incorporated over time into a program to help ensure that you achieve muscle balance.
Second, you should perform an equivalent amount of work on opposite movements. For example, if you perform three sets of pushing movements, you should perform three sets of pulling movements. This approach prevents one side of the body from being overdeveloped.
Third, these concepts apply to nontraditional examples as well. They are not limited to weight room exercises. For example, if you are pushing a weighted sled as part of your workout, you would also want to spend some time walking backward and pulling it.
Save
Learn more about Maximum Interval Training.
Related Books


