
- Home
- Sports and Activities
- Basketball
- Basketball Essentials

LeBron James, Stephen Curry, Kevin Durant, and all of the best basketball players in the world began their careers in the same way: by focusing on the fundamentals. With Basketball Essentials there has never been a better way to learn to play!
In Basketball Essentials, you learn by doing. Sequential instruction and detailed photographs will guide you to perform the techniques and tactics of the game:
Shooting
Passing
Dribbling
Defending
Rebounding
In addition to the basics, you’ll be challenged to expand your repertoire of skills and use those newly acquired tactics for competitive advantage. More than 100 of the best practice drills will develop your game and improve your performance. You’ll gain an understanding of the game, offensive and defensive strategies, and proven plays.
Basketball Essentials is the best way to learn the basics in less time. It’s the only guide that teaches the skills and the love of the game.
Chapter 1. Dribbling
Chapter 2. Passing
Chapter 3. Inside Shots
Chapter 4. Outside Shots
Chapter 5. Screening
Chapter 6. Rebounding
Chapter 7. Individual Defense
Chapter 8. On-Court Play
Ryan Goodson is a world-renowned coach and clinician of basketball skill development. Since 2009 he has trained more than 15,000 players from the youth to the professional levels and has conducted clinics in 30 states and 5 countries. Goodson is widely sought after to direct youth basketball camps across the globe because of his engaging teaching style and dynamic demonstrations.
Goodson directed the Stephen Curry Skills Academy in 2011 and is consistently contracted to direct camps for the United States Basketball Association. He has also developed a huge basketball following online. His instructional videos have been viewed more than five million times worldwide. Goodson earned a bachelor’s degree in health promotion from Appalachian State University.
Types of Layups and Related Drills
The layup is one of the highest-percentage shots in basketball; it is second only to the dunk. Proper finishing fundamentals are important in this low skill, high-accuracy inside shot. Let’s review several of the most common layups.
The layup is one of the highest-percentage shots in basketball; it is second only to the dunk. Proper finishing fundamentals are important in this low skill, high-accuracy inside shot. Let's review several of the most common layups.
Inside-Foot Layup
The inside-foot layup is a type of finish used when the defender is between the offensive player and the basket. In this scenario, jump off the inside foot and finish the shot with the outside hand, using the body as a shield to protect the basketball. A good offensive player always protects the ball with the off hand and body to create a better scoring window. Review the break-down drills to build an understanding of and comfort with the inside-foot layup.
After picking up the dribble, take two steps. The first step is with the outside foot and the second step is with the inside foot. The first step is long and the second is short in order to maintain body control. Land on the second step in a low and athletic position; then launch up and toward the basket and protect the basketball on the outside of the body by finishing with an outside-hand layup off the correct quadrant. During this maneuver, focus on the basket until the basketball comes through the bottom of the net (see figure 3.2).
 |  |
Inside-foot layup.
Inside-Foot Layup Choreography Drill
Breakdown
Setup
- Use one player and one basketball.
- The player is on the baseline with the ball.
Execution
- The player gets into a low and athletic stance by bending down and touching the basketball to the ground.
- The player then takes two steps to the right without a dribble. The first step (with the right foot) is long and the second step (with the left foot) is short.
- The player then explodes off the ground and shoots a right-hand layup straight up in the air.
- The player then catches the ball and returns to a low and athletic stance by bending down and touching the basketball to the ground.
- The player continues by taking two steps to the left without a dribble. The first step (with the left foot) is long and the second step (with the right foot) is short.
- The player then explodes off the ground and shoots a left-hand layup straight up in the air.
- The player repeats these steps in a zigzag motion and stops at the opposite baseline.
Inside-Foot Layup Cone Drill
Breakdown
Setup
- Use one player, one basketball, and one cone.
- The player has the ball and stands at the cone, which is placed just above the block.
Execution
- The player gets into a low and athletic stance by bending down and touching the basketball to the floor.
- The player takes two steps toward the rim: a long step with the outside foot followed by a short step with the inside foot.
- The player then jumps up toward the basket and finishes with a layup off the backboard with the outside hand.
- The player repeats these steps on both sides of the basket and completes 10 layups with each hand.
Inside-Foot Layup Game-Ready Drill
Breakdown
Inside-foot layup game-ready drill.
Setup
- Use one player, one basketball, and six cones.
- The player stands under the rim with the basketball.
Execution
- The player dribbles inside and around cone 1.
- The player then faces the basket and attacks the rim by dribbling through cones 2 and 3 with the outside hand, which creates the perfect angle for the player to finish at the rim with an inside-foot layup off the backboard (figure 3.3).
- The player rebounds the shot and dribbles inside and around cone 1on the opposite side of the court.
- The player then faces the basket and attacks the rim by dribbling through cones 2 and 3 with the outside hand, which again creates the perfect angle for the player to finish at the rim with an inside-foot layup off the backboard.
- The player repeats the drill until 10 layups are made with correct form.
Coaching Point
A player should keep the eyes on the ball from the beginning of the shot until it comes through the bottom of the net.
Save
Save
Save
Save
Save
Learn more about Basketball Essentials.
Defensive Rebounding Tactical Fundamentals
The fundamental goal of a good defensive rebounding team is to limit the offense to one shot. To achieve this, each defensive player must focus on the following three keys.
The fundamental goal of a good defensive rebounding team is to limit the offense to one shot. To achieve this, each defensive player must focus on the following three keys.
Vision and Voice
As a defender, use your peripheral vision to maintain sight of the basketball and your offensive player at all times. For rebounding purposes, seeing both the offensive player and the ball gives you a head start because you can move on the flight of the basketball as it leaves the shooter's hands, and you can keep eye contact with the ball from the beginning of the shot until it hits the rim. You should also use the proper pivot when executing the box out; I will discuss proper pivoting reads in subsequent sections. Once the shot is taken, each defensive player also says the word "shot" so each teammate is prepared for the rebound.
Inside Position
Inside position is the space between your opponent and the basket. As a golden rule, the defensive player always takes the inside position; this prevents the offense from making straight-line cuts to the rim for scoring opportunities, and it gives the defender an advantageous position when a shot is taken. Once the shot goes up, it is harder to maintain this inside position because the offensive player will fight around and through the defender to gain access to the basketball. There are three different techniques that are commonly used to maintain the inside position.
Hit-Go Technique
Use the hit-go technique to stop your opponent's path to the rebound by striking them with a forearm to the chest. As soon as contact is made and the opponent's forward progress is momentarily stopped, break contact and sprint to pursue the basketball. It is important to keep the elbow bent and to generate power from the lower body and not the arm. Exerting power from the upper body by extending the elbow will result in a foul.
Hit-Go Drill
Breakdown
Setup
- Use one player and one blocking pad.
- This drill is executed without a basketball. The player is inside the lane. The coach has the blocking pad and is outside the three-point arc.
Execution
- The coach blows the whistle.
- The player sprints toward the coach with short, choppy steps and blasts the coach with a bent forearm to the chest.
- The player then immediately sprints toward the rim, leaps off the ground, and secures the imaginary basketball.
- The player repeats the drill 10 times.
Coaching Point
A player should make contact with their forearm to the opponent's chest for only a moment before releasing contact to pursue the basketball.
Boxout Technique
Use the boxout technique to stop your opponent's path to the basketball by striking them with a bent forearm to the chest, making a front or reverse pivot, and ending with your posterior against the opponent's thighs and your back to the opponent's chest. When boxing out, keep your hands and arms high above your head and in the shape of a field-goal post to prevent your opponent from reaching over you for the basketball. When the basketball hits the rim, break contact with your opponent and pursue the ball.
Boxout Drill
Breakdown
Setup
- Use one player and one blocking pad.
- This drill is executed without a basketball. The player is inside the lane. The coach has the blocking pad and is outside the three-point arc.
Execution
- The coach blows the whistle.
- The player sprints toward the coach with short, choppy steps; blasts the coach with a bent forearm to the chest; and makes a front-pivot or reverse-pivot boxout.
- The player holds the boxout while driving the coach back until the coach blows the whistle again.
- On the second whistle, the player sprints toward the rim, leaps off of the ground, and secures the imaginary basketball.
- The player repeats the drill 10 times.
Coaching Point
The player should aggressively pursue the boxout with the goal of not allowing the coach to enter the lane.
The Chest-Out Technique
The chest-out technique is an emergency maneuver you can use when your opponent has forced you low and below the rim and thus negated your dominant inside position. In this situation, quickly turn and face your opponent, lift your hands high above your head, get low and wide at the base, and subtly push your opponent out and away from the basket with your hips. This technique may not allow you to secure the rebound, but it will help to prevent your opponent from obtaining it.
Learn more about Basketball Essentials.
Team Offense
The offensive team should be looking for quick and easy scoring opportunities before the opponent has a chance to retreat and set up their defense. These high-percentage early scoring opportunities are called fast breaks or primary breaks.
The offensive team should be looking for quick and easy scoring opportunities before the opponent has a chance to retreat and set up their defense. These high-percentage early scoring opportunities are called fast breaks or primary breaks.
Fast Break
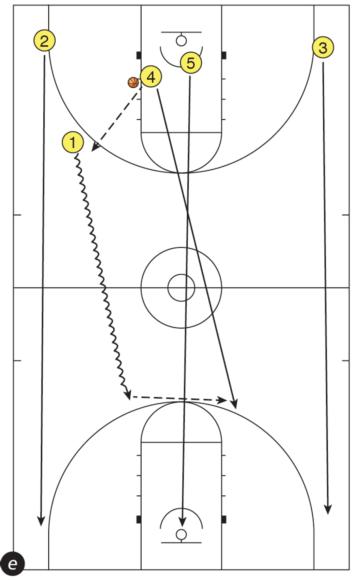
Most disciplined teams are taught how to properly run the floor to facilitate these quick and easy points. As shown in figure 8.10, each player has a specific responsibility on the fast break. In addition to these responsibilities, keep in mind that it is the job of every player to sprint the floor, maintain proper spacing, and communicate. The 4 and 5 positions are interchangeable, as are the 2 and 3 positions. The job of the 4 and 5 positions is first to rebound the basketball. If player 4 obtains the rebound, player 5 immediately sprints up the middle of the court and seals their defender at the front of the rim. Player 4 looks to quickly pass the basketball to the position 1 guard. As this is happening, players 2 and 3 run wide near the sideline until they reach the corner of the court where the baseline meets the sideline. The purpose of running wide up the sideline is to create more space between each offensive player, thus making the defense's job much tougher. The position 1 guard tries to make a hit-ahead pass to player 2, 3, or 5 for the open inside or outside shot, or player 1 can dribble up the court if none of these options are open. Player 4 finishes out the break by trailing behind to the weak side of the court. With the fast break, time is of the essence. It is faster to advance the basketball with a pass than with the dribble. If the advantage is there, look to score quickly by passing the basketball up the floor and finding the open player. The more time it takes, the more likely it is that the defense will recover. The fast break lanes in the following diagrams are an important part of the strategy for creating space and open scoring opportunities, and they should be implemented after every defensive rebound and after any quick change of possession.
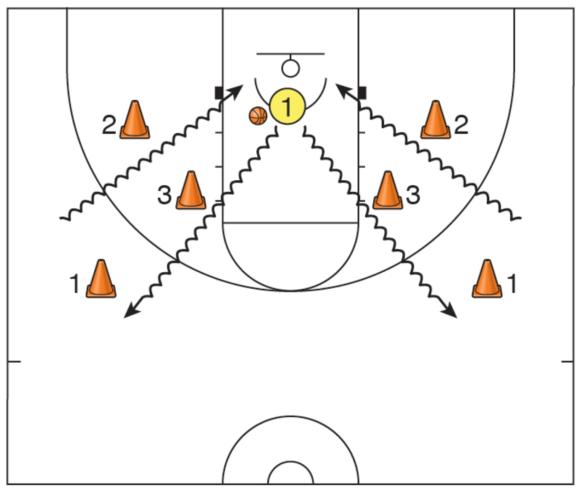
Primary Break Drill
Breakdown
 |  |  |
 |  |
Setup
Primary break drill.
- Use five players and one basketball.
- All five players are lined up across the baseline.
- As soon as everyone is in place, the coach takes a shot.
- Player 4 rebounds the basketball and makes a pass to player 1. Player 4 then runs the floor to the opposite three-point arc.
- Player 1 advances the basketball up the court either by pass or dribble.
- Players 2 and 3 run wide and up each sideline to the corner and outside the three-point line.
- Player 5 runs directly to the rim and looks for the basketball and an easy basket.
Execution
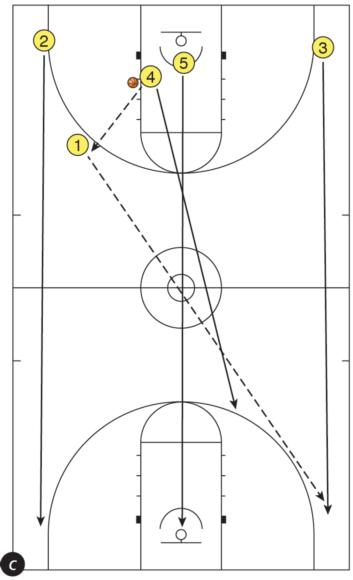
- When the shot goes up, player 4 retrieves the rebound and outlet passes to player 1. At the same time, players 2 and 3 sprint wide up the sidelines and player 5 sprints up the middle of the court and toward the rim (figure8.10a).
- During the first trip up the court, player 1 will pass ahead to player 5 for the layup. After each made shot, the drill will reset and each player will line up across the baseline again and wait for the coach to shoot the basketball.
- The second option is to pass ahead to player 2 for the perimeter shot or drive (figure 8.10b).
- The third option is to pass ahead to player 3 for the perimeter shot or drive (figure 8.10c).
- The fourth option is for player 1 to dribble up the court and attack toward the basket for a layup (figure 8.10d).
- The fifth option is for player 1 to dribble up the court and then pass to player 4, who is trailing the break, for the jump shot (figure8.10e).
- Players complete all five options to finish the drill.
Coaching Point
Each player should be sprinting as fast they can. To elevate the drill and to hold each player accountable, I often time the drill. Players must complete all five options within a certain time period.
Save
Save
Save
Learn more about Basketball Essentials.
Types of Layups and Related Drills
The layup is one of the highest-percentage shots in basketball; it is second only to the dunk. Proper finishing fundamentals are important in this low skill, high-accuracy inside shot. Let’s review several of the most common layups.
The layup is one of the highest-percentage shots in basketball; it is second only to the dunk. Proper finishing fundamentals are important in this low skill, high-accuracy inside shot. Let's review several of the most common layups.
Inside-Foot Layup
The inside-foot layup is a type of finish used when the defender is between the offensive player and the basket. In this scenario, jump off the inside foot and finish the shot with the outside hand, using the body as a shield to protect the basketball. A good offensive player always protects the ball with the off hand and body to create a better scoring window. Review the break-down drills to build an understanding of and comfort with the inside-foot layup.
After picking up the dribble, take two steps. The first step is with the outside foot and the second step is with the inside foot. The first step is long and the second is short in order to maintain body control. Land on the second step in a low and athletic position; then launch up and toward the basket and protect the basketball on the outside of the body by finishing with an outside-hand layup off the correct quadrant. During this maneuver, focus on the basket until the basketball comes through the bottom of the net (see figure 3.2).
| |
Inside-foot layup.
Inside-Foot Layup Choreography Drill
Breakdown
Setup
- Use one player and one basketball.
- The player is on the baseline with the ball.
Execution
- The player gets into a low and athletic stance by bending down and touching the basketball to the ground.
- The player then takes two steps to the right without a dribble. The first step (with the right foot) is long and the second step (with the left foot) is short.
- The player then explodes off the ground and shoots a right-hand layup straight up in the air.
- The player then catches the ball and returns to a low and athletic stance by bending down and touching the basketball to the ground.
- The player continues by taking two steps to the left without a dribble. The first step (with the left foot) is long and the second step (with the right foot) is short.
- The player then explodes off the ground and shoots a left-hand layup straight up in the air.
- The player repeats these steps in a zigzag motion and stops at the opposite baseline.
Inside-Foot Layup Cone Drill
Breakdown
Setup
- Use one player, one basketball, and one cone.
- The player has the ball and stands at the cone, which is placed just above the block.
Execution
- The player gets into a low and athletic stance by bending down and touching the basketball to the floor.
- The player takes two steps toward the rim: a long step with the outside foot followed by a short step with the inside foot.
- The player then jumps up toward the basket and finishes with a layup off the backboard with the outside hand.
- The player repeats these steps on both sides of the basket and completes 10 layups with each hand.
Inside-Foot Layup Game-Ready Drill
Breakdown
Inside-foot layup game-ready drill.
Setup
- Use one player, one basketball, and six cones.
- The player stands under the rim with the basketball.
Execution
- The player dribbles inside and around cone 1.
- The player then faces the basket and attacks the rim by dribbling through cones 2 and 3 with the outside hand, which creates the perfect angle for the player to finish at the rim with an inside-foot layup off the backboard (figure 3.3).
- The player rebounds the shot and dribbles inside and around cone 1on the opposite side of the court.
- The player then faces the basket and attacks the rim by dribbling through cones 2 and 3 with the outside hand, which again creates the perfect angle for the player to finish at the rim with an inside-foot layup off the backboard.
- The player repeats the drill until 10 layups are made with correct form.
Coaching Point
A player should keep the eyes on the ball from the beginning of the shot until it comes through the bottom of the net.
Save
Save
Save
Save
Save
Learn more about Basketball Essentials.
Defensive Rebounding Tactical Fundamentals
The fundamental goal of a good defensive rebounding team is to limit the offense to one shot. To achieve this, each defensive player must focus on the following three keys.
The fundamental goal of a good defensive rebounding team is to limit the offense to one shot. To achieve this, each defensive player must focus on the following three keys.
Vision and Voice
As a defender, use your peripheral vision to maintain sight of the basketball and your offensive player at all times. For rebounding purposes, seeing both the offensive player and the ball gives you a head start because you can move on the flight of the basketball as it leaves the shooter's hands, and you can keep eye contact with the ball from the beginning of the shot until it hits the rim. You should also use the proper pivot when executing the box out; I will discuss proper pivoting reads in subsequent sections. Once the shot is taken, each defensive player also says the word "shot" so each teammate is prepared for the rebound.
Inside Position
Inside position is the space between your opponent and the basket. As a golden rule, the defensive player always takes the inside position; this prevents the offense from making straight-line cuts to the rim for scoring opportunities, and it gives the defender an advantageous position when a shot is taken. Once the shot goes up, it is harder to maintain this inside position because the offensive player will fight around and through the defender to gain access to the basketball. There are three different techniques that are commonly used to maintain the inside position.
Hit-Go Technique
Use the hit-go technique to stop your opponent's path to the rebound by striking them with a forearm to the chest. As soon as contact is made and the opponent's forward progress is momentarily stopped, break contact and sprint to pursue the basketball. It is important to keep the elbow bent and to generate power from the lower body and not the arm. Exerting power from the upper body by extending the elbow will result in a foul.
Hit-Go Drill
Breakdown
Setup
- Use one player and one blocking pad.
- This drill is executed without a basketball. The player is inside the lane. The coach has the blocking pad and is outside the three-point arc.
Execution
- The coach blows the whistle.
- The player sprints toward the coach with short, choppy steps and blasts the coach with a bent forearm to the chest.
- The player then immediately sprints toward the rim, leaps off the ground, and secures the imaginary basketball.
- The player repeats the drill 10 times.
Coaching Point
A player should make contact with their forearm to the opponent's chest for only a moment before releasing contact to pursue the basketball.
Boxout Technique
Use the boxout technique to stop your opponent's path to the basketball by striking them with a bent forearm to the chest, making a front or reverse pivot, and ending with your posterior against the opponent's thighs and your back to the opponent's chest. When boxing out, keep your hands and arms high above your head and in the shape of a field-goal post to prevent your opponent from reaching over you for the basketball. When the basketball hits the rim, break contact with your opponent and pursue the ball.
Boxout Drill
Breakdown
Setup
- Use one player and one blocking pad.
- This drill is executed without a basketball. The player is inside the lane. The coach has the blocking pad and is outside the three-point arc.
Execution
- The coach blows the whistle.
- The player sprints toward the coach with short, choppy steps; blasts the coach with a bent forearm to the chest; and makes a front-pivot or reverse-pivot boxout.
- The player holds the boxout while driving the coach back until the coach blows the whistle again.
- On the second whistle, the player sprints toward the rim, leaps off of the ground, and secures the imaginary basketball.
- The player repeats the drill 10 times.
Coaching Point
The player should aggressively pursue the boxout with the goal of not allowing the coach to enter the lane.
The Chest-Out Technique
The chest-out technique is an emergency maneuver you can use when your opponent has forced you low and below the rim and thus negated your dominant inside position. In this situation, quickly turn and face your opponent, lift your hands high above your head, get low and wide at the base, and subtly push your opponent out and away from the basket with your hips. This technique may not allow you to secure the rebound, but it will help to prevent your opponent from obtaining it.
Learn more about Basketball Essentials.
Team Offense
The offensive team should be looking for quick and easy scoring opportunities before the opponent has a chance to retreat and set up their defense. These high-percentage early scoring opportunities are called fast breaks or primary breaks.
The offensive team should be looking for quick and easy scoring opportunities before the opponent has a chance to retreat and set up their defense. These high-percentage early scoring opportunities are called fast breaks or primary breaks.
Fast Break
Most disciplined teams are taught how to properly run the floor to facilitate these quick and easy points. As shown in figure 8.10, each player has a specific responsibility on the fast break. In addition to these responsibilities, keep in mind that it is the job of every player to sprint the floor, maintain proper spacing, and communicate. The 4 and 5 positions are interchangeable, as are the 2 and 3 positions. The job of the 4 and 5 positions is first to rebound the basketball. If player 4 obtains the rebound, player 5 immediately sprints up the middle of the court and seals their defender at the front of the rim. Player 4 looks to quickly pass the basketball to the position 1 guard. As this is happening, players 2 and 3 run wide near the sideline until they reach the corner of the court where the baseline meets the sideline. The purpose of running wide up the sideline is to create more space between each offensive player, thus making the defense's job much tougher. The position 1 guard tries to make a hit-ahead pass to player 2, 3, or 5 for the open inside or outside shot, or player 1 can dribble up the court if none of these options are open. Player 4 finishes out the break by trailing behind to the weak side of the court. With the fast break, time is of the essence. It is faster to advance the basketball with a pass than with the dribble. If the advantage is there, look to score quickly by passing the basketball up the floor and finding the open player. The more time it takes, the more likely it is that the defense will recover. The fast break lanes in the following diagrams are an important part of the strategy for creating space and open scoring opportunities, and they should be implemented after every defensive rebound and after any quick change of possession.
Primary Break Drill
Breakdown
| | |
| |
Setup
Primary break drill.
- Use five players and one basketball.
- All five players are lined up across the baseline.
- As soon as everyone is in place, the coach takes a shot.
- Player 4 rebounds the basketball and makes a pass to player 1. Player 4 then runs the floor to the opposite three-point arc.
- Player 1 advances the basketball up the court either by pass or dribble.
- Players 2 and 3 run wide and up each sideline to the corner and outside the three-point line.
- Player 5 runs directly to the rim and looks for the basketball and an easy basket.
Execution
- When the shot goes up, player 4 retrieves the rebound and outlet passes to player 1. At the same time, players 2 and 3 sprint wide up the sidelines and player 5 sprints up the middle of the court and toward the rim (figure8.10a).
- During the first trip up the court, player 1 will pass ahead to player 5 for the layup. After each made shot, the drill will reset and each player will line up across the baseline again and wait for the coach to shoot the basketball.
- The second option is to pass ahead to player 2 for the perimeter shot or drive (figure 8.10b).
- The third option is to pass ahead to player 3 for the perimeter shot or drive (figure 8.10c).
- The fourth option is for player 1 to dribble up the court and attack toward the basket for a layup (figure 8.10d).
- The fifth option is for player 1 to dribble up the court and then pass to player 4, who is trailing the break, for the jump shot (figure8.10e).
- Players complete all five options to finish the drill.
Coaching Point
Each player should be sprinting as fast they can. To elevate the drill and to hold each player accountable, I often time the drill. Players must complete all five options within a certain time period.
Save
Save
Save
Learn more about Basketball Essentials.
Types of Layups and Related Drills
The layup is one of the highest-percentage shots in basketball; it is second only to the dunk. Proper finishing fundamentals are important in this low skill, high-accuracy inside shot. Let’s review several of the most common layups.
The layup is one of the highest-percentage shots in basketball; it is second only to the dunk. Proper finishing fundamentals are important in this low skill, high-accuracy inside shot. Let's review several of the most common layups.
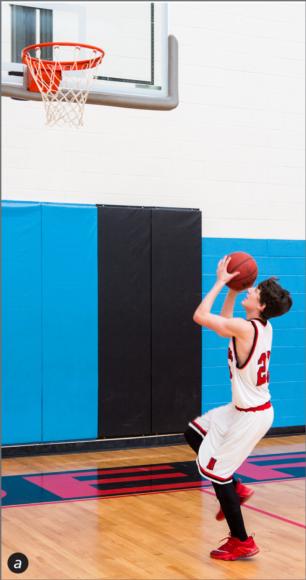
Inside-Foot Layup
The inside-foot layup is a type of finish used when the defender is between the offensive player and the basket. In this scenario, jump off the inside foot and finish the shot with the outside hand, using the body as a shield to protect the basketball. A good offensive player always protects the ball with the off hand and body to create a better scoring window. Review the break-down drills to build an understanding of and comfort with the inside-foot layup.
After picking up the dribble, take two steps. The first step is with the outside foot and the second step is with the inside foot. The first step is long and the second is short in order to maintain body control. Land on the second step in a low and athletic position; then launch up and toward the basket and protect the basketball on the outside of the body by finishing with an outside-hand layup off the correct quadrant. During this maneuver, focus on the basket until the basketball comes through the bottom of the net (see figure 3.2).
| |
Inside-foot layup.
Inside-Foot Layup Choreography Drill
Breakdown
Setup
- Use one player and one basketball.
- The player is on the baseline with the ball.
Execution
- The player gets into a low and athletic stance by bending down and touching the basketball to the ground.
- The player then takes two steps to the right without a dribble. The first step (with the right foot) is long and the second step (with the left foot) is short.
- The player then explodes off the ground and shoots a right-hand layup straight up in the air.
- The player then catches the ball and returns to a low and athletic stance by bending down and touching the basketball to the ground.
- The player continues by taking two steps to the left without a dribble. The first step (with the left foot) is long and the second step (with the right foot) is short.
- The player then explodes off the ground and shoots a left-hand layup straight up in the air.
- The player repeats these steps in a zigzag motion and stops at the opposite baseline.
Inside-Foot Layup Cone Drill
Breakdown
Setup
- Use one player, one basketball, and one cone.
- The player has the ball and stands at the cone, which is placed just above the block.
Execution
- The player gets into a low and athletic stance by bending down and touching the basketball to the floor.
- The player takes two steps toward the rim: a long step with the outside foot followed by a short step with the inside foot.
- The player then jumps up toward the basket and finishes with a layup off the backboard with the outside hand.
- The player repeats these steps on both sides of the basket and completes 10 layups with each hand.
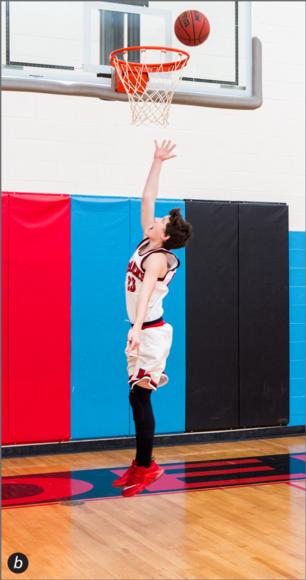
Inside-Foot Layup Game-Ready Drill
Breakdown
Inside-foot layup game-ready drill.
Setup
- Use one player, one basketball, and six cones.
- The player stands under the rim with the basketball.
Execution
- The player dribbles inside and around cone 1.
- The player then faces the basket and attacks the rim by dribbling through cones 2 and 3 with the outside hand, which creates the perfect angle for the player to finish at the rim with an inside-foot layup off the backboard (figure 3.3).
- The player rebounds the shot and dribbles inside and around cone 1on the opposite side of the court.
- The player then faces the basket and attacks the rim by dribbling through cones 2 and 3 with the outside hand, which again creates the perfect angle for the player to finish at the rim with an inside-foot layup off the backboard.
- The player repeats the drill until 10 layups are made with correct form.
Coaching Point
A player should keep the eyes on the ball from the beginning of the shot until it comes through the bottom of the net.
Save
Save
Save
Save
Save
Learn more about Basketball Essentials.
Defensive Rebounding Tactical Fundamentals
The fundamental goal of a good defensive rebounding team is to limit the offense to one shot. To achieve this, each defensive player must focus on the following three keys.
The fundamental goal of a good defensive rebounding team is to limit the offense to one shot. To achieve this, each defensive player must focus on the following three keys.
Vision and Voice
As a defender, use your peripheral vision to maintain sight of the basketball and your offensive player at all times. For rebounding purposes, seeing both the offensive player and the ball gives you a head start because you can move on the flight of the basketball as it leaves the shooter's hands, and you can keep eye contact with the ball from the beginning of the shot until it hits the rim. You should also use the proper pivot when executing the box out; I will discuss proper pivoting reads in subsequent sections. Once the shot is taken, each defensive player also says the word "shot" so each teammate is prepared for the rebound.
Inside Position
Inside position is the space between your opponent and the basket. As a golden rule, the defensive player always takes the inside position; this prevents the offense from making straight-line cuts to the rim for scoring opportunities, and it gives the defender an advantageous position when a shot is taken. Once the shot goes up, it is harder to maintain this inside position because the offensive player will fight around and through the defender to gain access to the basketball. There are three different techniques that are commonly used to maintain the inside position.
Hit-Go Technique
Use the hit-go technique to stop your opponent's path to the rebound by striking them with a forearm to the chest. As soon as contact is made and the opponent's forward progress is momentarily stopped, break contact and sprint to pursue the basketball. It is important to keep the elbow bent and to generate power from the lower body and not the arm. Exerting power from the upper body by extending the elbow will result in a foul.
Hit-Go Drill
Breakdown
Setup
- Use one player and one blocking pad.
- This drill is executed without a basketball. The player is inside the lane. The coach has the blocking pad and is outside the three-point arc.
Execution
- The coach blows the whistle.
- The player sprints toward the coach with short, choppy steps and blasts the coach with a bent forearm to the chest.
- The player then immediately sprints toward the rim, leaps off the ground, and secures the imaginary basketball.
- The player repeats the drill 10 times.
Coaching Point
A player should make contact with their forearm to the opponent's chest for only a moment before releasing contact to pursue the basketball.
Boxout Technique
Use the boxout technique to stop your opponent's path to the basketball by striking them with a bent forearm to the chest, making a front or reverse pivot, and ending with your posterior against the opponent's thighs and your back to the opponent's chest. When boxing out, keep your hands and arms high above your head and in the shape of a field-goal post to prevent your opponent from reaching over you for the basketball. When the basketball hits the rim, break contact with your opponent and pursue the ball.
Boxout Drill
Breakdown
Setup
- Use one player and one blocking pad.
- This drill is executed without a basketball. The player is inside the lane. The coach has the blocking pad and is outside the three-point arc.
Execution
- The coach blows the whistle.
- The player sprints toward the coach with short, choppy steps; blasts the coach with a bent forearm to the chest; and makes a front-pivot or reverse-pivot boxout.
- The player holds the boxout while driving the coach back until the coach blows the whistle again.
- On the second whistle, the player sprints toward the rim, leaps off of the ground, and secures the imaginary basketball.
- The player repeats the drill 10 times.
Coaching Point
The player should aggressively pursue the boxout with the goal of not allowing the coach to enter the lane.
The Chest-Out Technique
The chest-out technique is an emergency maneuver you can use when your opponent has forced you low and below the rim and thus negated your dominant inside position. In this situation, quickly turn and face your opponent, lift your hands high above your head, get low and wide at the base, and subtly push your opponent out and away from the basket with your hips. This technique may not allow you to secure the rebound, but it will help to prevent your opponent from obtaining it.
Learn more about Basketball Essentials.
Team Offense
The offensive team should be looking for quick and easy scoring opportunities before the opponent has a chance to retreat and set up their defense. These high-percentage early scoring opportunities are called fast breaks or primary breaks.
The offensive team should be looking for quick and easy scoring opportunities before the opponent has a chance to retreat and set up their defense. These high-percentage early scoring opportunities are called fast breaks or primary breaks.
Fast Break
Most disciplined teams are taught how to properly run the floor to facilitate these quick and easy points. As shown in figure 8.10, each player has a specific responsibility on the fast break. In addition to these responsibilities, keep in mind that it is the job of every player to sprint the floor, maintain proper spacing, and communicate. The 4 and 5 positions are interchangeable, as are the 2 and 3 positions. The job of the 4 and 5 positions is first to rebound the basketball. If player 4 obtains the rebound, player 5 immediately sprints up the middle of the court and seals their defender at the front of the rim. Player 4 looks to quickly pass the basketball to the position 1 guard. As this is happening, players 2 and 3 run wide near the sideline until they reach the corner of the court where the baseline meets the sideline. The purpose of running wide up the sideline is to create more space between each offensive player, thus making the defense's job much tougher. The position 1 guard tries to make a hit-ahead pass to player 2, 3, or 5 for the open inside or outside shot, or player 1 can dribble up the court if none of these options are open. Player 4 finishes out the break by trailing behind to the weak side of the court. With the fast break, time is of the essence. It is faster to advance the basketball with a pass than with the dribble. If the advantage is there, look to score quickly by passing the basketball up the floor and finding the open player. The more time it takes, the more likely it is that the defense will recover. The fast break lanes in the following diagrams are an important part of the strategy for creating space and open scoring opportunities, and they should be implemented after every defensive rebound and after any quick change of possession.
Primary Break Drill
Breakdown
| | |
| |
Setup
Primary break drill.
- Use five players and one basketball.
- All five players are lined up across the baseline.
- As soon as everyone is in place, the coach takes a shot.
- Player 4 rebounds the basketball and makes a pass to player 1. Player 4 then runs the floor to the opposite three-point arc.
- Player 1 advances the basketball up the court either by pass or dribble.
- Players 2 and 3 run wide and up each sideline to the corner and outside the three-point line.
- Player 5 runs directly to the rim and looks for the basketball and an easy basket.
Execution
- When the shot goes up, player 4 retrieves the rebound and outlet passes to player 1. At the same time, players 2 and 3 sprint wide up the sidelines and player 5 sprints up the middle of the court and toward the rim (figure8.10a).
- During the first trip up the court, player 1 will pass ahead to player 5 for the layup. After each made shot, the drill will reset and each player will line up across the baseline again and wait for the coach to shoot the basketball.
- The second option is to pass ahead to player 2 for the perimeter shot or drive (figure 8.10b).
- The third option is to pass ahead to player 3 for the perimeter shot or drive (figure 8.10c).
- The fourth option is for player 1 to dribble up the court and attack toward the basket for a layup (figure 8.10d).
- The fifth option is for player 1 to dribble up the court and then pass to player 4, who is trailing the break, for the jump shot (figure8.10e).
- Players complete all five options to finish the drill.
Coaching Point
Each player should be sprinting as fast they can. To elevate the drill and to hold each player accountable, I often time the drill. Players must complete all five options within a certain time period.
Save
Save
Save
Learn more about Basketball Essentials.
Types of Layups and Related Drills
The layup is one of the highest-percentage shots in basketball; it is second only to the dunk. Proper finishing fundamentals are important in this low skill, high-accuracy inside shot. Let’s review several of the most common layups.
The layup is one of the highest-percentage shots in basketball; it is second only to the dunk. Proper finishing fundamentals are important in this low skill, high-accuracy inside shot. Let's review several of the most common layups.
Inside-Foot Layup
The inside-foot layup is a type of finish used when the defender is between the offensive player and the basket. In this scenario, jump off the inside foot and finish the shot with the outside hand, using the body as a shield to protect the basketball. A good offensive player always protects the ball with the off hand and body to create a better scoring window. Review the break-down drills to build an understanding of and comfort with the inside-foot layup.
After picking up the dribble, take two steps. The first step is with the outside foot and the second step is with the inside foot. The first step is long and the second is short in order to maintain body control. Land on the second step in a low and athletic position; then launch up and toward the basket and protect the basketball on the outside of the body by finishing with an outside-hand layup off the correct quadrant. During this maneuver, focus on the basket until the basketball comes through the bottom of the net (see figure 3.2).
| |
Inside-foot layup.
Inside-Foot Layup Choreography Drill
Breakdown
Setup
- Use one player and one basketball.
- The player is on the baseline with the ball.
Execution
- The player gets into a low and athletic stance by bending down and touching the basketball to the ground.
- The player then takes two steps to the right without a dribble. The first step (with the right foot) is long and the second step (with the left foot) is short.
- The player then explodes off the ground and shoots a right-hand layup straight up in the air.
- The player then catches the ball and returns to a low and athletic stance by bending down and touching the basketball to the ground.
- The player continues by taking two steps to the left without a dribble. The first step (with the left foot) is long and the second step (with the right foot) is short.
- The player then explodes off the ground and shoots a left-hand layup straight up in the air.
- The player repeats these steps in a zigzag motion and stops at the opposite baseline.
Inside-Foot Layup Cone Drill
Breakdown
Setup
- Use one player, one basketball, and one cone.
- The player has the ball and stands at the cone, which is placed just above the block.
Execution
- The player gets into a low and athletic stance by bending down and touching the basketball to the floor.
- The player takes two steps toward the rim: a long step with the outside foot followed by a short step with the inside foot.
- The player then jumps up toward the basket and finishes with a layup off the backboard with the outside hand.
- The player repeats these steps on both sides of the basket and completes 10 layups with each hand.
Inside-Foot Layup Game-Ready Drill
Breakdown
Inside-foot layup game-ready drill.
Setup
- Use one player, one basketball, and six cones.
- The player stands under the rim with the basketball.
Execution
- The player dribbles inside and around cone 1.
- The player then faces the basket and attacks the rim by dribbling through cones 2 and 3 with the outside hand, which creates the perfect angle for the player to finish at the rim with an inside-foot layup off the backboard (figure 3.3).
- The player rebounds the shot and dribbles inside and around cone 1on the opposite side of the court.
- The player then faces the basket and attacks the rim by dribbling through cones 2 and 3 with the outside hand, which again creates the perfect angle for the player to finish at the rim with an inside-foot layup off the backboard.
- The player repeats the drill until 10 layups are made with correct form.
Coaching Point
A player should keep the eyes on the ball from the beginning of the shot until it comes through the bottom of the net.
Save
Save
Save
Save
Save
Learn more about Basketball Essentials.
Defensive Rebounding Tactical Fundamentals
The fundamental goal of a good defensive rebounding team is to limit the offense to one shot. To achieve this, each defensive player must focus on the following three keys.
The fundamental goal of a good defensive rebounding team is to limit the offense to one shot. To achieve this, each defensive player must focus on the following three keys.
Vision and Voice
As a defender, use your peripheral vision to maintain sight of the basketball and your offensive player at all times. For rebounding purposes, seeing both the offensive player and the ball gives you a head start because you can move on the flight of the basketball as it leaves the shooter's hands, and you can keep eye contact with the ball from the beginning of the shot until it hits the rim. You should also use the proper pivot when executing the box out; I will discuss proper pivoting reads in subsequent sections. Once the shot is taken, each defensive player also says the word "shot" so each teammate is prepared for the rebound.
Inside Position
Inside position is the space between your opponent and the basket. As a golden rule, the defensive player always takes the inside position; this prevents the offense from making straight-line cuts to the rim for scoring opportunities, and it gives the defender an advantageous position when a shot is taken. Once the shot goes up, it is harder to maintain this inside position because the offensive player will fight around and through the defender to gain access to the basketball. There are three different techniques that are commonly used to maintain the inside position.
Hit-Go Technique
Use the hit-go technique to stop your opponent's path to the rebound by striking them with a forearm to the chest. As soon as contact is made and the opponent's forward progress is momentarily stopped, break contact and sprint to pursue the basketball. It is important to keep the elbow bent and to generate power from the lower body and not the arm. Exerting power from the upper body by extending the elbow will result in a foul.
Hit-Go Drill
Breakdown
Setup
- Use one player and one blocking pad.
- This drill is executed without a basketball. The player is inside the lane. The coach has the blocking pad and is outside the three-point arc.
Execution
- The coach blows the whistle.
- The player sprints toward the coach with short, choppy steps and blasts the coach with a bent forearm to the chest.
- The player then immediately sprints toward the rim, leaps off the ground, and secures the imaginary basketball.
- The player repeats the drill 10 times.
Coaching Point
A player should make contact with their forearm to the opponent's chest for only a moment before releasing contact to pursue the basketball.
Boxout Technique
Use the boxout technique to stop your opponent's path to the basketball by striking them with a bent forearm to the chest, making a front or reverse pivot, and ending with your posterior against the opponent's thighs and your back to the opponent's chest. When boxing out, keep your hands and arms high above your head and in the shape of a field-goal post to prevent your opponent from reaching over you for the basketball. When the basketball hits the rim, break contact with your opponent and pursue the ball.
Boxout Drill
Breakdown
Setup
- Use one player and one blocking pad.
- This drill is executed without a basketball. The player is inside the lane. The coach has the blocking pad and is outside the three-point arc.
Execution
- The coach blows the whistle.
- The player sprints toward the coach with short, choppy steps; blasts the coach with a bent forearm to the chest; and makes a front-pivot or reverse-pivot boxout.
- The player holds the boxout while driving the coach back until the coach blows the whistle again.
- On the second whistle, the player sprints toward the rim, leaps off of the ground, and secures the imaginary basketball.
- The player repeats the drill 10 times.
Coaching Point
The player should aggressively pursue the boxout with the goal of not allowing the coach to enter the lane.
The Chest-Out Technique
The chest-out technique is an emergency maneuver you can use when your opponent has forced you low and below the rim and thus negated your dominant inside position. In this situation, quickly turn and face your opponent, lift your hands high above your head, get low and wide at the base, and subtly push your opponent out and away from the basket with your hips. This technique may not allow you to secure the rebound, but it will help to prevent your opponent from obtaining it.
Learn more about Basketball Essentials.
Team Offense
The offensive team should be looking for quick and easy scoring opportunities before the opponent has a chance to retreat and set up their defense. These high-percentage early scoring opportunities are called fast breaks or primary breaks.
The offensive team should be looking for quick and easy scoring opportunities before the opponent has a chance to retreat and set up their defense. These high-percentage early scoring opportunities are called fast breaks or primary breaks.
Fast Break
Most disciplined teams are taught how to properly run the floor to facilitate these quick and easy points. As shown in figure 8.10, each player has a specific responsibility on the fast break. In addition to these responsibilities, keep in mind that it is the job of every player to sprint the floor, maintain proper spacing, and communicate. The 4 and 5 positions are interchangeable, as are the 2 and 3 positions. The job of the 4 and 5 positions is first to rebound the basketball. If player 4 obtains the rebound, player 5 immediately sprints up the middle of the court and seals their defender at the front of the rim. Player 4 looks to quickly pass the basketball to the position 1 guard. As this is happening, players 2 and 3 run wide near the sideline until they reach the corner of the court where the baseline meets the sideline. The purpose of running wide up the sideline is to create more space between each offensive player, thus making the defense's job much tougher. The position 1 guard tries to make a hit-ahead pass to player 2, 3, or 5 for the open inside or outside shot, or player 1 can dribble up the court if none of these options are open. Player 4 finishes out the break by trailing behind to the weak side of the court. With the fast break, time is of the essence. It is faster to advance the basketball with a pass than with the dribble. If the advantage is there, look to score quickly by passing the basketball up the floor and finding the open player. The more time it takes, the more likely it is that the defense will recover. The fast break lanes in the following diagrams are an important part of the strategy for creating space and open scoring opportunities, and they should be implemented after every defensive rebound and after any quick change of possession.
Primary Break Drill
Breakdown
| | |
| |
Setup
Primary break drill.
- Use five players and one basketball.
- All five players are lined up across the baseline.
- As soon as everyone is in place, the coach takes a shot.
- Player 4 rebounds the basketball and makes a pass to player 1. Player 4 then runs the floor to the opposite three-point arc.
- Player 1 advances the basketball up the court either by pass or dribble.
- Players 2 and 3 run wide and up each sideline to the corner and outside the three-point line.
- Player 5 runs directly to the rim and looks for the basketball and an easy basket.
Execution
- When the shot goes up, player 4 retrieves the rebound and outlet passes to player 1. At the same time, players 2 and 3 sprint wide up the sidelines and player 5 sprints up the middle of the court and toward the rim (figure8.10a).
- During the first trip up the court, player 1 will pass ahead to player 5 for the layup. After each made shot, the drill will reset and each player will line up across the baseline again and wait for the coach to shoot the basketball.
- The second option is to pass ahead to player 2 for the perimeter shot or drive (figure 8.10b).
- The third option is to pass ahead to player 3 for the perimeter shot or drive (figure 8.10c).
- The fourth option is for player 1 to dribble up the court and attack toward the basket for a layup (figure 8.10d).
- The fifth option is for player 1 to dribble up the court and then pass to player 4, who is trailing the break, for the jump shot (figure8.10e).
- Players complete all five options to finish the drill.
Coaching Point
Each player should be sprinting as fast they can. To elevate the drill and to hold each player accountable, I often time the drill. Players must complete all five options within a certain time period.
Save
Save
Save
Learn more about Basketball Essentials.
Related Books


