
- Home
- Strength Training and Conditioning
- Sports and Activities
- Dance
- Conditioning for Dance

Conditioning for Dance
Training for Whole-Body Coordination and Efficiency
400 Pages
Eric Franklin’s first edition of Conditioning for Dance was a bestseller—and it is back and better than ever, offering state-of-the-art conditioning exercises for dancers.
An internationally renowned master teacher, Franklin has developed a science-based method of conditioning that is taught and practiced in companies and schools around the world. In this new edition of Conditioning for Dance, he integrates the latest scientific research on strength, flexibility, and conditioning into his dance exercises.
New to This Edition
Since the first edition, the topic of dancers’ health, wellness, and conditioning has taken on even greater importance in the dance community. Franklin has responded to this increased emphasis by adding these new exercises and resources:
• Over 100 new conditioning exercises—for all parts of the body—to support dancers in a wide range of genres, forms, and styles
• Over 100 new illustrations and photos to explain and show the exercises
• Two new chapters with exercises for a complete conditioning plan
• A new web resource that offers 17 video clips featuring Franklin showing correct execution of the conditioning exercises from the book, two 20-minute portable whole-body workouts that use elastic bands to increase strength and aerobic conditioning for dance, and a personal conditioning program you can use to set goals chapter by chapter and monitor your conditioning development to support your performance. The web resource is included with all new print books and some ebooks. For ebook formats that don’t provide access, the web resource is available separately.
In addition, the book is now printed in full color to enhance image quality in showing technique. Conditioning for Dance now has separate chapters for shoulders and feet, with additional information on calves and ankles. Franklin also offers practical tips to help you develop your personal conditioning plan, which you can set up through the web resource.
Applying Principles Through the Franklin Method
Conditioning for Dance is available in print and electronic formats. It uses the principles of resistance training, physics, anatomy, biomechanics, and neuroplasticity (using imagery for positive mental and physical changes) as applied to dance conditioning. Conditioning for Dance blends imagery, focus, and conditioning exercises for dancers to enhance their technique and performance while practicing injury-prevention strategies.
Franklin uses experiential anatomy to show and explain how the conditioning principles work to condition your body. As you undertake the exercises, you gain awareness of the body’s function and design and take in the knowledge of the principles through movement. This method, known as the Franklin Method, leads to greater understanding of your body, enhanced performance, and fewer injuries. Franklin developed the training systems within the book as well as a line of equipment, including the Franklin Band and Franklin Balls.
Franklin has designed the exercises to transfer directly into dance steps; as such, they are appropriate for incorporating into the preparation time for dance classes. You can use the two 20-minute elastic-band workouts from the web resource to prepare you for class or rehearsal and build your strength and aerobic capacities.
Immediate Benefits
Conditioning for Dance offers you the culmination of decades of wisdom and experience in dance conditioning from a master teacher. By using its practical exercises, mind–body relationships, and conditioning routines, and in transferring the book knowledge to body experience, you will notice immediate benefits to your conditioning, strength, and flexibility. You will become kinesthetically aware, create great dance technique from within your own body, and begin to craft injury-free and artistically successful routines.
Chapter 1. Conditioning Concepts for Body and Mind
Chapter 2. Mental Techniques for Successful Performance
Chapter 3. Improving Balance and Stability
Chapter 4. Flexibility in the Muscles and Fascia
Chapter 5. Dynamic Alignment and the Pelvic Floor
Chapter 6. Creating a Strong Core and Powerful Abdominal Muscles
Chapter 7. Conditioning the Muscles of the Pelvis, Hip Joint, and Knee
Chapter 8. Creating Stable, Flexible, and Expressive Feet
Chapter 9. Developing Power in the Torso, Shoulders, and Arms
Chapter 10. Improving Turns, Jumps, and Turnout
Chapter 11. Elastic Band Centre Workout
Appendix. Franklin Method Equipment and Resources
Eric Franklin is director and founder of the Institute for Franklin Method in Wetzikon, Switzerland. He has more than 35 years of experience as a dancer and choreographer, and he has shared imagery techniques in his teaching since 1986.
Franklin has taught extensively throughout the United States and Europe at the Juilliard School in New York, Royal Ballet School in London, Danish Ballet in Copenhagen, Dance Academy of Rome, and Institute for Psychomotor Therapy in Zurich. He was also a guest lecturer at the University of Vienna. He has provided training to Olympic and world-champion athletes and professional dance troupes such as Cirque du Soleil and the Forum de Dance in Monte Carlo. Franklin earned a BFA from New York University's Tisch School of the Arts and a BS from the University of Zurich. He has been on the faculty of the American Dance Festival since 1991.
Franklin is coauthor of the best-selling book Breakdance, which received a New York City Public Library Prize in 1984, and author of 100 Ideen für Beweglichkeit and Dance Imagery for Technique and Performance (both books about imagery in dance and movement). He is a member of the International Association for Dance Medicine and Science.
Franklin lives near Zurich, Switzerland.
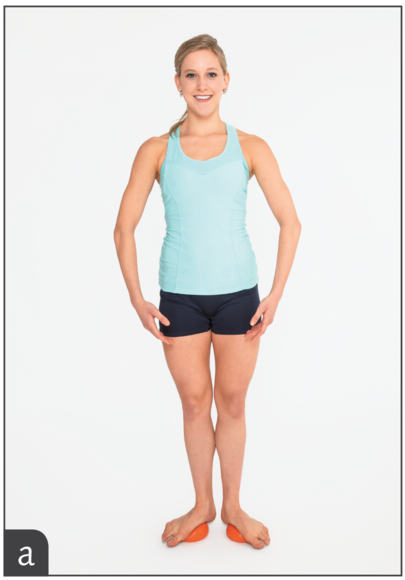
An exercise to enhance balance
Now you graduate to balancing on balls in some basic dance foot positions. This exercise will greatly enhance your balance and also your plié.
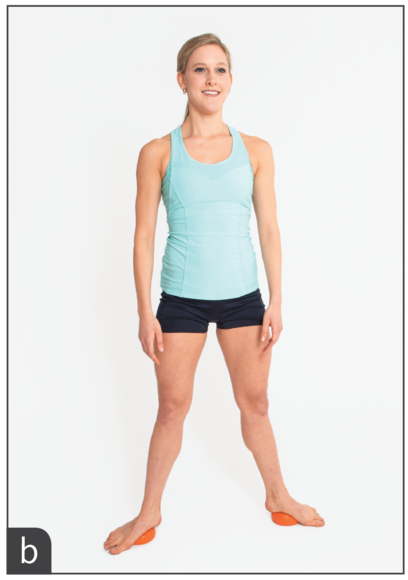
Balancing in First, Second, and Third Positions
Now you graduate to balancing on balls in some basic dance foot positions. This exercise will greatly enhance your balance and also your plié. In addition, it is a great exercise for improving turnout. It will help you feel more balanced and flexible in your legs. At first it will seem rather challenging, but once you get more practiced, you will want to add it to your daily routine.
- Place the balls next to each other.
- Stand on the balls in first position (figure a).
- Perform a few demi-pliés.
- Rotate your feet to a parallel position, and perform a few more demi-pliés.
- Get off the balls, and notice how it feels to perform a plié in first and second position as well as standing in parallel. Notice whether you feel more stable and aligned, and whether the plié will effortlessly go deeper.
- Next, practice balancing on balls in second position (see figure b). This position is more challenging and requires more strength in your legs. The balls should not be too widely placed, lest they roll out to the sides.
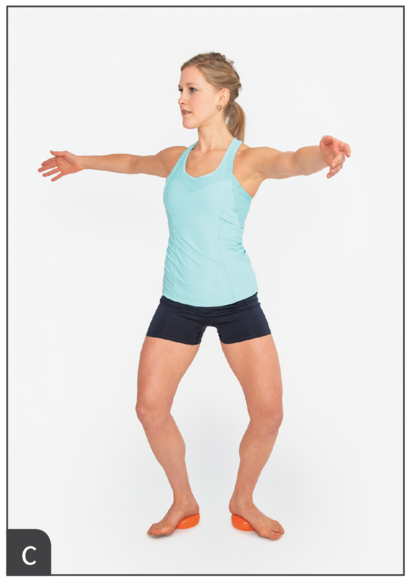
- Perform several pliés until you tire. These pliés can be done in a centered position or also with torso rotations (figure c).
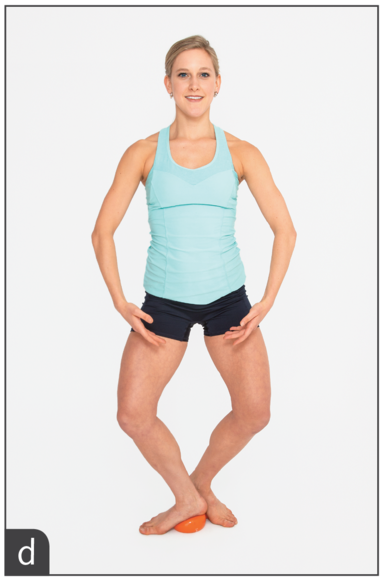
- Finally, stand on the balls in third position (figure d). For this part, you need to position the balls one in front of the other.
Advanced conditioning for the abdominal muscles
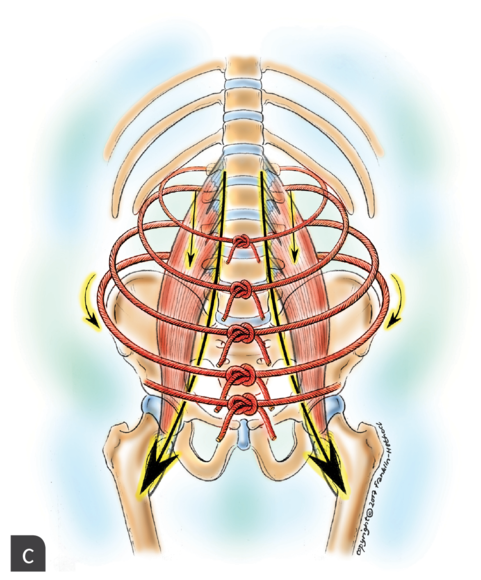
The upper abdominal twist emphasizes strengthening the rectus abdominis and the obliques. It also activates the intercostal (between the ribs) muscles that are actually the continuation into the rib cage of the line of pull of the obliques.
Abdominal Twist and Wave Support
The upper abdominal twist emphasizes strengthening the rectus abdominis and the obliques. It also activates the intercostal (between the ribs) muscles that are actually the continuation into the rib cage of the line of pull of the obliques. This exercise may make traditional crunches seem effortless. It is another example of advanced conditioning for the abdominal muscles, and you should not perform it if you have a back problem. For a reduced level of resistance, perform the exercise without the resistance of the band.
- Attach a band to a fixed object about 10 inches (25.4 cm) off the ground. Lie supine, facing away from the attachment of the band.
- Hold a loop of band around each hand, and place your hands next to your head. Alternatively you can position your hands behind your head to create a cradling support. The knees form a 90-degree angle.
- Lift your head off the floor, one vertebra after another, keeping your hands next to your head. The back rim of your pelvis remains on the ground (figure a).
- Twist your upper body to the right and then to the left (figure b). Return to center.
- Visualize the sliding of the rectus and oblique abdominal filaments.
- Focus on lengthening the spinal muscles as you roll up. Imagine that they could provide the power to lift you.
- Roll back down to the floor, vertebra after vertebra, and repeat the movement as soon as your head touches the floor.
- Think of being supported by water, as if you were made of cork. Imagine the water pushing you up, and back and forth, as you twist (figure c).
- To increase the effect on the obliques, drop your legs toward the opposite direction of your torso.
Strengthening pectoral muscles
By reversing the movement in the preceding exercise, you will strengthen the pectoral muscles and release tension between the shoulder blades.
Inward Push
By reversing the movement in the preceding exercise, you will strengthen the pectoral muscles and release tension between the shoulder blades. The inward push engages the muscles that stabilize the shoulder joint and the abdominal muscles to create a sense of knitting at the front of the pelvis. The exercise also strengthens the musculature that moves the wrist and fingers.
- Sit with your torso upright and your legs stretched out in front of you at an angle of approximately 90 degrees. Place your hands such that your palms are facing the outside of the band. Spread the band so that it covers the whole palm of the hand, and position the arms at a downward angle with the elbows slightly bent (figure a).
- Move your hands toward each other to push the band toward the midline of the body (figure b).
- Move your arms back out. Take 3 counts to move them out and 1 count to move them in.
- Feel the psoas major muscle lengthening downward to create a sense of grounding while releasing the spine into length (figure c).
- As you move your hands toward the midline, imagine the transversus abdominis knitting together in the navel area. You can visualize the transversus abdominis as a rope or stack of ropes being tied firmly at the front of your body. Notice how this image creates a sense of width in the lower back.
- As with exercise 9.11, you can enhance this exercise by circling your feet while moving your arms in and out.

An exercise to enhance balance
Now you graduate to balancing on balls in some basic dance foot positions. This exercise will greatly enhance your balance and also your plié.
Balancing in First, Second, and Third Positions
Now you graduate to balancing on balls in some basic dance foot positions. This exercise will greatly enhance your balance and also your plié. In addition, it is a great exercise for improving turnout. It will help you feel more balanced and flexible in your legs. At first it will seem rather challenging, but once you get more practiced, you will want to add it to your daily routine.
- Place the balls next to each other.
- Stand on the balls in first position (figure a).
- Perform a few demi-pliés.
- Rotate your feet to a parallel position, and perform a few more demi-pliés.
- Get off the balls, and notice how it feels to perform a plié in first and second position as well as standing in parallel. Notice whether you feel more stable and aligned, and whether the plié will effortlessly go deeper.
- Next, practice balancing on balls in second position (see figure b). This position is more challenging and requires more strength in your legs. The balls should not be too widely placed, lest they roll out to the sides.
- Perform several pliés until you tire. These pliés can be done in a centered position or also with torso rotations (figure c).
- Finally, stand on the balls in third position (figure d). For this part, you need to position the balls one in front of the other.
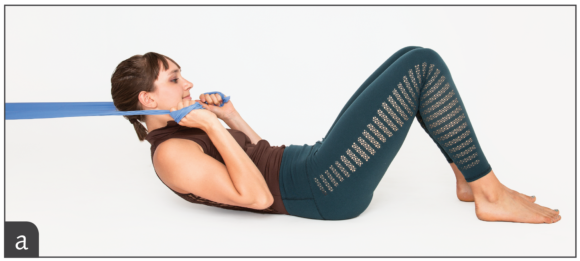
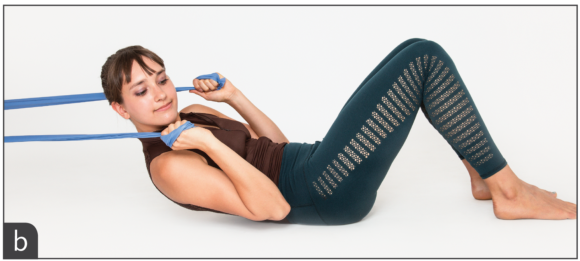
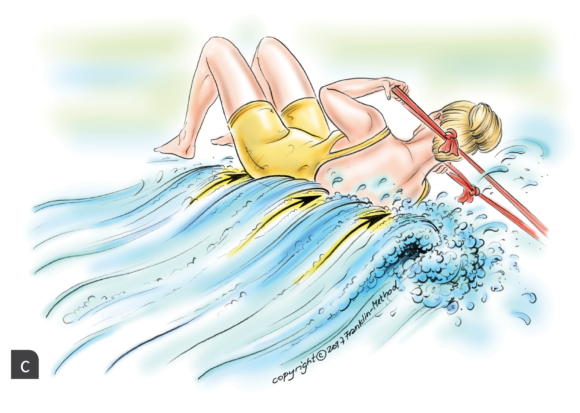
Advanced conditioning for the abdominal muscles
The upper abdominal twist emphasizes strengthening the rectus abdominis and the obliques. It also activates the intercostal (between the ribs) muscles that are actually the continuation into the rib cage of the line of pull of the obliques.
Abdominal Twist and Wave Support
The upper abdominal twist emphasizes strengthening the rectus abdominis and the obliques. It also activates the intercostal (between the ribs) muscles that are actually the continuation into the rib cage of the line of pull of the obliques. This exercise may make traditional crunches seem effortless. It is another example of advanced conditioning for the abdominal muscles, and you should not perform it if you have a back problem. For a reduced level of resistance, perform the exercise without the resistance of the band.
- Attach a band to a fixed object about 10 inches (25.4 cm) off the ground. Lie supine, facing away from the attachment of the band.
- Hold a loop of band around each hand, and place your hands next to your head. Alternatively you can position your hands behind your head to create a cradling support. The knees form a 90-degree angle.
- Lift your head off the floor, one vertebra after another, keeping your hands next to your head. The back rim of your pelvis remains on the ground (figure a).
- Twist your upper body to the right and then to the left (figure b). Return to center.
- Visualize the sliding of the rectus and oblique abdominal filaments.
- Focus on lengthening the spinal muscles as you roll up. Imagine that they could provide the power to lift you.
- Roll back down to the floor, vertebra after vertebra, and repeat the movement as soon as your head touches the floor.
- Think of being supported by water, as if you were made of cork. Imagine the water pushing you up, and back and forth, as you twist (figure c).
- To increase the effect on the obliques, drop your legs toward the opposite direction of your torso.
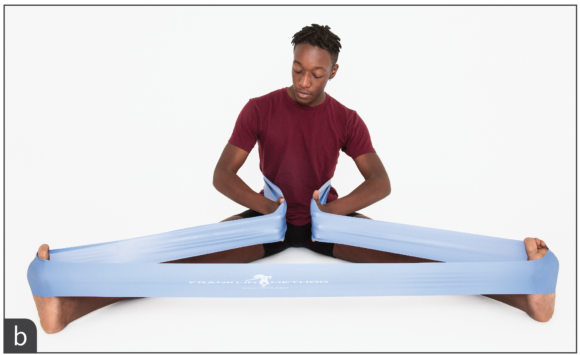
Strengthening pectoral muscles
By reversing the movement in the preceding exercise, you will strengthen the pectoral muscles and release tension between the shoulder blades.
Inward Push
By reversing the movement in the preceding exercise, you will strengthen the pectoral muscles and release tension between the shoulder blades. The inward push engages the muscles that stabilize the shoulder joint and the abdominal muscles to create a sense of knitting at the front of the pelvis. The exercise also strengthens the musculature that moves the wrist and fingers.
- Sit with your torso upright and your legs stretched out in front of you at an angle of approximately 90 degrees. Place your hands such that your palms are facing the outside of the band. Spread the band so that it covers the whole palm of the hand, and position the arms at a downward angle with the elbows slightly bent (figure a).
- Move your hands toward each other to push the band toward the midline of the body (figure b).
- Move your arms back out. Take 3 counts to move them out and 1 count to move them in.
- Feel the psoas major muscle lengthening downward to create a sense of grounding while releasing the spine into length (figure c).
- As you move your hands toward the midline, imagine the transversus abdominis knitting together in the navel area. You can visualize the transversus abdominis as a rope or stack of ropes being tied firmly at the front of your body. Notice how this image creates a sense of width in the lower back.
- As with exercise 9.11, you can enhance this exercise by circling your feet while moving your arms in and out.
An exercise to enhance balance
Now you graduate to balancing on balls in some basic dance foot positions. This exercise will greatly enhance your balance and also your plié.
Balancing in First, Second, and Third Positions
Now you graduate to balancing on balls in some basic dance foot positions. This exercise will greatly enhance your balance and also your plié. In addition, it is a great exercise for improving turnout. It will help you feel more balanced and flexible in your legs. At first it will seem rather challenging, but once you get more practiced, you will want to add it to your daily routine.
- Place the balls next to each other.
- Stand on the balls in first position (figure a).
- Perform a few demi-pliés.
- Rotate your feet to a parallel position, and perform a few more demi-pliés.
- Get off the balls, and notice how it feels to perform a plié in first and second position as well as standing in parallel. Notice whether you feel more stable and aligned, and whether the plié will effortlessly go deeper.
- Next, practice balancing on balls in second position (see figure b). This position is more challenging and requires more strength in your legs. The balls should not be too widely placed, lest they roll out to the sides.
- Perform several pliés until you tire. These pliés can be done in a centered position or also with torso rotations (figure c).
- Finally, stand on the balls in third position (figure d). For this part, you need to position the balls one in front of the other.
Advanced conditioning for the abdominal muscles
The upper abdominal twist emphasizes strengthening the rectus abdominis and the obliques. It also activates the intercostal (between the ribs) muscles that are actually the continuation into the rib cage of the line of pull of the obliques.
Abdominal Twist and Wave Support
The upper abdominal twist emphasizes strengthening the rectus abdominis and the obliques. It also activates the intercostal (between the ribs) muscles that are actually the continuation into the rib cage of the line of pull of the obliques. This exercise may make traditional crunches seem effortless. It is another example of advanced conditioning for the abdominal muscles, and you should not perform it if you have a back problem. For a reduced level of resistance, perform the exercise without the resistance of the band.
- Attach a band to a fixed object about 10 inches (25.4 cm) off the ground. Lie supine, facing away from the attachment of the band.
- Hold a loop of band around each hand, and place your hands next to your head. Alternatively you can position your hands behind your head to create a cradling support. The knees form a 90-degree angle.
- Lift your head off the floor, one vertebra after another, keeping your hands next to your head. The back rim of your pelvis remains on the ground (figure a).
- Twist your upper body to the right and then to the left (figure b). Return to center.
- Visualize the sliding of the rectus and oblique abdominal filaments.
- Focus on lengthening the spinal muscles as you roll up. Imagine that they could provide the power to lift you.
- Roll back down to the floor, vertebra after vertebra, and repeat the movement as soon as your head touches the floor.
- Think of being supported by water, as if you were made of cork. Imagine the water pushing you up, and back and forth, as you twist (figure c).
- To increase the effect on the obliques, drop your legs toward the opposite direction of your torso.
Strengthening pectoral muscles
By reversing the movement in the preceding exercise, you will strengthen the pectoral muscles and release tension between the shoulder blades.
Inward Push
By reversing the movement in the preceding exercise, you will strengthen the pectoral muscles and release tension between the shoulder blades. The inward push engages the muscles that stabilize the shoulder joint and the abdominal muscles to create a sense of knitting at the front of the pelvis. The exercise also strengthens the musculature that moves the wrist and fingers.
- Sit with your torso upright and your legs stretched out in front of you at an angle of approximately 90 degrees. Place your hands such that your palms are facing the outside of the band. Spread the band so that it covers the whole palm of the hand, and position the arms at a downward angle with the elbows slightly bent (figure a).
- Move your hands toward each other to push the band toward the midline of the body (figure b).
- Move your arms back out. Take 3 counts to move them out and 1 count to move them in.
- Feel the psoas major muscle lengthening downward to create a sense of grounding while releasing the spine into length (figure c).
- As you move your hands toward the midline, imagine the transversus abdominis knitting together in the navel area. You can visualize the transversus abdominis as a rope or stack of ropes being tied firmly at the front of your body. Notice how this image creates a sense of width in the lower back.
- As with exercise 9.11, you can enhance this exercise by circling your feet while moving your arms in and out.
Related Books


