
- Home
- Fitness and Health
- Sports and Activities
- Physical Education
- Effective Physical Education Content and Instruction

Effective Physical Education Content and Instruction
An Evidence-Based and Teacher-Tested Approach
by Phillip Ward and Harry Lehwald
552 Pages
As a physical educator (or student preparing to become one), you need to know more than the skills, techniques, and tactics of the sports and activities you teach. You need to understand, among other things, how to create task progressions, how to organize and adapt those tasks, and how to detect and correct student errors. Effective Physical Education Content and Instruction will help you learn how to do just that.
Theoretical Framework and Evidence-Based Plans
This text provides a theoretical framework to work from and gives you ready-to-use, teacher-tested content that is evidence based. Sample block plans are designed to help students of differing ability levels engage in skillful play. You'll be able to draw from teaching progressions that are game-like, developmental, and sequential in nature.
Effective Physical Education Content and Instruction offers the following:
• Sequential units with block plans
• Ready-to-use instructional tasks and warm-ups
• Teaching cues
• Explanations of common errors, their causes, and how to correct them
• Content maps for each unit
• A web resource that houses enlarged versions of the content maps, along with sample student awards and fair play guidelines
The content maps provide a roadmap for success in the attainment of goals and outcomes. The cues in the text, which assist in the detection and correction of student errors, act as an additional aid to help students achieve success.
Content Proven to Be Highly Effective
The approach and content in Effective Physical Education Content and Instruction have been proven to increase student learning as compared to other approaches. In fact, in one of the largest-ever intervention studies on teaching effectiveness in physical education, teachers who were taught to use this approach and content significantly improved the quality of their teaching and produced some of the highest learning gains for students reported in the physical education literature.
Book Organization
The book is organized into three parts. Part I lays the groundwork for successful teaching—undestanding and acquiring content knowledge, then conceptualizing and organizing that content for teaching. Part II explores the keys to teaching fundamental skills—understanding early elementary locomotion, and teaching elementary gymnastic skills. Part III consists of specific sport units for elementary, middle, and high school students, with each chapter providing the following:
• An explanation of the approach
• Maps that define the content and its interrelationship
• Block plans, warm-ups, and lesson organization
• A series of instructional tasks, which include the following: the purpose of the instructional task; equipment needed for instruction; a description of the instructional task; teaching cues; common errors, their causes, and how to correct them; and diagrams, as applicable.
Based on Extensive Research
Effective Physical Education Content and Instruction is based on decade-long research conducted by Phillip Ward. It has been deveeloped in collaboration with a team of master teachers who know the content and how to teach it. The result of their work is a rock-solid theoretical framework that offers practical applications, developmental progressions from beginner to advanced, and scheduling options. By using a framework that is proven to be effective (as evidenced by research), you can focus on tailoring the instructional plan to your students so they can acquire the sport skills they need, enjoy their participation in physical education, and make the most of their time in your class.
Part I: Preparing for Successful Teaching
Chapter 1: Understanding and Acquiring Content Knowledge
Phillip Ward
Chapter 2: Conceptualizing Content for Teaching
Phillip Ward, Harry Lehwald, and Yun Soo Lee
Chapter 3: Organizing Content for Teaching
Phillip Ward
Part II: Teaching Fundamental Skills
Chapter 4: Early Elementary Locomotion
Bobbie Siedentop and Phillip Ward
Chapter 5: Elementary Gymnastics
Phillip Ward and Chris Bell
Part III: Teaching Sport Skills
Chapter 6: Soccer
Adrian Turner and Phillip Ward
Chapter 7: Flag Football
Harry Lehwald and Kevin Lorson
Chapter 8: Basketball
Harry Lehwald and Jim Ressler
Chapter 9: Volleyball
Harry Lehwald and Debra Sazama
Chapter 10: Badminton
Insook Kim and Harry Lehwald
Chapter 11: Tennis
Shiri Ayvazo and Phillip Ward
Chapter 12: Softball
Ali Brian and Harry Lehwald
Dr. Phillip Ward is a professor of physical education teacher education in the department of human sciences at The Ohio State University. Dr. Ward is passionate about physical education and teacher education. He is director of the Learning to Teach Physical Education Research Program, which develops pedagogical content knowledge for teaching physical education. Dr. Ward has authored or coauthored more than 100 research papers and book chapters and has presented over 150 papers at international, national, and state conferences. He has served as an invited lecturer at 22 universities worldwide, including Belgium, China, Israel, and Japan, as well as at 16 international conferences. In 2014, he received the SHAPE America Curriculum and Instruction Honor Award. In 2015, he received the American Educational Research Association (AERA) Research on Learning and Instruction in Physical Education Outstanding Scholar Award. He is a fellow of the National Academy of Kinesiology and a research fellow of SHAPE America.
Dr. Harry Lehwald is a senior lecturer of physical education in the department of human sciences at The Ohio State University. He and the other faculty at The Ohio State University were awarded the 2014 Physical Education Teacher Education Honor Award from the National Association for Sport and Physical Education (NASPE). In addition to his teaching, he has provided in-service teacher training and presented workshops and research on the topic of content knowledge at state and national conferences, as well as in Russia. He is a member of the Learning to Teach Physical Education Research Program at The Ohio State University. He has also coauthored several articles dealing with content knowledge and pedagogical content knowledge. He served on South Carolina's elementary physical education assessment writing team. Prior to his time in higher education, he taught and coached in public schools for 11 years and coached track and field and cross country at the collegiate level for 13 years, winning two Coach of the Year awards.
Basketball
Basketball is the second most popular sport in the world, and it is played in more than 200 countries. In the United States, the home of basketball, it is a staple of many physical education programs in elementary, middle, and high schools.
Basketball is the second most popular sport in the world, and it is played in more than 200 countries. In the United States, the home of basketball, it is a staple of many physical education programs in elementary, middle, and high schools. It is also becoming more popular in the physical education curricula in other countries. Research conducted in the United States shows that basketball is among the top four activities (after camping, swimming, and biking) that nonparticipants in physical activity aged 6 to 12 years would like to learn (Physical Activity Council, 2016). Although basketball is common in the U.S. school curriculum, research shows that it is one of the least-liked sports among U.S. students aged 5 to 17 years (Bailey, Hillman, Arent, & Petipas, 2013; Rikard & Baneville, 2006). What is the reason for this seeming contradiction? We propose that students dislike basketball in physical education because it is often taught in ways that do not help them develop skillfulness and game sense. Failure to develop these aspects hinders children from pursuing basketball and enjoying the game. We have designed this chapter to ensure that skillfulness and game sense are progressively taught and that the organization and use of pedagogies ensure that students have frequent opportunities to learn in every lesson.
Our Pedagogical Approach to Basketball
Basketball is a small-sided court invasion game. Instruction in the elementary and secondary units focuses on developing skillful performance and game sense through tasks and instructional sequences that teach basketball skills and quickly using these skills in modified games.
Developing skillful performance involves the basic offensive techniques of shooting, passing, and dribbling. Because dribbling is challenging, we focus on passing and shooting performance with beginners and introduce dribbling in tasks and during the warm-up. Once students develop dribbling skills, these are incorporated into the tasks and game play as part of the triple-threat (pass, dribble, or shoot) decision-making process.
We begin with person-to-person defensive principles. We do not add zone defense until late in the learning sequence, because effective zones are founded on person-to-person principles.
We use modified games that emphasize passing in level 1, 3v3 half-court games in level 2, and 4v4 full-court games in level 3. We use overload games (e.g., 2v1, 3v2) to develop game sense because they can be used to emphasize specific elements such as dribbling and shooting in game-like conditions. Overload games increase student engagement and allow for greater student success as they apply the learned techniques. We use the PAC progression when adding defensive pressure. See chapter 7 for a detailed description of the PAC progression.
Modifications to Address Individual Needs of Students
For students with disabilities, appropriate modifications depend on the nature of the disability. To modify basketball instruction for students with visual impairments, you can (a) use brightly colored basketballs (e.g., bright orange or yellow), (b) use brightly colored floor tape to mark off boundaries, or (c) use tactile modeling when demonstrating the proper form for various basketball skills.
For students with autism spectrum disorder, set up groups that practice in quieter or less chaotic areas of the gymnasium. You can also present materials using the students' desired communication methods (e.g., using picture symbols).
For students who use wheelchairs, adopt rules from wheelchair basketball. Rather than holding students to the same dribbling technicalities, introduce and enforce wheelchair basketball dribbling rules (e.g., students are not allowed to take more than two consecutive pushes without bouncing a ball).
For individuals with cerebral palsy, you may need to limit the speed at which students move between locations. To accommodate this, consider decreasing the playing area (e.g., playing half-court) and teaching zone defense so each student defends only a small area within the court.
Organization
A full-sided basketball game is 5v5. We question the appropriateness of 5v5 in a physical education setting relative to teaching beginners. The development of game sense in basketball is based on three general game tactics: on-the-ball play, off-the-ball play, and opposite-the-ball play. When these are taught to beginners in a 5v5 setting, the fifth student (and to a lesser extent the fourth student) congests the midcourt and limits students' abilities to apply the techniques and tactics being learned. As such, we advocate the use of a 3v3 team structure with beginners to develop the skillful play and game sense needed for basketball. We don't recommended adding the fourth student until students can somewhat successfully apply the elements of skillful play and game sense they have learned. We do not recommend that you use a 5v5 game in a typical physical education setting.
Space
We recommend that you have one basketball court and at least 4 to 6 baskets. At the elementary level, when equipment might be limited, we suggest detachable baskets with suction cups or targets that are attached to the wall (students strike the targets with the ball). If fixed baskets are available, they should be adjustable down to 6 or 8 feet (1.8 to 2.4 meters) for elementary and middle school students. Adjustable goals are also preferred at the high school level, but this is not mandatory. The court space should be large enough to be divided into home areas for groups of 4 to 8 students, and you should have enough goals to accommodate each group of students. If you use an outdoor space, a wall is helpful for some tasks.
Equipment Needed
Having a variety of basketballs sizes (e.g., 4, 5, 6) is important at the elementary level regardless of skill level. Balls must be scaled to the students' hands. At the middle and high school levels, basketball sizes 6 (intermediate) and 7 (official) need to be available. You should have enough balls for each student.
Content Map Structure
Figure 8.1 is a combined content map that illustrates the flow and connectedness of all the tasks used to develop skillful play and game sense in basketball. It is divided into three levels, and each level has a separate content map that includes the application games used to refine the elements of skillful play and game sense at that level. Although dribbling is introduced in level 1 (figure 8.2), the primary focus is on passing and shooting, and it ends with an application game that combines those two techniques. At level 2 (figure 8.3), dribbling, defense, and individual offensive tactics are added, and the end game is a 3v3 game. At level 3 (figure 8.4), offensive and defensive tactics are stressed; this level ends in a 4v4 game.
In the content maps, we have numbered the tasks. These numbers are used to cross reference tasks descriptions in the body of the chapter with the content maps. The task numbers should not be interpreted as the order in which they should be taught. It is important that tasks are taught and progressed from simpler to more complex forms which is shown in the upward progress of the task sequence on the content map. This is particularly necessary before tasks are combined. For instance in basketball whether you teach shooting first or dribbling, the progressions of both need to be taught before they are combined in task 19.

Combined content map for basketball.
Level 1 content map for basketball.
Level 2 content map for basketball.
Level 3 content map for basketball.
Structure of the Lessons
The following is a sample daily lesson structure for a 50-minute elementary basketball lesson.
- Warm-up (5 to 6 minutes)
- Application game: end line passing game (5 to 6 minutes)
- Informing task: 2v1 passing (5 minutes)
- Extension task: 2v1 passing from the other side (4 minutes)
- Extension task: PAC defense applied to the 2v1 passing task (5 minutes)
- Informing task: individual dribbling (5 minutes)
- Extension task: nondominant side dribbling (4 minutes)
- Application game: mat basketball with shooting game (10 minutes)
- Closure (3 to 5 minutes)
Warm-up
Elementary School
The warm-up should be taught to students on the first or second day of the unit. If a technique used in the warm-up has not been taught, it should not be included in the warm-up circuit until the day after you teach it. Passing, dribbling, and shooting are the initial techniques used in the warm-up. In the first lesson, passing and wall shots are introduced; therefore, you can include passing and shooting practice in the warm-up for lesson 2. Lesson 2 introduces individual dribbling, so you can include that technique in the warm-up for lesson 3. Each day you can add new techniques, such as step back shots for wall shots (see the five-day block plan), or you can stick with the same warm-up.
For the passing task, pairs of students stand 8 to 10 feet (2.4 to 3 meters) apart and pass the ball back and forth using the techniques that have been taught. For the shooting task, students begin with wall shots and move to step-back shots with a partner after a couple of days. For the dribbling task, students dribble in a stationary position using the dominant and nondominant hands. After a couple days, students can add movement to the dribbling if their skills have progressed appropriately. The warm-up time should allow for multiple trials. Once students have learned the warm-up, it should not last more than 5 to 6 minutes.
How you organize your students for the warm-up will depend on the decisions you make about the organization of the class.If you use a circuit, divide the class into three groups and include the appropriate equipment at each of the three stations (see figure 8.5). The passing and shooting stations require basketballs for each pair of students, and the dribbling station requires a ball for each student. Students should begin each day in the same area and rotate through the stations. The tasks can be done in any order. Provide instructions for what students should do once they have completed all the stations. If you decide to have the whole class do the warm-up activities together, you need to have enough baskets to accommodate the entire class with no more than 8 students at a basket. You can add stick-on baskets to the walls if needed. We recommend that the warm-up not last more than 5-6 minutes once it has been learned.
Sample elementary school warm-up circuit for basketball.
Secondary School
Teach the warm-up in lessons 2 through 4; once students know the warm-up, it should take 4 to 5 minutes. Students work in pairs. In the first task, students alternate between open-space and close-control dribbling in the court space. Each pair has a ball, and one student assumes the role of offense and the other assumes the role of defense. The defensive student moves along with the offensive student and provides active defense as the offensive student dribbles under control. Students switch roles after each trial. In the next task, students practice left- and right-handed layups; one student shoots and the other student rebounds. After rebounding, the rebounder moves to the shooting line and the shooter moves to the rebounding line. After a determined number of right-handed layups, have students attempt left-handed layups. In the last task, students practice open shooting and attempt shots they would take in a game situation. If a student makes a shot, the partner returns the ball and the student continues shooting until a shot is missed or a set number of shots have been attempted; then, the partner becomes the shooter.
This warm-up can be done with stations or in teams. If you use stations, divide the class into three groups and have each group spend about 90 seconds at each station. The lay-ups should be done at one end basket, the open shooting at the opposite end basket with the open- and closed-space dribbling occurring in the middle of the court (see figure 8.6). If the warm-up is done in teams, have groups of 6 to 8 students complete each part of the warm-up in the home area. This requires one basket for each group. Provide students with instructions for what they should do once they finish the warm-up (e.g., put balls away, ball rake, sit down in an assigned space, line up, repeat tasks).
Sample secondary school warm-up circuit for basketball stations.
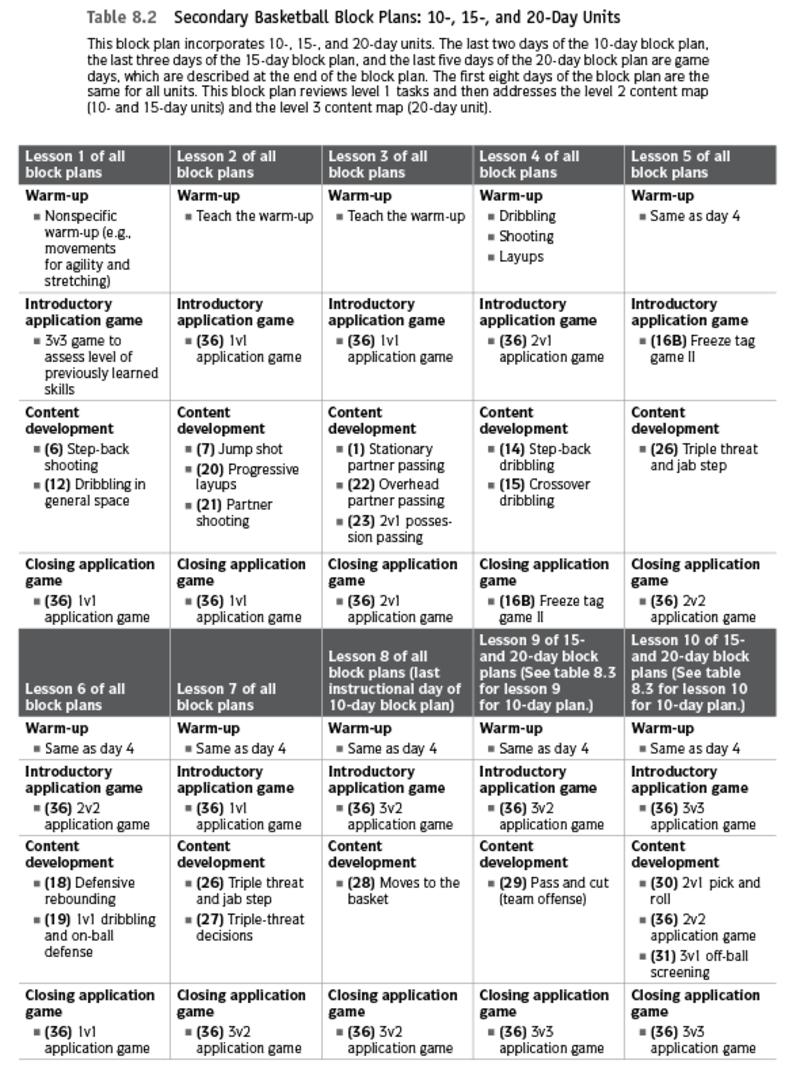
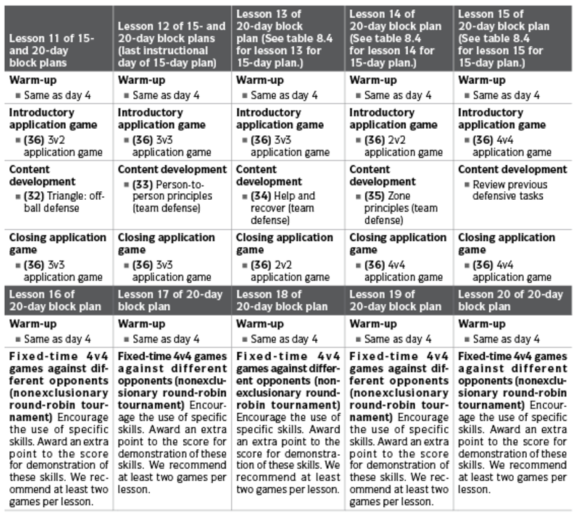
Block Plan
The introductory block plan is designed for beginners. In elementary school, this should not be introduced earlier than fourth grade. This allows students to refine their basic ball-handling techniques in other activities prior to facing the challenges of manipulating a basketball. Although longer units are always preferred, we recognize that there are time limitations at the elementary level; therefore, the elementary unit is five days for the initial grade in which it is taught.
The secondary block plan follows the elementary block plan and is designed for students in middle school and high school. It assumes that students were taught the basic basketball techniques at the elementary level. If this is not the case, follow the introductory block plan. Because middle and high school physical education programs have different requirements, these units should not be taught in fewer than 10 days. These units are adjusted for 10-, 15-, and 20-day programs, although we recommend units of 20 or more days.


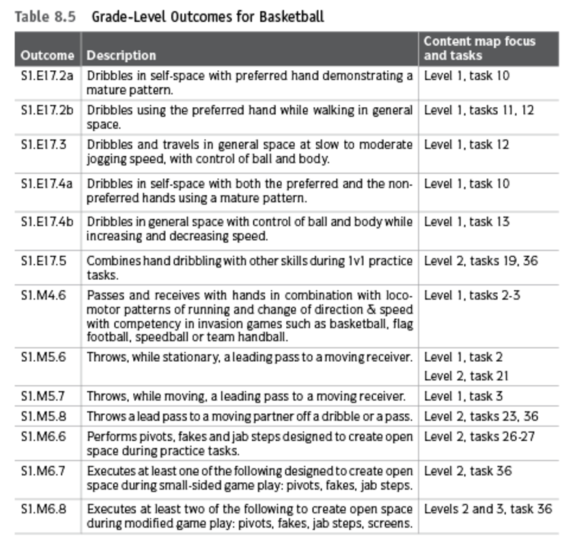
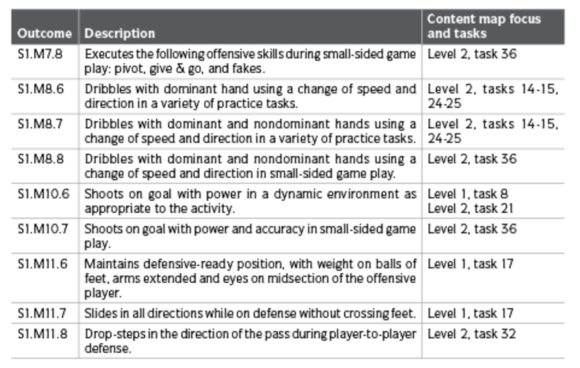
SHAPE America's Grade-Level Outcomes for K-12 Physical Education
In table 8.5, we identify key grade-level outcomes for basketball for 2nd through 8th grade.These are linked to specific tasks on the content maps that are appropriate for teaching the skill and assessing the outcome.
Learn more about Effective Physical Education Content and Instruction With Web Resource.
Organizing Content for Teaching
One of the truisms in teaching is that you must understand what you teach. Your deep understanding of content leads to deeper content learning by students (Ward, 2013; Ward, Ayvazo, & Lehwald, 2014).
One of the truisms in teaching is that you must understand what you teach. Your deep understanding of content leads to deeper content learning by students (Ward, 2013; Ward, Ayvazo, & Lehwald, 2014). In addition, the quality of the tasks is critical, because students acquire better knowledge and perform better if you use high-quality tasks. Your capacity to improve student learning is grounded in the professional knowledge that informs PCK. As discussed in chapter 1, PCK is influenced by your knowledge of students, the curriculum, the context in which you teach, the pedagogical strategies you use, and the content you teach.
What does it mean to know content deeply? In the following two examples, much of the teachers' decision-making and many of their instructional behaviors, content representations, and task selections depend on the extent of their SCK. In chapter 2, we argued that SCK is meaningful, relational, and progressive.Itis reflective of deeper content knowledge. When you compare the following two examples, you will see that the second teacher shows a deeper and more explicit knowledge of basketball.
Consider a simple 4v1 keep-away basketball game. The first teacher introduces the game with a demonstration and an explanation. There is an off-the-ball focus of moving away from the defender to receive a pass, and there is a rule that the ball carrier must pass to the open players. The defensive rule is that the ball can be intercepted, but there cannot be any physical contact between players. Students are sent to practice in groups. During the practice, the teacher provides feedback to students. Once the task is completed, the teacher moves the students to the more difficult 3v1 keep-away game.
The second teacher also provides an explanation and demonstration of the 4v1 keep-away game. The focus is the same as in the previous example. However, this teacher begins by requiring the defender to walk and not intercept the ball; this gives students learning the offense time to make decisions relative to the defender (i.e., a passive defense). The teacher prompts students to get open. Next, the teacher asks the defender to move more quickly and indicates that no interceptions are allowed (i.e., an active defense). As the practice progresses, the defender can intercept the ball (i.e., a competitive defense). The teacher pauses game play to emphasize moving deep or wide or to refine the technique. The advantages of this process include the following:
- Small progressive incremental changes allow for student understanding, refinement, and extension.
- Keeping the same instructional format as new concepts are introduced allowing students to build on the original task, which builds competence.
- The creation of high numbers of repetitions that occur as task complexity or difficulty increase, without major changes to the pedagogical conditions of game.
The teacher in the second example uses extension and applying tasks, and the task progression is more incremental and systematic than in the first example. As these two examples show, teaching a skill demands in-depth and detailed knowledge that goes beyond the critical elements and the ability to demonstrate the skill. You must have extensive SCK (Ayvazo & Ward, 2011; Ward, 2009), including knowledge of errors that students could make in performing the task and knowledge of the instructional representations and tasks. The deeper your knowledge, the more choices you will have in adapting instruction for students (Ayvazo & Ward, 2011; Griffey & Housner, 2007; Ward, 2013).
Defining the Scope of Content Knowledge in K-12 Teaching
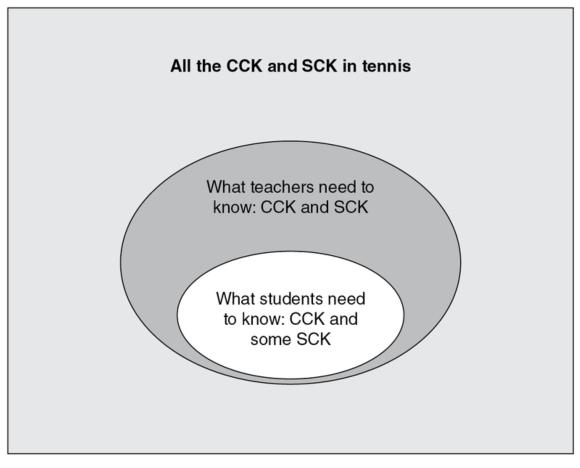
Deep understanding of content does not mean you must know everything about a sport or activity to teach it. Figure 3.1 illustrates the broad scope of knowledge for tennis. The large box represents all that is known about tennis. The smaller circle represents the tennis knowledge students in K-12 settings need. It includes CCK such as rules of the game, safety rules, techniques, and tactics. If you are using an instructional strategy in which one student is teaching another (e.g., peer tutoring), students will also need the SCK required to provide feedback. The larger circle represents what you need to know: the SCK for teaching the CCK in the small circle and the SCK required for adaptations for students with disabilities or more skilled students.
The scope of K-12 content knowledge in tennis.
Principles Behind Our Approach
This book is based on several principles for teaching physical education that are derived from our research and practice over the past 30 years. Here we list these principles and discuss how they influence the contents of the book.
- Teachers are decision makers. You should neither blindly follow a plan nor teach without one; rather, you should adapt instruction from an existing plan that you create or that comes from another source. If you have to create plans for content you know little about, you are likely to experience frustration in your teaching. In addition, student learning will suffer. In this book, we provide models for teaching content. Contexts and students differ, however, so we expect you to adapt these models as needed. It is our firm belief that it is better to operate from a good plan that needs to be adapted than to create a weak plan that is ineffective.
- Experts teach content differently from nonexperts.If you are learning to teach content as a nonexpert, you will probably learn differently than an expert because you have less SCK and less experience teaching this content. The models in this book were not created for experts. They allow teachers who do not know the content well to teach their students successfully and learn from that teachingas they develop increasingly better PCK.
- In middle school and high school, longer instructional units are preferred over shorter ones because longer instructional units allow more time for skillful performance to be developed, deeper understanding of the game, and for game sense to be developed.Longer instructional units serve students better if they are organized around meaningful, relational, and progressivecontent. There are many arguments for teaching short units in the multiactivity curriculum format. Two common ones are that short units maintain student interest by providing variety and that some students might not like a particular sport but do like another. Students get bored with the typical instruction in most schools (i.e., short units, limited skill development, little development of game sense) because the tasks used in these short units are not meaningful, relational, or progressive.Our goal in this book is to change that to create more engaging units.
Similarly, the argument that students will like one sport over another is misleading. A much better indicator of student enjoyment in physical education is not the sport or activity being taught but rather the way it is taught. In our own teaching experiences, training of preservice teachers, and work with in-service teachers, we have consistently found that content that is meaningful, relational, and progressiveengages students and creates learning and enjoyment.
- In elementary school, instructional units should be related to each other in ways that cumulatively build content. Elementary school teachers have fewer lessons per year than their secondary school counterparts; therefore, we present elementary school instructional units as 5-7 lesson blocks. Our assumption is that many skills transfer across units, such as the ready position (e.g., basketball, volleyball, football), the concept of having fast feet to move into a position to receive the ball (e.g., tennis, volleyball, badminton, softball, baseball), calling for the ball, person-to-person defense, and moving (invasion games). Elementary instruction units should be sequenced to develop complexity and refinement of movements introduced in previous units and to extend and refine movements in later units.
- Small-sided games rather than full-sided games should be taught first in physical education. The question of whether a full-sided game (or a doubles game in a racket sport) should be played is a function of the time it takes to teach students to play the game. In this book, the end goal is to play full-sided games, but to get there you must progress from small-sided games to ensure that students have the skills and the game sense to be successful. The modified games we provide represent the main features of full-sided games. If longer instructional units are used, students in middle school and high school might be able to progress toward full-sided games.
- Skillful performance in sports is a function of technique and game sense. We use the term technique to describe the critical elements of the performance of a movement such as how to hold a bat in softball, assume the starting position, swing, and follow through. The term game sense refers to"the ability to use an understanding of the rules, tactics, strategy and of oneself (and of one's teammates) to overcome the problems posed by the sport or by one's opponents" (Launder & Piltz, 2013, p. 16). Game sense is represented by what players do in the game to demonstrate their understanding, such as reading the play and making decisions. When players apply the rules in the game, they are demonstrating game sense. Technique development and game sense are highly interdependent. This interdependence has been described by Launder and Piltz (2013, p. 59) as "what is tactically desirable must be technically possible." In short, if the goal is to play the game, then technique and games sense must be developed synchronously.
Develop Working Technique
In her article "It's OK to Be a Beginner," Rink (2004) observed that being good or not good at motor skills is not a permanent condition for children and youth. That is why we have teachers. The variety of abilities found in physical education classes means that at any given time, students are at different places in their learning of motor skills, knowledge, and understanding and use of affective skills. Rink's point is that your goal is to move all students forward, and it is important for students to understand that they will get better with practice. Given that students arrive in class at different places in their learning, Launder and Piltz (2013) have suggested the need to develop a working technique. Using a working technique, a student moves from A to B, in which A represents the student's current level and B is where you would like the student to be at the end of instruction. The student should travel the most effective and efficient road between these two points. In this example, the road represents technique. Even beginners should have a working technique that places them on the road to improved learning.
In the Working Technique in Volleyball sidebar, Dr. Dena Deglau, a professor of physical education and an expert volleyball teacher, describes the development of a working technique.
Dr. Deglau clearly has deep content knowledge of volleyball. Her example highlights the developmental nature of working technique. Our point is that teachers must determine what are the essential elements of a working technique that they want to develop as they teach their students. A teacher's understanding of a working technique and their expectations for students will likely change over time as they reflect and tinker with their instruction.
Working Technique in Volleyball: Example of Development
Beginners
To begin to understand how the game is played, young children need to learn how angles affect where the ball will go. They will have some experience with this from the use of paddles and racquets in other activities. However, the force production demands are different in volleyball than in racquet sports. In racquet sports students learn that more force is generated by swinging the paddle faster. In volleyball, students must not think of their arms as having this function. In volleyball, students must learn that force production is generated differently.
Students will often exclusively focus on the forearm pass as beginners, which is the most used skill in the game.
- Students will move and receive the ball in the center of their body at thigh height (young children can move and let the ball bounce between their legs and then move and catch).
- Student should learn to change the degree of bend at the waist and recognize how this affects the trajectory of the ball regardless of what they do with their arms. Students learn to place their arms forward and locked as they try to forearm pass in ready position, then straightening the torso a little. They will learn that this is required if you are bumping repeatedly to yourself and that in a game, the closer you are to the net, the straighter your torso should be.
- Students should learn that force production occurs from the legs and not from swinging their arms.
Beyond the Initial Performance of the Forearm Pass
To approximate the game, students at this level would build from the forearm pass to understand the spatial relationship of the ball relative to body position and target. Here students must understand the three performance characteristics that afford or constrain one's ability to play a modified game
- Move and receive a high ball in front of the forehead. Most students cannot position their bodies appropriately in relation to the ball, and thus the set or volley looks like a throw or hit off the hands. They contact the ball behind or on top of the head, and this constrains the ability to correctly volley the ball.
- Move and volley the ball to someone in front of you. This is truly a volley. Students receive the ball in front of them, and then volley it to someone in front of them. This would lead to continuous passing back and forth with a partner.
- Move and set a ball in a different direction. For example, if a free ball comes over the net to team A, the back-row person would volley or bump the ball to the setter. The setter is standing sideways at the net and must move behind and around the ball to set it to the hitter. Students can't execute a set in the game because they can't move sideways from the net and position themselves correctly to pass to a hitter. If the setter faces the teammates while waiting for the pass to the front row instead of standing sideways, the task of moving around the ball to face the hitter is even more difficult.
I intentionally make a distinction between volleying and setting. The difference is the orientation of the body to the ball and the target. Volleying occurs when the ball is coming directly at you and you are passing directly back (continuous passing back and forth). Setting occurs when the ball is coming at you from the side and you must set in front of you (setter to hitter).
Thisunderstanding extends to the hitter who will set the ball over the net instead of hitting or tipping it over in grade 6. The ball is coming from the setter, so the person getting the ball over the net must see the ball coming from the side, move around and behind the pass, and then set it forward over the net.
More Advanced Performance of the Forearm Pass
At this level of performance students need to understand the spatial relationship of the ball with the body, the target, and the net (height above and distance from). This allows the hitter to learn how to do more than set or bump the ball over the net. Students will also need to develop the ability to execute the cycle of the game. Here students must learn and understand the three new performance characteristics that afford or constrain one's ability to play in a game.
- Students who understand how to tip a ball relative to the height and distance from the net can jump and catch a ball above the forehead. This develops the timing of the jump for the spike. Students need to understand how their movement must be adapted to account for differing sets. Often they are forced to bump the ball over instead of setting or tipping because their movement is too slow relative to the set.
- To learn to play the game, students must inherently learn how to move from the passing position to hitting, setting, or defensive positions. These patterns need to be built into tasks.
Implement a Sport Education Curriculum
We used the term meaningful in chapter 2 to refer to instruction that is connected to students' past learning experiences and knowledge and the real-world context of the activity. The focus is on developing skillfulness in the students so that they can perform modified versions of the activity that are consistent with how it is performed in the real world while valuing and enjoying the movement experience. Though there are many ways to achieve this, we think one of the best is the use of the sport education curriculum and instructional model (Siedentop, Hastie, & van der Mars, 2011) in combination with content knowledge. You do not have to use the sport education model with the content in this book, but we recommend it.
Sport education has several pedagogical features that allow you to present content in meaningful ways. In this section, we discuss the key features of sport education. A more complete description of sport education can be found in the Complete Guide to Sport Education by Siedentop, Hastie, and van der Mars (2011).
Seasons
Creating seasons provide a similar structure to that used in sports. There is often a practice season followed by a competition season. In our secondary block plans, we provide 5-, 10-, 15-, and 20-day plans. Three-quarters of the unit is typically the practice season, and simple games take place each day. The tournament season lasts 2 to 5 days, and the primary focus is competition. Several games are played each day against different opponents.
Team Affiliation
Sport education assumes that you will make every effort to create mixed-ability teams, because this is the most equitable strategy to ensure that students perceive the game play as fair. Affiliation is created in sport education by placing students in the same teams for the duration of a unit and providing a team identity (e.g., team colors, team name, team cheer, home field or court, team mascot). We recommend that teams be named after college or professional sports teams, depending on the sport. Teams can adopt the colors, icons, or cheers of these teams (e.g., "Go Bucks" is an Ohio State cheer).
Lesson Management
A central feature of sport education is that students share in the management of and responsibility for the lesson because each person has a role. There are many possible roles to be filled. With groups of four (either one team of four students or two teams of two for racquet sports), we have used the roles of captain, trainer, equipment manager, and statistician. Descriptions of these roles can be found in the Common Team Roles in Sport Education sidebar. To introduce these roles, you must explain the tasks that a student will do in each role. We typically introduce the roles at the beginning of the unit and leave students in the same roles for the duration. If we have additional students, we create new roles or co-roles.
Common Team Roles in Sport Education
Team Roster
- Captain
- Captain's assistant
- Equipment manager
- Trainer
- Statistician
Roles
Captain
- Start the game (rock, paper, scissors).
- Act as a referee during game play.
- Call wall (a defensive strategy) for the team.
- Keep the team on task.
- Line up the team to shake hands at the end of the game.
Captain's assistant
- Hand out and turn in team quizzes.
- Hand out and collect pedometers.
Equipment manager
- Keep equipment neat and organized.
- Set up equipment when needed.
- Return equipment to the proper location at the end of class.
Trainer
- Lead the warm-up activity.
- Keep the team on task during the warm-up.
- Encourage teammates to accumulate pedometer steps.
Statistician
- Record fair play points.
- Record pedometer steps.
- Record game points.
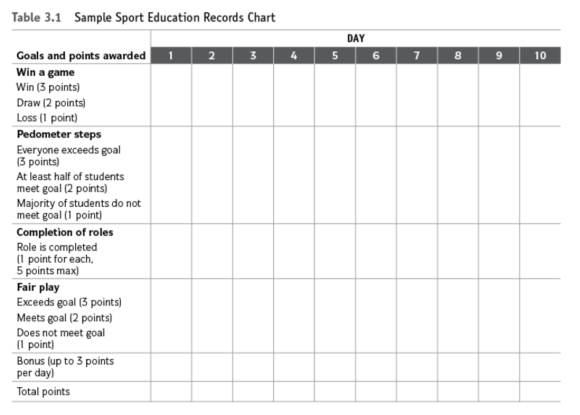
Records
Records are kept in sport education. We find that the easiest method is to use a team chart (see table 3.1). On this chart we record wins and losses, pedometer steps (a goal is set each day),completion of daily roles, fair play (see the web resource for a printable fair play form), and bonus points for good behavior (e.g., extra effort in performance, starting quickly after warm-up, the entire team starting the warm-up on time, excellence performance).
Fair play guidelines are as follows:
- Be respectful to yourself, other players, officials, and equipment.
- Know and play by the rules.
- Practice self-control prior to, during, and after class.
- Give full effort, and appreciate others' efforts.
- Smile and have fun.
You assign the points. The statistician is responsible for recording the points each day at the end of class. These points can be accrued during the unit and totaled at the end to identify the teams with best win-loss and fair play records and to allow the teams to play for a championship on the final day of the unit (see next section).
Culminating Event
The last day of the unit is reserved for a culminating event. Such an event can take many forms, but we typically have pairs of teams (ranked by win-loss records) play championship games. Then we have an awards ceremony in which the teams march onto the field and line up. We award teams and individuals based on specific categories. Some examples of these awards are provided in the web resource. You can print and use these awards or adapt them to suit your needs.
Pedagogical Features in Knowledge Packets
Our goal is to provide you with an organizational framework that will allow you to not only understand the content but also to make instructional decisions about the content as you select and use it in your teaching practice. Central to this goal is understanding why we have not provided specific lesson plans in this book (other than our examples of lesson plan organization and block plans). One of the great contributions of the late Alan Launder (Launder & Piltz, 2013) was his insistence that physical education teachers need to observe student performance relative to the assigned task and then introduce the next task that will further develop student performance. Although you need a plan to guide you, the overall goal you are trying to accomplish (e.g., skillfully playing a 4v4 game) and knowing the steps (i.e., the instructional tasks and the sequencing of tasks toward the major goals) are a critical element of teaching. You must observe the performances and make the best decision on the basis of your knowledge and what you see as the performance needs of your students. This book provides you with the knowledge about the big picture in terms of the content to be taught. Knowing all of the content to be taught allows the teacher to make informed instructional decisions about which content to use in particular learning contexts. We organized chapters 4 through 12 as knowledge packets (Ward et al., 2014) that present what (i.e., the big picture) you need to know to teach the content (as shown in figure 3.1 earlier in the chapter).
Each chapter begins with a description of the pedagogical approachwe recommend for teaching the content. Subsections discuss task modifications to address the needs of students with disabilities, organization of students for instruction, and space and equipment needs.
Next, we provide content maps. These provide an overview of the instructional tasks and the relationship among them and a broad recommendation about when content might be introduced in the K-12 curriculum. With this information, you can decide where your students are in their performances and then select instructional tasks to advance them. There is a combined content map that illustrates the flow of the tasks used to develop sport-specific techniques and tactics starting with beginners and ending with advanced players (in school settings). The combined content maps for chapters 6 through 12 are divided into three levels, and each level has its own separate content map that includes the application games (outline of box is dashed) used to refine the techniques and tactics in that level (outline of box is solid).
Then we provide our recommendations for lesson structure based on the content. An important feature of our lesson structure is a belief, common to many games pedagogies, thatstudents should play games that teach them to use what they have learned in past lessons at the start of the current lesson and to use what they have learned in the current lesson at the end of the lessons. We call these application games.Many of our instructional tasks are presented as games (e.g., overload games in invasion sports, target games in volleyball and badminton) to emphasize a particular outcome. However, application games allow new techniques and game sense elements to be added to previous outcomes to strengthen student performance. Application games are important pedagogical tools that allow you to determine the performance of the students; as such, they can drive the selection of instructional tasks to meet the needs of students. The lesson plan organization examples include sample warm-up activities that have been used for elementary and secondary classes.
In chapters 4 and 5 we provide sample 5- and 7-day block plans, and in chapters 6 through 12 we provide 5-, 10-, 15-, and 20-day block plans for each content area. These block plans are organized according to the lesson format we just described and provide examples of the content that could be used depending on the duration of the unit and the experiences and abilities of the students.
Next, we identify key grade-level outcomes for K-12 physical education and match them with instructional tasks in the content map. This allows you to choose which tasks you will use to meet specific standards.
The remainder of each chapter is devoted to presenting the instructional tasks. Each instructional task is organized using the following headings:
- Purpose
- Description
- Equipment
- Critical elements and cues
- Common errors, causes, and corrections
Learn more about Effective Physical Education Content and Instruction With Web Resource.
Stationary Partner Passing
Technique: In this task, students learn the basic techniques of passing and catching a basketball without a defender.
Purpose
Following are the purposes of the task as related to aspects of skilled performance.
- Technique: In this task, students learn the basic techniques of passing and catching a basketball without a defender.
- Fair play: Students pass the ball where the partner can receive it.
- Communication: Students hold their hands out to indicate they are ready to receive the pass.
Description
Divide students into pairs and have them stand 10 to 15 feet (3 to 4.6 meters) apart. On your signal, the students continuously pass a ball back and forth using the assigned pass (chest and bounce) and catch techniques. If students need motivation, have pairs count how many successful passes they can make in a row or within a designated time. As an extension, have students move back one step until they are 20 feet (6.1 meters) apart.
Equipment
One ball per pair of students
Critical Elements and Cues
Technique: Chest Pass
- Place both hands on the side of the ball and spread the fingers and thumbs. Cue: Fingers spread.
- Start with the ball close to chest. Cue: Ball to chest.
- Look at the receiver's chest. Cue: Eyes on target.
- Step toward the receiver with one leg. Cue: Step to receiver.
- Move the ball away from the chest by extending the elbows. Cue: Push.
- As the arms extend, pronate the arms and end in a thumb-down position. Cue: Thumbs down.
Technique: Bounce Pass
- Place both hands on the side of the ball and spread the fingers and thumbs. Cue: Fingers spread.
- Start with the ball close to chest. Cue: Ball to chest.
- Step toward the receiver with one leg. Cue: Step to receiver.
- Move the ball away from the chest by extending the elbows. Cue: Push.
- Push the ball toward the floor so it bounces two-thirds of the distance to your partner. Cue: Down and close.
- The target is between the receiver's knees and waist. Cue: Keep it low.
- Actively push the thumbs through the pass (thumbs back to thumbs down) to create backspin. Cue: Slam the door.
Technique: Receive a Pass
- Look at the ball as it comes into the hands. Cue: Eyes on ball.
- Step toward the ball as it comes toward you. Cue: Step to ball.
- As the ball contacts the hands, pull the ball into the body as you catch it. Cue: Absorb the ball.
- End with the ball close to the body and the elbows flexed. Cue: Bring it in.
Fair Play
- Pass the ball directly to the receiver.
- The pass must have enough force to reach the receiver, but it should not be so hard that the receiver cannot catch it.
Communication
- When you are ready to receive a pass, create a target with both hands by placing the hands in the target area and spreading the fingers and palms. Cue: Big target.
Common Errors, Causes, and Corrections
Catching
- The receiver does not step toward the ball. Cause: The receiver doesn't understand that a defender can intercept a passed ball. Correction: Place a student slightly behind and to the side of the receiver who tries to disrupt the catch.
- The receiver doesn't follow the ball into the hands. Cause: The receiver keeps the eyes on the passer. Correction: Remind the student to keep the eyes on the ball.
- On the catch, the ball is away from the body. Cause: The receiver does not absorb the ball into the body. Correction: Ask the student to exaggerate the flexing of the elbows such that the elbows are almost out to the side.
Chest Pass
- The ball does not make it to the receiver. Cause: The passer does not step toward the receiver. Correction: Place a poly spot in front of the passer and have the student step over it when making the pass.
- The ball does not make it to the receiver. Cause: The arms do not extend quickly. Correction: Remind the student to "slam the gate."
- The thumbs do not point down after release. Cause: The wrists are not pronated. Correction: Remind the student that the thumbs should end up pointing toward the wall. (This is an exaggeration, but it will help the student understand the need to pronate.)
- The pass does not arrive at the receiver's chest. Cause: The passer is not looking at the receiver's chest. Correction: Have the receiver create a number with one hand and then have the passer tell what the number was after the pass is made.
- The pass does not arrive at the receiver's chest. Cause: The passer doesn't have the strength to get the pass to the chest. Correction: Have partners move closer together.
Bounce Pass
- The ball has topspin as it hits the floor. Cause: The thumbs moved over the top of the ball. Correction: Stress the pronation of the wrists by reminding the student to keep the thumbs down.
- The ball does not make it to the receiver. Cause: The passer does not step toward the receiver. Correction: Place a poly spot in front of the passer and have the student step over it when making the pass.
- The ball does not make it to the receiver. Cause: The arms do not extend quickly. Correction: Remind the student to "slam the gate."
- The student catches the ball on the downward arc. Cause: The ball is bounced less than two-thirds of the way to the receiver. Correction: Place a marker two-thirds of the way to the receiver and have the passer aim for that spot.
Learn more about Effective Physical Education Content and Instruction With Web Resource.
Basketball
Basketball is the second most popular sport in the world, and it is played in more than 200 countries. In the United States, the home of basketball, it is a staple of many physical education programs in elementary, middle, and high schools.
Basketball is the second most popular sport in the world, and it is played in more than 200 countries. In the United States, the home of basketball, it is a staple of many physical education programs in elementary, middle, and high schools. It is also becoming more popular in the physical education curricula in other countries. Research conducted in the United States shows that basketball is among the top four activities (after camping, swimming, and biking) that nonparticipants in physical activity aged 6 to 12 years would like to learn (Physical Activity Council, 2016). Although basketball is common in the U.S. school curriculum, research shows that it is one of the least-liked sports among U.S. students aged 5 to 17 years (Bailey, Hillman, Arent, & Petipas, 2013; Rikard & Baneville, 2006). What is the reason for this seeming contradiction? We propose that students dislike basketball in physical education because it is often taught in ways that do not help them develop skillfulness and game sense. Failure to develop these aspects hinders children from pursuing basketball and enjoying the game. We have designed this chapter to ensure that skillfulness and game sense are progressively taught and that the organization and use of pedagogies ensure that students have frequent opportunities to learn in every lesson.
Our Pedagogical Approach to Basketball
Basketball is a small-sided court invasion game. Instruction in the elementary and secondary units focuses on developing skillful performance and game sense through tasks and instructional sequences that teach basketball skills and quickly using these skills in modified games.
Developing skillful performance involves the basic offensive techniques of shooting, passing, and dribbling. Because dribbling is challenging, we focus on passing and shooting performance with beginners and introduce dribbling in tasks and during the warm-up. Once students develop dribbling skills, these are incorporated into the tasks and game play as part of the triple-threat (pass, dribble, or shoot) decision-making process.
We begin with person-to-person defensive principles. We do not add zone defense until late in the learning sequence, because effective zones are founded on person-to-person principles.
We use modified games that emphasize passing in level 1, 3v3 half-court games in level 2, and 4v4 full-court games in level 3. We use overload games (e.g., 2v1, 3v2) to develop game sense because they can be used to emphasize specific elements such as dribbling and shooting in game-like conditions. Overload games increase student engagement and allow for greater student success as they apply the learned techniques. We use the PAC progression when adding defensive pressure. See chapter 7 for a detailed description of the PAC progression.
Modifications to Address Individual Needs of Students
For students with disabilities, appropriate modifications depend on the nature of the disability. To modify basketball instruction for students with visual impairments, you can (a) use brightly colored basketballs (e.g., bright orange or yellow), (b) use brightly colored floor tape to mark off boundaries, or (c) use tactile modeling when demonstrating the proper form for various basketball skills.
For students with autism spectrum disorder, set up groups that practice in quieter or less chaotic areas of the gymnasium. You can also present materials using the students' desired communication methods (e.g., using picture symbols).
For students who use wheelchairs, adopt rules from wheelchair basketball. Rather than holding students to the same dribbling technicalities, introduce and enforce wheelchair basketball dribbling rules (e.g., students are not allowed to take more than two consecutive pushes without bouncing a ball).
For individuals with cerebral palsy, you may need to limit the speed at which students move between locations. To accommodate this, consider decreasing the playing area (e.g., playing half-court) and teaching zone defense so each student defends only a small area within the court.
Organization
A full-sided basketball game is 5v5. We question the appropriateness of 5v5 in a physical education setting relative to teaching beginners. The development of game sense in basketball is based on three general game tactics: on-the-ball play, off-the-ball play, and opposite-the-ball play. When these are taught to beginners in a 5v5 setting, the fifth student (and to a lesser extent the fourth student) congests the midcourt and limits students' abilities to apply the techniques and tactics being learned. As such, we advocate the use of a 3v3 team structure with beginners to develop the skillful play and game sense needed for basketball. We don't recommended adding the fourth student until students can somewhat successfully apply the elements of skillful play and game sense they have learned. We do not recommend that you use a 5v5 game in a typical physical education setting.
Space
We recommend that you have one basketball court and at least 4 to 6 baskets. At the elementary level, when equipment might be limited, we suggest detachable baskets with suction cups or targets that are attached to the wall (students strike the targets with the ball). If fixed baskets are available, they should be adjustable down to 6 or 8 feet (1.8 to 2.4 meters) for elementary and middle school students. Adjustable goals are also preferred at the high school level, but this is not mandatory. The court space should be large enough to be divided into home areas for groups of 4 to 8 students, and you should have enough goals to accommodate each group of students. If you use an outdoor space, a wall is helpful for some tasks.
Equipment Needed
Having a variety of basketballs sizes (e.g., 4, 5, 6) is important at the elementary level regardless of skill level. Balls must be scaled to the students' hands. At the middle and high school levels, basketball sizes 6 (intermediate) and 7 (official) need to be available. You should have enough balls for each student.
Content Map Structure
Figure 8.1 is a combined content map that illustrates the flow and connectedness of all the tasks used to develop skillful play and game sense in basketball. It is divided into three levels, and each level has a separate content map that includes the application games used to refine the elements of skillful play and game sense at that level. Although dribbling is introduced in level 1 (figure 8.2), the primary focus is on passing and shooting, and it ends with an application game that combines those two techniques. At level 2 (figure 8.3), dribbling, defense, and individual offensive tactics are added, and the end game is a 3v3 game. At level 3 (figure 8.4), offensive and defensive tactics are stressed; this level ends in a 4v4 game.
In the content maps, we have numbered the tasks. These numbers are used to cross reference tasks descriptions in the body of the chapter with the content maps. The task numbers should not be interpreted as the order in which they should be taught. It is important that tasks are taught and progressed from simpler to more complex forms which is shown in the upward progress of the task sequence on the content map. This is particularly necessary before tasks are combined. For instance in basketball whether you teach shooting first or dribbling, the progressions of both need to be taught before they are combined in task 19.
Combined content map for basketball.
Level 1 content map for basketball.
Level 2 content map for basketball.
Level 3 content map for basketball.
Structure of the Lessons
The following is a sample daily lesson structure for a 50-minute elementary basketball lesson.
- Warm-up (5 to 6 minutes)
- Application game: end line passing game (5 to 6 minutes)
- Informing task: 2v1 passing (5 minutes)
- Extension task: 2v1 passing from the other side (4 minutes)
- Extension task: PAC defense applied to the 2v1 passing task (5 minutes)
- Informing task: individual dribbling (5 minutes)
- Extension task: nondominant side dribbling (4 minutes)
- Application game: mat basketball with shooting game (10 minutes)
- Closure (3 to 5 minutes)
Warm-up
Elementary School
The warm-up should be taught to students on the first or second day of the unit. If a technique used in the warm-up has not been taught, it should not be included in the warm-up circuit until the day after you teach it. Passing, dribbling, and shooting are the initial techniques used in the warm-up. In the first lesson, passing and wall shots are introduced; therefore, you can include passing and shooting practice in the warm-up for lesson 2. Lesson 2 introduces individual dribbling, so you can include that technique in the warm-up for lesson 3. Each day you can add new techniques, such as step back shots for wall shots (see the five-day block plan), or you can stick with the same warm-up.
For the passing task, pairs of students stand 8 to 10 feet (2.4 to 3 meters) apart and pass the ball back and forth using the techniques that have been taught. For the shooting task, students begin with wall shots and move to step-back shots with a partner after a couple of days. For the dribbling task, students dribble in a stationary position using the dominant and nondominant hands. After a couple days, students can add movement to the dribbling if their skills have progressed appropriately. The warm-up time should allow for multiple trials. Once students have learned the warm-up, it should not last more than 5 to 6 minutes.
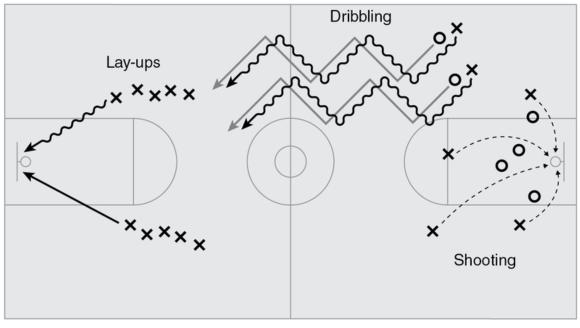
How you organize your students for the warm-up will depend on the decisions you make about the organization of the class.If you use a circuit, divide the class into three groups and include the appropriate equipment at each of the three stations (see figure 8.5). The passing and shooting stations require basketballs for each pair of students, and the dribbling station requires a ball for each student. Students should begin each day in the same area and rotate through the stations. The tasks can be done in any order. Provide instructions for what students should do once they have completed all the stations. If you decide to have the whole class do the warm-up activities together, you need to have enough baskets to accommodate the entire class with no more than 8 students at a basket. You can add stick-on baskets to the walls if needed. We recommend that the warm-up not last more than 5-6 minutes once it has been learned.
Sample elementary school warm-up circuit for basketball.
Secondary School
Teach the warm-up in lessons 2 through 4; once students know the warm-up, it should take 4 to 5 minutes. Students work in pairs. In the first task, students alternate between open-space and close-control dribbling in the court space. Each pair has a ball, and one student assumes the role of offense and the other assumes the role of defense. The defensive student moves along with the offensive student and provides active defense as the offensive student dribbles under control. Students switch roles after each trial. In the next task, students practice left- and right-handed layups; one student shoots and the other student rebounds. After rebounding, the rebounder moves to the shooting line and the shooter moves to the rebounding line. After a determined number of right-handed layups, have students attempt left-handed layups. In the last task, students practice open shooting and attempt shots they would take in a game situation. If a student makes a shot, the partner returns the ball and the student continues shooting until a shot is missed or a set number of shots have been attempted; then, the partner becomes the shooter.
This warm-up can be done with stations or in teams. If you use stations, divide the class into three groups and have each group spend about 90 seconds at each station. The lay-ups should be done at one end basket, the open shooting at the opposite end basket with the open- and closed-space dribbling occurring in the middle of the court (see figure 8.6). If the warm-up is done in teams, have groups of 6 to 8 students complete each part of the warm-up in the home area. This requires one basket for each group. Provide students with instructions for what they should do once they finish the warm-up (e.g., put balls away, ball rake, sit down in an assigned space, line up, repeat tasks).
Sample secondary school warm-up circuit for basketball stations.
Block Plan
The introductory block plan is designed for beginners. In elementary school, this should not be introduced earlier than fourth grade. This allows students to refine their basic ball-handling techniques in other activities prior to facing the challenges of manipulating a basketball. Although longer units are always preferred, we recognize that there are time limitations at the elementary level; therefore, the elementary unit is five days for the initial grade in which it is taught.
The secondary block plan follows the elementary block plan and is designed for students in middle school and high school. It assumes that students were taught the basic basketball techniques at the elementary level. If this is not the case, follow the introductory block plan. Because middle and high school physical education programs have different requirements, these units should not be taught in fewer than 10 days. These units are adjusted for 10-, 15-, and 20-day programs, although we recommend units of 20 or more days.
SHAPE America's Grade-Level Outcomes for K-12 Physical Education
In table 8.5, we identify key grade-level outcomes for basketball for 2nd through 8th grade.These are linked to specific tasks on the content maps that are appropriate for teaching the skill and assessing the outcome.
Learn more about Effective Physical Education Content and Instruction With Web Resource.
Organizing Content for Teaching
One of the truisms in teaching is that you must understand what you teach. Your deep understanding of content leads to deeper content learning by students (Ward, 2013; Ward, Ayvazo, & Lehwald, 2014).
One of the truisms in teaching is that you must understand what you teach. Your deep understanding of content leads to deeper content learning by students (Ward, 2013; Ward, Ayvazo, & Lehwald, 2014). In addition, the quality of the tasks is critical, because students acquire better knowledge and perform better if you use high-quality tasks. Your capacity to improve student learning is grounded in the professional knowledge that informs PCK. As discussed in chapter 1, PCK is influenced by your knowledge of students, the curriculum, the context in which you teach, the pedagogical strategies you use, and the content you teach.
What does it mean to know content deeply? In the following two examples, much of the teachers' decision-making and many of their instructional behaviors, content representations, and task selections depend on the extent of their SCK. In chapter 2, we argued that SCK is meaningful, relational, and progressive.Itis reflective of deeper content knowledge. When you compare the following two examples, you will see that the second teacher shows a deeper and more explicit knowledge of basketball.
Consider a simple 4v1 keep-away basketball game. The first teacher introduces the game with a demonstration and an explanation. There is an off-the-ball focus of moving away from the defender to receive a pass, and there is a rule that the ball carrier must pass to the open players. The defensive rule is that the ball can be intercepted, but there cannot be any physical contact between players. Students are sent to practice in groups. During the practice, the teacher provides feedback to students. Once the task is completed, the teacher moves the students to the more difficult 3v1 keep-away game.
The second teacher also provides an explanation and demonstration of the 4v1 keep-away game. The focus is the same as in the previous example. However, this teacher begins by requiring the defender to walk and not intercept the ball; this gives students learning the offense time to make decisions relative to the defender (i.e., a passive defense). The teacher prompts students to get open. Next, the teacher asks the defender to move more quickly and indicates that no interceptions are allowed (i.e., an active defense). As the practice progresses, the defender can intercept the ball (i.e., a competitive defense). The teacher pauses game play to emphasize moving deep or wide or to refine the technique. The advantages of this process include the following:
- Small progressive incremental changes allow for student understanding, refinement, and extension.
- Keeping the same instructional format as new concepts are introduced allowing students to build on the original task, which builds competence.
- The creation of high numbers of repetitions that occur as task complexity or difficulty increase, without major changes to the pedagogical conditions of game.
The teacher in the second example uses extension and applying tasks, and the task progression is more incremental and systematic than in the first example. As these two examples show, teaching a skill demands in-depth and detailed knowledge that goes beyond the critical elements and the ability to demonstrate the skill. You must have extensive SCK (Ayvazo & Ward, 2011; Ward, 2009), including knowledge of errors that students could make in performing the task and knowledge of the instructional representations and tasks. The deeper your knowledge, the more choices you will have in adapting instruction for students (Ayvazo & Ward, 2011; Griffey & Housner, 2007; Ward, 2013).
Defining the Scope of Content Knowledge in K-12 Teaching
Deep understanding of content does not mean you must know everything about a sport or activity to teach it. Figure 3.1 illustrates the broad scope of knowledge for tennis. The large box represents all that is known about tennis. The smaller circle represents the tennis knowledge students in K-12 settings need. It includes CCK such as rules of the game, safety rules, techniques, and tactics. If you are using an instructional strategy in which one student is teaching another (e.g., peer tutoring), students will also need the SCK required to provide feedback. The larger circle represents what you need to know: the SCK for teaching the CCK in the small circle and the SCK required for adaptations for students with disabilities or more skilled students.
The scope of K-12 content knowledge in tennis.
Principles Behind Our Approach
This book is based on several principles for teaching physical education that are derived from our research and practice over the past 30 years. Here we list these principles and discuss how they influence the contents of the book.
- Teachers are decision makers. You should neither blindly follow a plan nor teach without one; rather, you should adapt instruction from an existing plan that you create or that comes from another source. If you have to create plans for content you know little about, you are likely to experience frustration in your teaching. In addition, student learning will suffer. In this book, we provide models for teaching content. Contexts and students differ, however, so we expect you to adapt these models as needed. It is our firm belief that it is better to operate from a good plan that needs to be adapted than to create a weak plan that is ineffective.
- Experts teach content differently from nonexperts.If you are learning to teach content as a nonexpert, you will probably learn differently than an expert because you have less SCK and less experience teaching this content. The models in this book were not created for experts. They allow teachers who do not know the content well to teach their students successfully and learn from that teachingas they develop increasingly better PCK.
- In middle school and high school, longer instructional units are preferred over shorter ones because longer instructional units allow more time for skillful performance to be developed, deeper understanding of the game, and for game sense to be developed.Longer instructional units serve students better if they are organized around meaningful, relational, and progressivecontent. There are many arguments for teaching short units in the multiactivity curriculum format. Two common ones are that short units maintain student interest by providing variety and that some students might not like a particular sport but do like another. Students get bored with the typical instruction in most schools (i.e., short units, limited skill development, little development of game sense) because the tasks used in these short units are not meaningful, relational, or progressive.Our goal in this book is to change that to create more engaging units.
Similarly, the argument that students will like one sport over another is misleading. A much better indicator of student enjoyment in physical education is not the sport or activity being taught but rather the way it is taught. In our own teaching experiences, training of preservice teachers, and work with in-service teachers, we have consistently found that content that is meaningful, relational, and progressiveengages students and creates learning and enjoyment.
- In elementary school, instructional units should be related to each other in ways that cumulatively build content. Elementary school teachers have fewer lessons per year than their secondary school counterparts; therefore, we present elementary school instructional units as 5-7 lesson blocks. Our assumption is that many skills transfer across units, such as the ready position (e.g., basketball, volleyball, football), the concept of having fast feet to move into a position to receive the ball (e.g., tennis, volleyball, badminton, softball, baseball), calling for the ball, person-to-person defense, and moving (invasion games). Elementary instruction units should be sequenced to develop complexity and refinement of movements introduced in previous units and to extend and refine movements in later units.
- Small-sided games rather than full-sided games should be taught first in physical education. The question of whether a full-sided game (or a doubles game in a racket sport) should be played is a function of the time it takes to teach students to play the game. In this book, the end goal is to play full-sided games, but to get there you must progress from small-sided games to ensure that students have the skills and the game sense to be successful. The modified games we provide represent the main features of full-sided games. If longer instructional units are used, students in middle school and high school might be able to progress toward full-sided games.
- Skillful performance in sports is a function of technique and game sense. We use the term technique to describe the critical elements of the performance of a movement such as how to hold a bat in softball, assume the starting position, swing, and follow through. The term game sense refers to"the ability to use an understanding of the rules, tactics, strategy and of oneself (and of one's teammates) to overcome the problems posed by the sport or by one's opponents" (Launder & Piltz, 2013, p. 16). Game sense is represented by what players do in the game to demonstrate their understanding, such as reading the play and making decisions. When players apply the rules in the game, they are demonstrating game sense. Technique development and game sense are highly interdependent. This interdependence has been described by Launder and Piltz (2013, p. 59) as "what is tactically desirable must be technically possible." In short, if the goal is to play the game, then technique and games sense must be developed synchronously.
Develop Working Technique
In her article "It's OK to Be a Beginner," Rink (2004) observed that being good or not good at motor skills is not a permanent condition for children and youth. That is why we have teachers. The variety of abilities found in physical education classes means that at any given time, students are at different places in their learning of motor skills, knowledge, and understanding and use of affective skills. Rink's point is that your goal is to move all students forward, and it is important for students to understand that they will get better with practice. Given that students arrive in class at different places in their learning, Launder and Piltz (2013) have suggested the need to develop a working technique. Using a working technique, a student moves from A to B, in which A represents the student's current level and B is where you would like the student to be at the end of instruction. The student should travel the most effective and efficient road between these two points. In this example, the road represents technique. Even beginners should have a working technique that places them on the road to improved learning.
In the Working Technique in Volleyball sidebar, Dr. Dena Deglau, a professor of physical education and an expert volleyball teacher, describes the development of a working technique.
Dr. Deglau clearly has deep content knowledge of volleyball. Her example highlights the developmental nature of working technique. Our point is that teachers must determine what are the essential elements of a working technique that they want to develop as they teach their students. A teacher's understanding of a working technique and their expectations for students will likely change over time as they reflect and tinker with their instruction.
Working Technique in Volleyball: Example of Development
Beginners
To begin to understand how the game is played, young children need to learn how angles affect where the ball will go. They will have some experience with this from the use of paddles and racquets in other activities. However, the force production demands are different in volleyball than in racquet sports. In racquet sports students learn that more force is generated by swinging the paddle faster. In volleyball, students must not think of their arms as having this function. In volleyball, students must learn that force production is generated differently.
Students will often exclusively focus on the forearm pass as beginners, which is the most used skill in the game.
- Students will move and receive the ball in the center of their body at thigh height (young children can move and let the ball bounce between their legs and then move and catch).
- Student should learn to change the degree of bend at the waist and recognize how this affects the trajectory of the ball regardless of what they do with their arms. Students learn to place their arms forward and locked as they try to forearm pass in ready position, then straightening the torso a little. They will learn that this is required if you are bumping repeatedly to yourself and that in a game, the closer you are to the net, the straighter your torso should be.
- Students should learn that force production occurs from the legs and not from swinging their arms.
Beyond the Initial Performance of the Forearm Pass
To approximate the game, students at this level would build from the forearm pass to understand the spatial relationship of the ball relative to body position and target. Here students must understand the three performance characteristics that afford or constrain one's ability to play a modified game
- Move and receive a high ball in front of the forehead. Most students cannot position their bodies appropriately in relation to the ball, and thus the set or volley looks like a throw or hit off the hands. They contact the ball behind or on top of the head, and this constrains the ability to correctly volley the ball.
- Move and volley the ball to someone in front of you. This is truly a volley. Students receive the ball in front of them, and then volley it to someone in front of them. This would lead to continuous passing back and forth with a partner.
- Move and set a ball in a different direction. For example, if a free ball comes over the net to team A, the back-row person would volley or bump the ball to the setter. The setter is standing sideways at the net and must move behind and around the ball to set it to the hitter. Students can't execute a set in the game because they can't move sideways from the net and position themselves correctly to pass to a hitter. If the setter faces the teammates while waiting for the pass to the front row instead of standing sideways, the task of moving around the ball to face the hitter is even more difficult.
I intentionally make a distinction between volleying and setting. The difference is the orientation of the body to the ball and the target. Volleying occurs when the ball is coming directly at you and you are passing directly back (continuous passing back and forth). Setting occurs when the ball is coming at you from the side and you must set in front of you (setter to hitter).
Thisunderstanding extends to the hitter who will set the ball over the net instead of hitting or tipping it over in grade 6. The ball is coming from the setter, so the person getting the ball over the net must see the ball coming from the side, move around and behind the pass, and then set it forward over the net.
More Advanced Performance of the Forearm Pass
At this level of performance students need to understand the spatial relationship of the ball with the body, the target, and the net (height above and distance from). This allows the hitter to learn how to do more than set or bump the ball over the net. Students will also need to develop the ability to execute the cycle of the game. Here students must learn and understand the three new performance characteristics that afford or constrain one's ability to play in a game.
- Students who understand how to tip a ball relative to the height and distance from the net can jump and catch a ball above the forehead. This develops the timing of the jump for the spike. Students need to understand how their movement must be adapted to account for differing sets. Often they are forced to bump the ball over instead of setting or tipping because their movement is too slow relative to the set.
- To learn to play the game, students must inherently learn how to move from the passing position to hitting, setting, or defensive positions. These patterns need to be built into tasks.
Implement a Sport Education Curriculum
We used the term meaningful in chapter 2 to refer to instruction that is connected to students' past learning experiences and knowledge and the real-world context of the activity. The focus is on developing skillfulness in the students so that they can perform modified versions of the activity that are consistent with how it is performed in the real world while valuing and enjoying the movement experience. Though there are many ways to achieve this, we think one of the best is the use of the sport education curriculum and instructional model (Siedentop, Hastie, & van der Mars, 2011) in combination with content knowledge. You do not have to use the sport education model with the content in this book, but we recommend it.
Sport education has several pedagogical features that allow you to present content in meaningful ways. In this section, we discuss the key features of sport education. A more complete description of sport education can be found in the Complete Guide to Sport Education by Siedentop, Hastie, and van der Mars (2011).
Seasons
Creating seasons provide a similar structure to that used in sports. There is often a practice season followed by a competition season. In our secondary block plans, we provide 5-, 10-, 15-, and 20-day plans. Three-quarters of the unit is typically the practice season, and simple games take place each day. The tournament season lasts 2 to 5 days, and the primary focus is competition. Several games are played each day against different opponents.
Team Affiliation
Sport education assumes that you will make every effort to create mixed-ability teams, because this is the most equitable strategy to ensure that students perceive the game play as fair. Affiliation is created in sport education by placing students in the same teams for the duration of a unit and providing a team identity (e.g., team colors, team name, team cheer, home field or court, team mascot). We recommend that teams be named after college or professional sports teams, depending on the sport. Teams can adopt the colors, icons, or cheers of these teams (e.g., "Go Bucks" is an Ohio State cheer).
Lesson Management
A central feature of sport education is that students share in the management of and responsibility for the lesson because each person has a role. There are many possible roles to be filled. With groups of four (either one team of four students or two teams of two for racquet sports), we have used the roles of captain, trainer, equipment manager, and statistician. Descriptions of these roles can be found in the Common Team Roles in Sport Education sidebar. To introduce these roles, you must explain the tasks that a student will do in each role. We typically introduce the roles at the beginning of the unit and leave students in the same roles for the duration. If we have additional students, we create new roles or co-roles.
Common Team Roles in Sport Education
Team Roster
- Captain
- Captain's assistant
- Equipment manager
- Trainer
- Statistician
Roles
Captain
- Start the game (rock, paper, scissors).
- Act as a referee during game play.
- Call wall (a defensive strategy) for the team.
- Keep the team on task.
- Line up the team to shake hands at the end of the game.
Captain's assistant
- Hand out and turn in team quizzes.
- Hand out and collect pedometers.
Equipment manager
- Keep equipment neat and organized.
- Set up equipment when needed.
- Return equipment to the proper location at the end of class.
Trainer
- Lead the warm-up activity.
- Keep the team on task during the warm-up.
- Encourage teammates to accumulate pedometer steps.
Statistician
- Record fair play points.
- Record pedometer steps.
- Record game points.
Records
Records are kept in sport education. We find that the easiest method is to use a team chart (see table 3.1). On this chart we record wins and losses, pedometer steps (a goal is set each day),completion of daily roles, fair play (see the web resource for a printable fair play form), and bonus points for good behavior (e.g., extra effort in performance, starting quickly after warm-up, the entire team starting the warm-up on time, excellence performance).
Fair play guidelines are as follows:
- Be respectful to yourself, other players, officials, and equipment.
- Know and play by the rules.
- Practice self-control prior to, during, and after class.
- Give full effort, and appreciate others' efforts.
- Smile and have fun.
You assign the points. The statistician is responsible for recording the points each day at the end of class. These points can be accrued during the unit and totaled at the end to identify the teams with best win-loss and fair play records and to allow the teams to play for a championship on the final day of the unit (see next section).
Culminating Event
The last day of the unit is reserved for a culminating event. Such an event can take many forms, but we typically have pairs of teams (ranked by win-loss records) play championship games. Then we have an awards ceremony in which the teams march onto the field and line up. We award teams and individuals based on specific categories. Some examples of these awards are provided in the web resource. You can print and use these awards or adapt them to suit your needs.
Pedagogical Features in Knowledge Packets
Our goal is to provide you with an organizational framework that will allow you to not only understand the content but also to make instructional decisions about the content as you select and use it in your teaching practice. Central to this goal is understanding why we have not provided specific lesson plans in this book (other than our examples of lesson plan organization and block plans). One of the great contributions of the late Alan Launder (Launder & Piltz, 2013) was his insistence that physical education teachers need to observe student performance relative to the assigned task and then introduce the next task that will further develop student performance. Although you need a plan to guide you, the overall goal you are trying to accomplish (e.g., skillfully playing a 4v4 game) and knowing the steps (i.e., the instructional tasks and the sequencing of tasks toward the major goals) are a critical element of teaching. You must observe the performances and make the best decision on the basis of your knowledge and what you see as the performance needs of your students. This book provides you with the knowledge about the big picture in terms of the content to be taught. Knowing all of the content to be taught allows the teacher to make informed instructional decisions about which content to use in particular learning contexts. We organized chapters 4 through 12 as knowledge packets (Ward et al., 2014) that present what (i.e., the big picture) you need to know to teach the content (as shown in figure 3.1 earlier in the chapter).
Each chapter begins with a description of the pedagogical approachwe recommend for teaching the content. Subsections discuss task modifications to address the needs of students with disabilities, organization of students for instruction, and space and equipment needs.
Next, we provide content maps. These provide an overview of the instructional tasks and the relationship among them and a broad recommendation about when content might be introduced in the K-12 curriculum. With this information, you can decide where your students are in their performances and then select instructional tasks to advance them. There is a combined content map that illustrates the flow of the tasks used to develop sport-specific techniques and tactics starting with beginners and ending with advanced players (in school settings). The combined content maps for chapters 6 through 12 are divided into three levels, and each level has its own separate content map that includes the application games (outline of box is dashed) used to refine the techniques and tactics in that level (outline of box is solid).
Then we provide our recommendations for lesson structure based on the content. An important feature of our lesson structure is a belief, common to many games pedagogies, thatstudents should play games that teach them to use what they have learned in past lessons at the start of the current lesson and to use what they have learned in the current lesson at the end of the lessons. We call these application games.Many of our instructional tasks are presented as games (e.g., overload games in invasion sports, target games in volleyball and badminton) to emphasize a particular outcome. However, application games allow new techniques and game sense elements to be added to previous outcomes to strengthen student performance. Application games are important pedagogical tools that allow you to determine the performance of the students; as such, they can drive the selection of instructional tasks to meet the needs of students. The lesson plan organization examples include sample warm-up activities that have been used for elementary and secondary classes.
In chapters 4 and 5 we provide sample 5- and 7-day block plans, and in chapters 6 through 12 we provide 5-, 10-, 15-, and 20-day block plans for each content area. These block plans are organized according to the lesson format we just described and provide examples of the content that could be used depending on the duration of the unit and the experiences and abilities of the students.
Next, we identify key grade-level outcomes for K-12 physical education and match them with instructional tasks in the content map. This allows you to choose which tasks you will use to meet specific standards.
The remainder of each chapter is devoted to presenting the instructional tasks. Each instructional task is organized using the following headings:
- Purpose
- Description
- Equipment
- Critical elements and cues
- Common errors, causes, and corrections
Learn more about Effective Physical Education Content and Instruction With Web Resource.
Stationary Partner Passing
Technique: In this task, students learn the basic techniques of passing and catching a basketball without a defender.
Purpose
Following are the purposes of the task as related to aspects of skilled performance.
- Technique: In this task, students learn the basic techniques of passing and catching a basketball without a defender.
- Fair play: Students pass the ball where the partner can receive it.
- Communication: Students hold their hands out to indicate they are ready to receive the pass.
Description
Divide students into pairs and have them stand 10 to 15 feet (3 to 4.6 meters) apart. On your signal, the students continuously pass a ball back and forth using the assigned pass (chest and bounce) and catch techniques. If students need motivation, have pairs count how many successful passes they can make in a row or within a designated time. As an extension, have students move back one step until they are 20 feet (6.1 meters) apart.
Equipment
One ball per pair of students
Critical Elements and Cues
Technique: Chest Pass
- Place both hands on the side of the ball and spread the fingers and thumbs. Cue: Fingers spread.
- Start with the ball close to chest. Cue: Ball to chest.
- Look at the receiver's chest. Cue: Eyes on target.
- Step toward the receiver with one leg. Cue: Step to receiver.
- Move the ball away from the chest by extending the elbows. Cue: Push.
- As the arms extend, pronate the arms and end in a thumb-down position. Cue: Thumbs down.
Technique: Bounce Pass
- Place both hands on the side of the ball and spread the fingers and thumbs. Cue: Fingers spread.
- Start with the ball close to chest. Cue: Ball to chest.
- Step toward the receiver with one leg. Cue: Step to receiver.
- Move the ball away from the chest by extending the elbows. Cue: Push.
- Push the ball toward the floor so it bounces two-thirds of the distance to your partner. Cue: Down and close.
- The target is between the receiver's knees and waist. Cue: Keep it low.
- Actively push the thumbs through the pass (thumbs back to thumbs down) to create backspin. Cue: Slam the door.
Technique: Receive a Pass
- Look at the ball as it comes into the hands. Cue: Eyes on ball.
- Step toward the ball as it comes toward you. Cue: Step to ball.
- As the ball contacts the hands, pull the ball into the body as you catch it. Cue: Absorb the ball.
- End with the ball close to the body and the elbows flexed. Cue: Bring it in.
Fair Play
- Pass the ball directly to the receiver.
- The pass must have enough force to reach the receiver, but it should not be so hard that the receiver cannot catch it.
Communication
- When you are ready to receive a pass, create a target with both hands by placing the hands in the target area and spreading the fingers and palms. Cue: Big target.
Common Errors, Causes, and Corrections
Catching
- The receiver does not step toward the ball. Cause: The receiver doesn't understand that a defender can intercept a passed ball. Correction: Place a student slightly behind and to the side of the receiver who tries to disrupt the catch.
- The receiver doesn't follow the ball into the hands. Cause: The receiver keeps the eyes on the passer. Correction: Remind the student to keep the eyes on the ball.
- On the catch, the ball is away from the body. Cause: The receiver does not absorb the ball into the body. Correction: Ask the student to exaggerate the flexing of the elbows such that the elbows are almost out to the side.
Chest Pass
- The ball does not make it to the receiver. Cause: The passer does not step toward the receiver. Correction: Place a poly spot in front of the passer and have the student step over it when making the pass.
- The ball does not make it to the receiver. Cause: The arms do not extend quickly. Correction: Remind the student to "slam the gate."
- The thumbs do not point down after release. Cause: The wrists are not pronated. Correction: Remind the student that the thumbs should end up pointing toward the wall. (This is an exaggeration, but it will help the student understand the need to pronate.)
- The pass does not arrive at the receiver's chest. Cause: The passer is not looking at the receiver's chest. Correction: Have the receiver create a number with one hand and then have the passer tell what the number was after the pass is made.
- The pass does not arrive at the receiver's chest. Cause: The passer doesn't have the strength to get the pass to the chest. Correction: Have partners move closer together.
Bounce Pass
- The ball has topspin as it hits the floor. Cause: The thumbs moved over the top of the ball. Correction: Stress the pronation of the wrists by reminding the student to keep the thumbs down.
- The ball does not make it to the receiver. Cause: The passer does not step toward the receiver. Correction: Place a poly spot in front of the passer and have the student step over it when making the pass.
- The ball does not make it to the receiver. Cause: The arms do not extend quickly. Correction: Remind the student to "slam the gate."
- The student catches the ball on the downward arc. Cause: The ball is bounced less than two-thirds of the way to the receiver. Correction: Place a marker two-thirds of the way to the receiver and have the passer aim for that spot.
Learn more about Effective Physical Education Content and Instruction With Web Resource.
Basketball
Basketball is the second most popular sport in the world, and it is played in more than 200 countries. In the United States, the home of basketball, it is a staple of many physical education programs in elementary, middle, and high schools.
Basketball is the second most popular sport in the world, and it is played in more than 200 countries. In the United States, the home of basketball, it is a staple of many physical education programs in elementary, middle, and high schools. It is also becoming more popular in the physical education curricula in other countries. Research conducted in the United States shows that basketball is among the top four activities (after camping, swimming, and biking) that nonparticipants in physical activity aged 6 to 12 years would like to learn (Physical Activity Council, 2016). Although basketball is common in the U.S. school curriculum, research shows that it is one of the least-liked sports among U.S. students aged 5 to 17 years (Bailey, Hillman, Arent, & Petipas, 2013; Rikard & Baneville, 2006). What is the reason for this seeming contradiction? We propose that students dislike basketball in physical education because it is often taught in ways that do not help them develop skillfulness and game sense. Failure to develop these aspects hinders children from pursuing basketball and enjoying the game. We have designed this chapter to ensure that skillfulness and game sense are progressively taught and that the organization and use of pedagogies ensure that students have frequent opportunities to learn in every lesson.
Our Pedagogical Approach to Basketball
Basketball is a small-sided court invasion game. Instruction in the elementary and secondary units focuses on developing skillful performance and game sense through tasks and instructional sequences that teach basketball skills and quickly using these skills in modified games.
Developing skillful performance involves the basic offensive techniques of shooting, passing, and dribbling. Because dribbling is challenging, we focus on passing and shooting performance with beginners and introduce dribbling in tasks and during the warm-up. Once students develop dribbling skills, these are incorporated into the tasks and game play as part of the triple-threat (pass, dribble, or shoot) decision-making process.
We begin with person-to-person defensive principles. We do not add zone defense until late in the learning sequence, because effective zones are founded on person-to-person principles.
We use modified games that emphasize passing in level 1, 3v3 half-court games in level 2, and 4v4 full-court games in level 3. We use overload games (e.g., 2v1, 3v2) to develop game sense because they can be used to emphasize specific elements such as dribbling and shooting in game-like conditions. Overload games increase student engagement and allow for greater student success as they apply the learned techniques. We use the PAC progression when adding defensive pressure. See chapter 7 for a detailed description of the PAC progression.
Modifications to Address Individual Needs of Students
For students with disabilities, appropriate modifications depend on the nature of the disability. To modify basketball instruction for students with visual impairments, you can (a) use brightly colored basketballs (e.g., bright orange or yellow), (b) use brightly colored floor tape to mark off boundaries, or (c) use tactile modeling when demonstrating the proper form for various basketball skills.
For students with autism spectrum disorder, set up groups that practice in quieter or less chaotic areas of the gymnasium. You can also present materials using the students' desired communication methods (e.g., using picture symbols).
For students who use wheelchairs, adopt rules from wheelchair basketball. Rather than holding students to the same dribbling technicalities, introduce and enforce wheelchair basketball dribbling rules (e.g., students are not allowed to take more than two consecutive pushes without bouncing a ball).
For individuals with cerebral palsy, you may need to limit the speed at which students move between locations. To accommodate this, consider decreasing the playing area (e.g., playing half-court) and teaching zone defense so each student defends only a small area within the court.
Organization
A full-sided basketball game is 5v5. We question the appropriateness of 5v5 in a physical education setting relative to teaching beginners. The development of game sense in basketball is based on three general game tactics: on-the-ball play, off-the-ball play, and opposite-the-ball play. When these are taught to beginners in a 5v5 setting, the fifth student (and to a lesser extent the fourth student) congests the midcourt and limits students' abilities to apply the techniques and tactics being learned. As such, we advocate the use of a 3v3 team structure with beginners to develop the skillful play and game sense needed for basketball. We don't recommended adding the fourth student until students can somewhat successfully apply the elements of skillful play and game sense they have learned. We do not recommend that you use a 5v5 game in a typical physical education setting.
Space
We recommend that you have one basketball court and at least 4 to 6 baskets. At the elementary level, when equipment might be limited, we suggest detachable baskets with suction cups or targets that are attached to the wall (students strike the targets with the ball). If fixed baskets are available, they should be adjustable down to 6 or 8 feet (1.8 to 2.4 meters) for elementary and middle school students. Adjustable goals are also preferred at the high school level, but this is not mandatory. The court space should be large enough to be divided into home areas for groups of 4 to 8 students, and you should have enough goals to accommodate each group of students. If you use an outdoor space, a wall is helpful for some tasks.
Equipment Needed
Having a variety of basketballs sizes (e.g., 4, 5, 6) is important at the elementary level regardless of skill level. Balls must be scaled to the students' hands. At the middle and high school levels, basketball sizes 6 (intermediate) and 7 (official) need to be available. You should have enough balls for each student.
Content Map Structure
Figure 8.1 is a combined content map that illustrates the flow and connectedness of all the tasks used to develop skillful play and game sense in basketball. It is divided into three levels, and each level has a separate content map that includes the application games used to refine the elements of skillful play and game sense at that level. Although dribbling is introduced in level 1 (figure 8.2), the primary focus is on passing and shooting, and it ends with an application game that combines those two techniques. At level 2 (figure 8.3), dribbling, defense, and individual offensive tactics are added, and the end game is a 3v3 game. At level 3 (figure 8.4), offensive and defensive tactics are stressed; this level ends in a 4v4 game.
In the content maps, we have numbered the tasks. These numbers are used to cross reference tasks descriptions in the body of the chapter with the content maps. The task numbers should not be interpreted as the order in which they should be taught. It is important that tasks are taught and progressed from simpler to more complex forms which is shown in the upward progress of the task sequence on the content map. This is particularly necessary before tasks are combined. For instance in basketball whether you teach shooting first or dribbling, the progressions of both need to be taught before they are combined in task 19.
Combined content map for basketball.
Level 1 content map for basketball.
Level 2 content map for basketball.
Level 3 content map for basketball.
Structure of the Lessons
The following is a sample daily lesson structure for a 50-minute elementary basketball lesson.
- Warm-up (5 to 6 minutes)
- Application game: end line passing game (5 to 6 minutes)
- Informing task: 2v1 passing (5 minutes)
- Extension task: 2v1 passing from the other side (4 minutes)
- Extension task: PAC defense applied to the 2v1 passing task (5 minutes)
- Informing task: individual dribbling (5 minutes)
- Extension task: nondominant side dribbling (4 minutes)
- Application game: mat basketball with shooting game (10 minutes)
- Closure (3 to 5 minutes)
Warm-up
Elementary School
The warm-up should be taught to students on the first or second day of the unit. If a technique used in the warm-up has not been taught, it should not be included in the warm-up circuit until the day after you teach it. Passing, dribbling, and shooting are the initial techniques used in the warm-up. In the first lesson, passing and wall shots are introduced; therefore, you can include passing and shooting practice in the warm-up for lesson 2. Lesson 2 introduces individual dribbling, so you can include that technique in the warm-up for lesson 3. Each day you can add new techniques, such as step back shots for wall shots (see the five-day block plan), or you can stick with the same warm-up.
For the passing task, pairs of students stand 8 to 10 feet (2.4 to 3 meters) apart and pass the ball back and forth using the techniques that have been taught. For the shooting task, students begin with wall shots and move to step-back shots with a partner after a couple of days. For the dribbling task, students dribble in a stationary position using the dominant and nondominant hands. After a couple days, students can add movement to the dribbling if their skills have progressed appropriately. The warm-up time should allow for multiple trials. Once students have learned the warm-up, it should not last more than 5 to 6 minutes.
How you organize your students for the warm-up will depend on the decisions you make about the organization of the class.If you use a circuit, divide the class into three groups and include the appropriate equipment at each of the three stations (see figure 8.5). The passing and shooting stations require basketballs for each pair of students, and the dribbling station requires a ball for each student. Students should begin each day in the same area and rotate through the stations. The tasks can be done in any order. Provide instructions for what students should do once they have completed all the stations. If you decide to have the whole class do the warm-up activities together, you need to have enough baskets to accommodate the entire class with no more than 8 students at a basket. You can add stick-on baskets to the walls if needed. We recommend that the warm-up not last more than 5-6 minutes once it has been learned.
Sample elementary school warm-up circuit for basketball.
Secondary School
Teach the warm-up in lessons 2 through 4; once students know the warm-up, it should take 4 to 5 minutes. Students work in pairs. In the first task, students alternate between open-space and close-control dribbling in the court space. Each pair has a ball, and one student assumes the role of offense and the other assumes the role of defense. The defensive student moves along with the offensive student and provides active defense as the offensive student dribbles under control. Students switch roles after each trial. In the next task, students practice left- and right-handed layups; one student shoots and the other student rebounds. After rebounding, the rebounder moves to the shooting line and the shooter moves to the rebounding line. After a determined number of right-handed layups, have students attempt left-handed layups. In the last task, students practice open shooting and attempt shots they would take in a game situation. If a student makes a shot, the partner returns the ball and the student continues shooting until a shot is missed or a set number of shots have been attempted; then, the partner becomes the shooter.
This warm-up can be done with stations or in teams. If you use stations, divide the class into three groups and have each group spend about 90 seconds at each station. The lay-ups should be done at one end basket, the open shooting at the opposite end basket with the open- and closed-space dribbling occurring in the middle of the court (see figure 8.6). If the warm-up is done in teams, have groups of 6 to 8 students complete each part of the warm-up in the home area. This requires one basket for each group. Provide students with instructions for what they should do once they finish the warm-up (e.g., put balls away, ball rake, sit down in an assigned space, line up, repeat tasks).
Sample secondary school warm-up circuit for basketball stations.
Block Plan
The introductory block plan is designed for beginners. In elementary school, this should not be introduced earlier than fourth grade. This allows students to refine their basic ball-handling techniques in other activities prior to facing the challenges of manipulating a basketball. Although longer units are always preferred, we recognize that there are time limitations at the elementary level; therefore, the elementary unit is five days for the initial grade in which it is taught.
The secondary block plan follows the elementary block plan and is designed for students in middle school and high school. It assumes that students were taught the basic basketball techniques at the elementary level. If this is not the case, follow the introductory block plan. Because middle and high school physical education programs have different requirements, these units should not be taught in fewer than 10 days. These units are adjusted for 10-, 15-, and 20-day programs, although we recommend units of 20 or more days.
SHAPE America's Grade-Level Outcomes for K-12 Physical Education
In table 8.5, we identify key grade-level outcomes for basketball for 2nd through 8th grade.These are linked to specific tasks on the content maps that are appropriate for teaching the skill and assessing the outcome.
Learn more about Effective Physical Education Content and Instruction With Web Resource.
Organizing Content for Teaching
One of the truisms in teaching is that you must understand what you teach. Your deep understanding of content leads to deeper content learning by students (Ward, 2013; Ward, Ayvazo, & Lehwald, 2014).
One of the truisms in teaching is that you must understand what you teach. Your deep understanding of content leads to deeper content learning by students (Ward, 2013; Ward, Ayvazo, & Lehwald, 2014). In addition, the quality of the tasks is critical, because students acquire better knowledge and perform better if you use high-quality tasks. Your capacity to improve student learning is grounded in the professional knowledge that informs PCK. As discussed in chapter 1, PCK is influenced by your knowledge of students, the curriculum, the context in which you teach, the pedagogical strategies you use, and the content you teach.
What does it mean to know content deeply? In the following two examples, much of the teachers' decision-making and many of their instructional behaviors, content representations, and task selections depend on the extent of their SCK. In chapter 2, we argued that SCK is meaningful, relational, and progressive.Itis reflective of deeper content knowledge. When you compare the following two examples, you will see that the second teacher shows a deeper and more explicit knowledge of basketball.
Consider a simple 4v1 keep-away basketball game. The first teacher introduces the game with a demonstration and an explanation. There is an off-the-ball focus of moving away from the defender to receive a pass, and there is a rule that the ball carrier must pass to the open players. The defensive rule is that the ball can be intercepted, but there cannot be any physical contact between players. Students are sent to practice in groups. During the practice, the teacher provides feedback to students. Once the task is completed, the teacher moves the students to the more difficult 3v1 keep-away game.
The second teacher also provides an explanation and demonstration of the 4v1 keep-away game. The focus is the same as in the previous example. However, this teacher begins by requiring the defender to walk and not intercept the ball; this gives students learning the offense time to make decisions relative to the defender (i.e., a passive defense). The teacher prompts students to get open. Next, the teacher asks the defender to move more quickly and indicates that no interceptions are allowed (i.e., an active defense). As the practice progresses, the defender can intercept the ball (i.e., a competitive defense). The teacher pauses game play to emphasize moving deep or wide or to refine the technique. The advantages of this process include the following:
- Small progressive incremental changes allow for student understanding, refinement, and extension.
- Keeping the same instructional format as new concepts are introduced allowing students to build on the original task, which builds competence.
- The creation of high numbers of repetitions that occur as task complexity or difficulty increase, without major changes to the pedagogical conditions of game.
The teacher in the second example uses extension and applying tasks, and the task progression is more incremental and systematic than in the first example. As these two examples show, teaching a skill demands in-depth and detailed knowledge that goes beyond the critical elements and the ability to demonstrate the skill. You must have extensive SCK (Ayvazo & Ward, 2011; Ward, 2009), including knowledge of errors that students could make in performing the task and knowledge of the instructional representations and tasks. The deeper your knowledge, the more choices you will have in adapting instruction for students (Ayvazo & Ward, 2011; Griffey & Housner, 2007; Ward, 2013).
Defining the Scope of Content Knowledge in K-12 Teaching
Deep understanding of content does not mean you must know everything about a sport or activity to teach it. Figure 3.1 illustrates the broad scope of knowledge for tennis. The large box represents all that is known about tennis. The smaller circle represents the tennis knowledge students in K-12 settings need. It includes CCK such as rules of the game, safety rules, techniques, and tactics. If you are using an instructional strategy in which one student is teaching another (e.g., peer tutoring), students will also need the SCK required to provide feedback. The larger circle represents what you need to know: the SCK for teaching the CCK in the small circle and the SCK required for adaptations for students with disabilities or more skilled students.
The scope of K-12 content knowledge in tennis.
Principles Behind Our Approach
This book is based on several principles for teaching physical education that are derived from our research and practice over the past 30 years. Here we list these principles and discuss how they influence the contents of the book.
- Teachers are decision makers. You should neither blindly follow a plan nor teach without one; rather, you should adapt instruction from an existing plan that you create or that comes from another source. If you have to create plans for content you know little about, you are likely to experience frustration in your teaching. In addition, student learning will suffer. In this book, we provide models for teaching content. Contexts and students differ, however, so we expect you to adapt these models as needed. It is our firm belief that it is better to operate from a good plan that needs to be adapted than to create a weak plan that is ineffective.
- Experts teach content differently from nonexperts.If you are learning to teach content as a nonexpert, you will probably learn differently than an expert because you have less SCK and less experience teaching this content. The models in this book were not created for experts. They allow teachers who do not know the content well to teach their students successfully and learn from that teachingas they develop increasingly better PCK.
- In middle school and high school, longer instructional units are preferred over shorter ones because longer instructional units allow more time for skillful performance to be developed, deeper understanding of the game, and for game sense to be developed.Longer instructional units serve students better if they are organized around meaningful, relational, and progressivecontent. There are many arguments for teaching short units in the multiactivity curriculum format. Two common ones are that short units maintain student interest by providing variety and that some students might not like a particular sport but do like another. Students get bored with the typical instruction in most schools (i.e., short units, limited skill development, little development of game sense) because the tasks used in these short units are not meaningful, relational, or progressive.Our goal in this book is to change that to create more engaging units.
Similarly, the argument that students will like one sport over another is misleading. A much better indicator of student enjoyment in physical education is not the sport or activity being taught but rather the way it is taught. In our own teaching experiences, training of preservice teachers, and work with in-service teachers, we have consistently found that content that is meaningful, relational, and progressiveengages students and creates learning and enjoyment.
- In elementary school, instructional units should be related to each other in ways that cumulatively build content. Elementary school teachers have fewer lessons per year than their secondary school counterparts; therefore, we present elementary school instructional units as 5-7 lesson blocks. Our assumption is that many skills transfer across units, such as the ready position (e.g., basketball, volleyball, football), the concept of having fast feet to move into a position to receive the ball (e.g., tennis, volleyball, badminton, softball, baseball), calling for the ball, person-to-person defense, and moving (invasion games). Elementary instruction units should be sequenced to develop complexity and refinement of movements introduced in previous units and to extend and refine movements in later units.
- Small-sided games rather than full-sided games should be taught first in physical education. The question of whether a full-sided game (or a doubles game in a racket sport) should be played is a function of the time it takes to teach students to play the game. In this book, the end goal is to play full-sided games, but to get there you must progress from small-sided games to ensure that students have the skills and the game sense to be successful. The modified games we provide represent the main features of full-sided games. If longer instructional units are used, students in middle school and high school might be able to progress toward full-sided games.
- Skillful performance in sports is a function of technique and game sense. We use the term technique to describe the critical elements of the performance of a movement such as how to hold a bat in softball, assume the starting position, swing, and follow through. The term game sense refers to"the ability to use an understanding of the rules, tactics, strategy and of oneself (and of one's teammates) to overcome the problems posed by the sport or by one's opponents" (Launder & Piltz, 2013, p. 16). Game sense is represented by what players do in the game to demonstrate their understanding, such as reading the play and making decisions. When players apply the rules in the game, they are demonstrating game sense. Technique development and game sense are highly interdependent. This interdependence has been described by Launder and Piltz (2013, p. 59) as "what is tactically desirable must be technically possible." In short, if the goal is to play the game, then technique and games sense must be developed synchronously.
Develop Working Technique
In her article "It's OK to Be a Beginner," Rink (2004) observed that being good or not good at motor skills is not a permanent condition for children and youth. That is why we have teachers. The variety of abilities found in physical education classes means that at any given time, students are at different places in their learning of motor skills, knowledge, and understanding and use of affective skills. Rink's point is that your goal is to move all students forward, and it is important for students to understand that they will get better with practice. Given that students arrive in class at different places in their learning, Launder and Piltz (2013) have suggested the need to develop a working technique. Using a working technique, a student moves from A to B, in which A represents the student's current level and B is where you would like the student to be at the end of instruction. The student should travel the most effective and efficient road between these two points. In this example, the road represents technique. Even beginners should have a working technique that places them on the road to improved learning.
In the Working Technique in Volleyball sidebar, Dr. Dena Deglau, a professor of physical education and an expert volleyball teacher, describes the development of a working technique.
Dr. Deglau clearly has deep content knowledge of volleyball. Her example highlights the developmental nature of working technique. Our point is that teachers must determine what are the essential elements of a working technique that they want to develop as they teach their students. A teacher's understanding of a working technique and their expectations for students will likely change over time as they reflect and tinker with their instruction.
Working Technique in Volleyball: Example of Development
Beginners
To begin to understand how the game is played, young children need to learn how angles affect where the ball will go. They will have some experience with this from the use of paddles and racquets in other activities. However, the force production demands are different in volleyball than in racquet sports. In racquet sports students learn that more force is generated by swinging the paddle faster. In volleyball, students must not think of their arms as having this function. In volleyball, students must learn that force production is generated differently.
Students will often exclusively focus on the forearm pass as beginners, which is the most used skill in the game.
- Students will move and receive the ball in the center of their body at thigh height (young children can move and let the ball bounce between their legs and then move and catch).
- Student should learn to change the degree of bend at the waist and recognize how this affects the trajectory of the ball regardless of what they do with their arms. Students learn to place their arms forward and locked as they try to forearm pass in ready position, then straightening the torso a little. They will learn that this is required if you are bumping repeatedly to yourself and that in a game, the closer you are to the net, the straighter your torso should be.
- Students should learn that force production occurs from the legs and not from swinging their arms.
Beyond the Initial Performance of the Forearm Pass
To approximate the game, students at this level would build from the forearm pass to understand the spatial relationship of the ball relative to body position and target. Here students must understand the three performance characteristics that afford or constrain one's ability to play a modified game
- Move and receive a high ball in front of the forehead. Most students cannot position their bodies appropriately in relation to the ball, and thus the set or volley looks like a throw or hit off the hands. They contact the ball behind or on top of the head, and this constrains the ability to correctly volley the ball.
- Move and volley the ball to someone in front of you. This is truly a volley. Students receive the ball in front of them, and then volley it to someone in front of them. This would lead to continuous passing back and forth with a partner.
- Move and set a ball in a different direction. For example, if a free ball comes over the net to team A, the back-row person would volley or bump the ball to the setter. The setter is standing sideways at the net and must move behind and around the ball to set it to the hitter. Students can't execute a set in the game because they can't move sideways from the net and position themselves correctly to pass to a hitter. If the setter faces the teammates while waiting for the pass to the front row instead of standing sideways, the task of moving around the ball to face the hitter is even more difficult.
I intentionally make a distinction between volleying and setting. The difference is the orientation of the body to the ball and the target. Volleying occurs when the ball is coming directly at you and you are passing directly back (continuous passing back and forth). Setting occurs when the ball is coming at you from the side and you must set in front of you (setter to hitter).
Thisunderstanding extends to the hitter who will set the ball over the net instead of hitting or tipping it over in grade 6. The ball is coming from the setter, so the person getting the ball over the net must see the ball coming from the side, move around and behind the pass, and then set it forward over the net.
More Advanced Performance of the Forearm Pass
At this level of performance students need to understand the spatial relationship of the ball with the body, the target, and the net (height above and distance from). This allows the hitter to learn how to do more than set or bump the ball over the net. Students will also need to develop the ability to execute the cycle of the game. Here students must learn and understand the three new performance characteristics that afford or constrain one's ability to play in a game.
- Students who understand how to tip a ball relative to the height and distance from the net can jump and catch a ball above the forehead. This develops the timing of the jump for the spike. Students need to understand how their movement must be adapted to account for differing sets. Often they are forced to bump the ball over instead of setting or tipping because their movement is too slow relative to the set.
- To learn to play the game, students must inherently learn how to move from the passing position to hitting, setting, or defensive positions. These patterns need to be built into tasks.
Implement a Sport Education Curriculum
We used the term meaningful in chapter 2 to refer to instruction that is connected to students' past learning experiences and knowledge and the real-world context of the activity. The focus is on developing skillfulness in the students so that they can perform modified versions of the activity that are consistent with how it is performed in the real world while valuing and enjoying the movement experience. Though there are many ways to achieve this, we think one of the best is the use of the sport education curriculum and instructional model (Siedentop, Hastie, & van der Mars, 2011) in combination with content knowledge. You do not have to use the sport education model with the content in this book, but we recommend it.
Sport education has several pedagogical features that allow you to present content in meaningful ways. In this section, we discuss the key features of sport education. A more complete description of sport education can be found in the Complete Guide to Sport Education by Siedentop, Hastie, and van der Mars (2011).
Seasons
Creating seasons provide a similar structure to that used in sports. There is often a practice season followed by a competition season. In our secondary block plans, we provide 5-, 10-, 15-, and 20-day plans. Three-quarters of the unit is typically the practice season, and simple games take place each day. The tournament season lasts 2 to 5 days, and the primary focus is competition. Several games are played each day against different opponents.
Team Affiliation
Sport education assumes that you will make every effort to create mixed-ability teams, because this is the most equitable strategy to ensure that students perceive the game play as fair. Affiliation is created in sport education by placing students in the same teams for the duration of a unit and providing a team identity (e.g., team colors, team name, team cheer, home field or court, team mascot). We recommend that teams be named after college or professional sports teams, depending on the sport. Teams can adopt the colors, icons, or cheers of these teams (e.g., "Go Bucks" is an Ohio State cheer).
Lesson Management
A central feature of sport education is that students share in the management of and responsibility for the lesson because each person has a role. There are many possible roles to be filled. With groups of four (either one team of four students or two teams of two for racquet sports), we have used the roles of captain, trainer, equipment manager, and statistician. Descriptions of these roles can be found in the Common Team Roles in Sport Education sidebar. To introduce these roles, you must explain the tasks that a student will do in each role. We typically introduce the roles at the beginning of the unit and leave students in the same roles for the duration. If we have additional students, we create new roles or co-roles.
Common Team Roles in Sport Education
Team Roster
- Captain
- Captain's assistant
- Equipment manager
- Trainer
- Statistician
Roles
Captain
- Start the game (rock, paper, scissors).
- Act as a referee during game play.
- Call wall (a defensive strategy) for the team.
- Keep the team on task.
- Line up the team to shake hands at the end of the game.
Captain's assistant
- Hand out and turn in team quizzes.
- Hand out and collect pedometers.
Equipment manager
- Keep equipment neat and organized.
- Set up equipment when needed.
- Return equipment to the proper location at the end of class.
Trainer
- Lead the warm-up activity.
- Keep the team on task during the warm-up.
- Encourage teammates to accumulate pedometer steps.
Statistician
- Record fair play points.
- Record pedometer steps.
- Record game points.
Records
Records are kept in sport education. We find that the easiest method is to use a team chart (see table 3.1). On this chart we record wins and losses, pedometer steps (a goal is set each day),completion of daily roles, fair play (see the web resource for a printable fair play form), and bonus points for good behavior (e.g., extra effort in performance, starting quickly after warm-up, the entire team starting the warm-up on time, excellence performance).
Fair play guidelines are as follows:
- Be respectful to yourself, other players, officials, and equipment.
- Know and play by the rules.
- Practice self-control prior to, during, and after class.
- Give full effort, and appreciate others' efforts.
- Smile and have fun.
You assign the points. The statistician is responsible for recording the points each day at the end of class. These points can be accrued during the unit and totaled at the end to identify the teams with best win-loss and fair play records and to allow the teams to play for a championship on the final day of the unit (see next section).
Culminating Event
The last day of the unit is reserved for a culminating event. Such an event can take many forms, but we typically have pairs of teams (ranked by win-loss records) play championship games. Then we have an awards ceremony in which the teams march onto the field and line up. We award teams and individuals based on specific categories. Some examples of these awards are provided in the web resource. You can print and use these awards or adapt them to suit your needs.
Pedagogical Features in Knowledge Packets
Our goal is to provide you with an organizational framework that will allow you to not only understand the content but also to make instructional decisions about the content as you select and use it in your teaching practice. Central to this goal is understanding why we have not provided specific lesson plans in this book (other than our examples of lesson plan organization and block plans). One of the great contributions of the late Alan Launder (Launder & Piltz, 2013) was his insistence that physical education teachers need to observe student performance relative to the assigned task and then introduce the next task that will further develop student performance. Although you need a plan to guide you, the overall goal you are trying to accomplish (e.g., skillfully playing a 4v4 game) and knowing the steps (i.e., the instructional tasks and the sequencing of tasks toward the major goals) are a critical element of teaching. You must observe the performances and make the best decision on the basis of your knowledge and what you see as the performance needs of your students. This book provides you with the knowledge about the big picture in terms of the content to be taught. Knowing all of the content to be taught allows the teacher to make informed instructional decisions about which content to use in particular learning contexts. We organized chapters 4 through 12 as knowledge packets (Ward et al., 2014) that present what (i.e., the big picture) you need to know to teach the content (as shown in figure 3.1 earlier in the chapter).
Each chapter begins with a description of the pedagogical approachwe recommend for teaching the content. Subsections discuss task modifications to address the needs of students with disabilities, organization of students for instruction, and space and equipment needs.
Next, we provide content maps. These provide an overview of the instructional tasks and the relationship among them and a broad recommendation about when content might be introduced in the K-12 curriculum. With this information, you can decide where your students are in their performances and then select instructional tasks to advance them. There is a combined content map that illustrates the flow of the tasks used to develop sport-specific techniques and tactics starting with beginners and ending with advanced players (in school settings). The combined content maps for chapters 6 through 12 are divided into three levels, and each level has its own separate content map that includes the application games (outline of box is dashed) used to refine the techniques and tactics in that level (outline of box is solid).
Then we provide our recommendations for lesson structure based on the content. An important feature of our lesson structure is a belief, common to many games pedagogies, thatstudents should play games that teach them to use what they have learned in past lessons at the start of the current lesson and to use what they have learned in the current lesson at the end of the lessons. We call these application games.Many of our instructional tasks are presented as games (e.g., overload games in invasion sports, target games in volleyball and badminton) to emphasize a particular outcome. However, application games allow new techniques and game sense elements to be added to previous outcomes to strengthen student performance. Application games are important pedagogical tools that allow you to determine the performance of the students; as such, they can drive the selection of instructional tasks to meet the needs of students. The lesson plan organization examples include sample warm-up activities that have been used for elementary and secondary classes.
In chapters 4 and 5 we provide sample 5- and 7-day block plans, and in chapters 6 through 12 we provide 5-, 10-, 15-, and 20-day block plans for each content area. These block plans are organized according to the lesson format we just described and provide examples of the content that could be used depending on the duration of the unit and the experiences and abilities of the students.
Next, we identify key grade-level outcomes for K-12 physical education and match them with instructional tasks in the content map. This allows you to choose which tasks you will use to meet specific standards.
The remainder of each chapter is devoted to presenting the instructional tasks. Each instructional task is organized using the following headings:
- Purpose
- Description
- Equipment
- Critical elements and cues
- Common errors, causes, and corrections
Learn more about Effective Physical Education Content and Instruction With Web Resource.
Stationary Partner Passing
Technique: In this task, students learn the basic techniques of passing and catching a basketball without a defender.
Purpose
Following are the purposes of the task as related to aspects of skilled performance.
- Technique: In this task, students learn the basic techniques of passing and catching a basketball without a defender.
- Fair play: Students pass the ball where the partner can receive it.
- Communication: Students hold their hands out to indicate they are ready to receive the pass.
Description
Divide students into pairs and have them stand 10 to 15 feet (3 to 4.6 meters) apart. On your signal, the students continuously pass a ball back and forth using the assigned pass (chest and bounce) and catch techniques. If students need motivation, have pairs count how many successful passes they can make in a row or within a designated time. As an extension, have students move back one step until they are 20 feet (6.1 meters) apart.
Equipment
One ball per pair of students
Critical Elements and Cues
Technique: Chest Pass
- Place both hands on the side of the ball and spread the fingers and thumbs. Cue: Fingers spread.
- Start with the ball close to chest. Cue: Ball to chest.
- Look at the receiver's chest. Cue: Eyes on target.
- Step toward the receiver with one leg. Cue: Step to receiver.
- Move the ball away from the chest by extending the elbows. Cue: Push.
- As the arms extend, pronate the arms and end in a thumb-down position. Cue: Thumbs down.
Technique: Bounce Pass
- Place both hands on the side of the ball and spread the fingers and thumbs. Cue: Fingers spread.
- Start with the ball close to chest. Cue: Ball to chest.
- Step toward the receiver with one leg. Cue: Step to receiver.
- Move the ball away from the chest by extending the elbows. Cue: Push.
- Push the ball toward the floor so it bounces two-thirds of the distance to your partner. Cue: Down and close.
- The target is between the receiver's knees and waist. Cue: Keep it low.
- Actively push the thumbs through the pass (thumbs back to thumbs down) to create backspin. Cue: Slam the door.
Technique: Receive a Pass
- Look at the ball as it comes into the hands. Cue: Eyes on ball.
- Step toward the ball as it comes toward you. Cue: Step to ball.
- As the ball contacts the hands, pull the ball into the body as you catch it. Cue: Absorb the ball.
- End with the ball close to the body and the elbows flexed. Cue: Bring it in.
Fair Play
- Pass the ball directly to the receiver.
- The pass must have enough force to reach the receiver, but it should not be so hard that the receiver cannot catch it.
Communication
- When you are ready to receive a pass, create a target with both hands by placing the hands in the target area and spreading the fingers and palms. Cue: Big target.
Common Errors, Causes, and Corrections
Catching
- The receiver does not step toward the ball. Cause: The receiver doesn't understand that a defender can intercept a passed ball. Correction: Place a student slightly behind and to the side of the receiver who tries to disrupt the catch.
- The receiver doesn't follow the ball into the hands. Cause: The receiver keeps the eyes on the passer. Correction: Remind the student to keep the eyes on the ball.
- On the catch, the ball is away from the body. Cause: The receiver does not absorb the ball into the body. Correction: Ask the student to exaggerate the flexing of the elbows such that the elbows are almost out to the side.
Chest Pass
- The ball does not make it to the receiver. Cause: The passer does not step toward the receiver. Correction: Place a poly spot in front of the passer and have the student step over it when making the pass.
- The ball does not make it to the receiver. Cause: The arms do not extend quickly. Correction: Remind the student to "slam the gate."
- The thumbs do not point down after release. Cause: The wrists are not pronated. Correction: Remind the student that the thumbs should end up pointing toward the wall. (This is an exaggeration, but it will help the student understand the need to pronate.)
- The pass does not arrive at the receiver's chest. Cause: The passer is not looking at the receiver's chest. Correction: Have the receiver create a number with one hand and then have the passer tell what the number was after the pass is made.
- The pass does not arrive at the receiver's chest. Cause: The passer doesn't have the strength to get the pass to the chest. Correction: Have partners move closer together.
Bounce Pass
- The ball has topspin as it hits the floor. Cause: The thumbs moved over the top of the ball. Correction: Stress the pronation of the wrists by reminding the student to keep the thumbs down.
- The ball does not make it to the receiver. Cause: The passer does not step toward the receiver. Correction: Place a poly spot in front of the passer and have the student step over it when making the pass.
- The ball does not make it to the receiver. Cause: The arms do not extend quickly. Correction: Remind the student to "slam the gate."
- The student catches the ball on the downward arc. Cause: The ball is bounced less than two-thirds of the way to the receiver. Correction: Place a marker two-thirds of the way to the receiver and have the passer aim for that spot.
Learn more about Effective Physical Education Content and Instruction With Web Resource.
Related Books


