
- Home
- Track and Field (Athletics)
- Physical Therapy/Physiotherapy
- Athletic Training and Therapy
- Athletic Taping, Bracing, and Casting

The premier text for athletic taping and bracing is back in a stunning fourth edition. Newly expanded to cover casting techniques, Athletic Taping, Bracing, and Casting, Fourth Edition With HKPropel Access, continues to set itself apart from the pack with superior photos and illustrations, precise step-by-step instructions, and pinpoint focus on the techniques that athletic trainers and therapists are most likely to apply in clinical practice.
Author Ian McLeod joins veteran author David Perrin in this fourth edition to lend further expertise in the application guidelines and precautions for casting and splinting. Additional enhancements include the following:
• New related online learning tools delivered via HKPropel feature featuring 56 competency testing checklists that detail the steps required to show competency
• Related online video with demonstrations of proper technique, including six clips dedicated to casting
• Twenty new casting and splinting techniques for Achilles tendon ruptures and common fractures of the foot, ankle, elbow, wrist, and hand
• Information about the importance of evidence-based practice for the techniques, presented by special contributor Carrie Docherty
Athletic Taping, Bracing, and Casting, Fourth Edition, features more than 650 full-color illustrations and photos demonstrating the most frequently applied procedures in clinical practice, some of which are broken down into as many as 16 steps. The book follows a systematic approach for each major joint and body region, covering traditional taping as well as rigid strap taping, elastic kinesiology taping, and techniques for immobilization with casting and splinting. The photos that depict taping sequences feature tape with darkened edges that enable readers to distinguish the layers and patterns of the tape applied in each step, providing invaluable visual aids for both students and professionals. In addition, icons in the text will indicate when a technique is also demonstrated in the companion online video.
With its concise anatomical descriptions and detailed anatomical illustrations similar to those normally found in advanced texts on anatomy, Athletic Taping, Bracing, and Casting clearly highlights the mechanisms of injury that are crucial for understanding effective taping, bracing, and casting. To further support the practice, the book also presents basic stretching and strengthening exercises for injury rehabilitation. These exercises are illustrated for each body part and can be used in conjunction with the taping, bracing, and casting techniques to prevent injury and help rehabilitated patients maintain strength and flexibility and safely return to play.
The clear instructional guidance and robust visual support offered in Athletic Taping, Bracing, and Casting, Fourth Edition, will allow both future and current athletic trainers to build proficiency—and then mastery—of the performance of these techniques.
Note: A code for accessing HKPropel is included with all new print books.
Chapter 1. Introduction to Taping, Bracing, Casting, and Splinting
Anatomy as the Foundation to Taping, Bracing, Casting, and Splinting
Evidence-Based Practice of Taping, Bracing, Casting, and Splinting
Role of Taping, Bracing, Casting, and Splinting
Apparatus of Taping and Bracing
Apparatus of Splinting and Casting
Knowing the Sport, Patient, and Injury
Preparing for Taping, Casting, and Splinting
Applying and Removing Tape
Applying and Removing Casts and Splints
Chapter 2. The Foot, Ankle, and Leg
Ankle Sprains
Achilles Tendon and Plantar Fasciitis
Arch Strains and Plantar Fasciitis
Morton’s Neuroma
Great Toe Sprains
Heel Contusions
Shin Splints
Foot Orthotics
Fractures of the Foot and Ankle
Chapter 3. The Knee
Collateral and Cruciate Ligament Sprains
Knee Braces
Knee Hyperextension
Patellofemoral Joint Pain
Chapter 4. The Thigh, Hip, and Pelvis
Hip Strains
Thigh Strains
Hip and Thigh Contusions
Chapter 5. The Shoulder and Arm
Acromioclavicular Joint Sprains
Glenohumeral Sprains
Arm Contusions
Chapter 6. The Elbow and Forearm
Elbow Sprains
Elbow Hypertension
Epicondylitis of the Humerus
Fractures of the Forearm
Chapter 7. The Wrist and Hand
Wrist Sprains
Thumb Sprains
Finger Sprains
Tendon Ruptures and Avulsions
Fractures of the Wrist and Hand
David H. Perrin, PhD, FNATA, has over 40 years of experience as an athletic training educator, clinician, and researcher. He is dean of the College of Health at the University of Utah and a professor of physical therapy and athletic training. He previously served at the University of North Carolina at Greensboro—first as dean of the School of Health and Human Performance from 2001 to 2007 and then as provost and executive vice chancellor from 2007 to 2014. Prior to that, Perrin directed the athletic training education program at the University of Virginia from 1986 to 2001. His awards and honors from the National Athletic Trainers’ Association (NATA) include the Sayers “Bud” Miller Distinguished Educator Award, the Most Distinguished Athletic Trainer Award, the William G. Clancy Medal for Distinguished Athletic Training Research, induction into the NATA Hall of Fame, and the NATA Research and Education Foundation Lifetime Contribution Award.
Perrin is a fellow of the American College of Sports Medicine and a fellow of the National Academy of Kinesiology. For 13 years, he was also a member of the NATA Professional Education Committee, helping to write the guidelines for accreditation of both undergraduate and graduate athletic training education programs. In 2011, Perrin was elected a fellow of the National Athletic Trainers’ Association. He was editor in chief of the Journal of Athletic Training from 1996 to 2004 and was the founding editor of the Journal of Sport Rehabilitation. He is author of Isokinetic Exercise and Assessment and Athletic Taping and Bracing, editor of the third edition of The Injured Athlete, and coauthor of Research Methods in Athletic Training.
In his free time, Perrin enjoys traveling, running and cycling, and vacationing at his lake cottage in Vermont.
Ian McLeod, PA-C, ATC, is an assistant clinical professor in the department of physician assistant studies at Northern Arizona University. Prior to joining Northern Arizona University, he worked clinically as a physician assistant at University Sports and Family Medicine, part of Dignity Health Medical Group.
McLeod’s expertise includes athletic training, sports medicine, and primary care. He is a member of the Arizona State Association of Physician Assistants, Arizona Athletic Trainers’ Association, National Athletic Trainers’ Association, and American Academy of Physician Assistants. He has extensive experience working with world-class athletes, particularly swimmers. McLeod was a member of the U.S. team’s medical staff at the 2008 Summer Olympic Games in Beijing. He remains involved with USA Swimming's High Performance Network and has been given the organization's highest honor, the Gold Standard Award. He is the author of Swimming Anatomy.
McLeod has a master of education degree in athletic training from the University of Virginia as well as a master of science degree in physician assistant studies from AT Still University.
Applying and removing casts and splints
This section details the fundamental steps and important considerations that pertain to applying and removing fiberglass casts and splints.
This section details the fundamental steps and important considerations that pertain to applying and removing fiberglass casts and splints.
Application of a Fiberglass Cast
- Based upon history, physical exam, and imaging studies, determine what type of cast should be applied.
- Inspect the involved extremity and document the presence or absence of skin lesions, open wounds, and swelling.
- Presence of an open wound in an area that will be covered by the cast is a contraindication to applying the cast.
- If post-traumatic swelling is still present and the injury occurred less than 48 hours ago, it is contraindicated to apply a cast. If the injury occurred more than 48 hours ago, swelling is gradually decreasing, and the patient is capable of elevating the involved extremity, a cast can be applied. Manifestations of compartment syndrome must be reviewed.
- Check and document distal neurovascular status for the involved and uninvolved extremity.
- Cover the patient's clothing with a protective barrier.
- To determine the amount of stockinette needed, measure about 4 inches (10 cm) beyond each end of the area that will be casted.
- Apply stockinette and place each joint that will be immobilized in a functional position. Specific positions are as follows:
- Elbow: 90º of flexion (see figure 6.13a)
- Wrist: 30º of extension (see figure 7.22a)
- Thumb: midway between maximal radial and palmar abduction (see figure 7.22a)
- Hand: metacarpophalangeal joints in 70º of flexion and interphalangeal joints in full extension (see figure 7.19a)
- Knee: 15º to 30º of flexion
- Ankle: 0º of dorsiflexion (see figure 2.33a)
- Smooth out any wrinkles in the stockinette. If needed, trim the stockinette over flexor surfaces.
- Apply cast padding by beginning about 1 inch (2-3 cm) beyond the distal end of the area that will be casted. Roll the cast padding circumferentially from distal to proximal, making sure to overlap the previous layer by 50%. This will provide two layers of padding. Ideally you should have two to three layers of padding. The cast padding should extend about 1 inch (2-3 cm) beyond the proximal end of the area that will be casted (see figure 2.33e).
- Extra padding can be applied to protect bony prominences (e.g., ulnar styloid, olecranon process, medial malleoli, and lateral malleoli).
- Place extra padding at the proximal and distal edges of the area that will be casted.
- Too much padding on the flexor surface of a joint will increase the risk of skin irritation and skin breakdown.
- Excessive padding can compromise the ability of the cast to immobilize the injured area.
- Apply fiberglass casting material by beginning about 1 inch (2-3 cm) in from the distal end of the cast padding. The fiberglass material should be rolled circumferentially from distal to proximal, overlapping the previous layer by 50%. Maintaining a small amount of uniform tension will reduce the risk of skin irritation, neurological injury, and vascular compromise (see figure 2.33h).
- After applying two to three layers of fiberglass, confirm that functional positioning of the joints has been maintained. Using the palm and heel of the hand, mold the casting material as needed. Never use the fingertips when molding because they may create focal pressure points that increase the risk of skin irritation and pressure sores.
- Prior to applying the final layer of fiberglass, fold the stockinette back over the previously applied fiberglass. The final layer of fiberglass should be applied in a distal to proximal direction. If necessary, mold the final layers of casting material.
- Following cast application. recheck and document distal neurovascular status for the involved and uninvolved extremity.
Video 1.1 demonstrates the preparation and application of a fiberglass cast.
Cast removal is best accomplished with use of a cast saw (see figure 1.23a) because it has an oscillating blade that is specially designed to cut hardened fiberglass and plaster. While the oscillating blade can damage the underlying soft tissue, the risk of injury is significantly less in comparison to that of a rotating saw blade. As the oscillating blade cuts the hard cast material, a significant amount of heat is generated, which has the potential to burn the patient. Inserting a plastic cutting guard between the stockinette and skin and using proper cutting technique reduces the risk of soft-tissue injury. When cutting the fiberglass it is best to use the "up, over, and down" technique described here:
- While holding the saw blade perpendicular to the cast (see figure 1.24a), apply gentle downward pressure until there is a sudden decrease in resistance, which indicates that the saw blade has cut through the cast.
- Lift upwards to remove the saw blade. Once the saw blade is clear of the cast, move it over to the adjacent portion of the cast.
- Once again, apply gentle downward pressure until the blade cuts through the cast.
- Repeat this technique along the entire length of the cast.
- Resist the temptation to "drag" or "push" the saw blade along the length of the cast because doing so significantly increases the risk of soft-tissue injury.
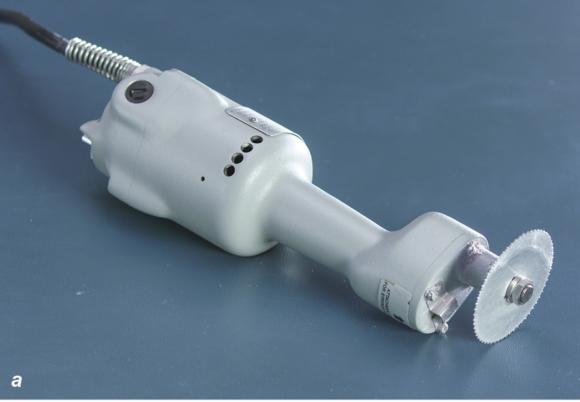
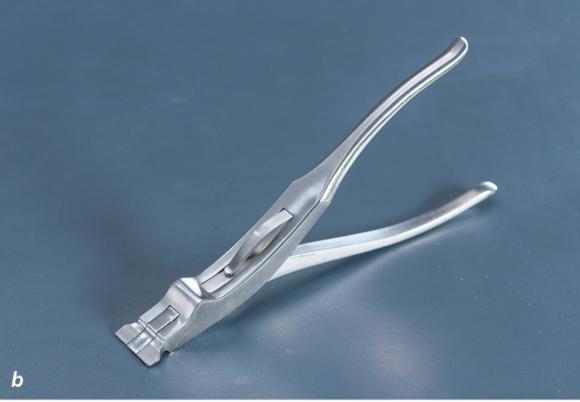
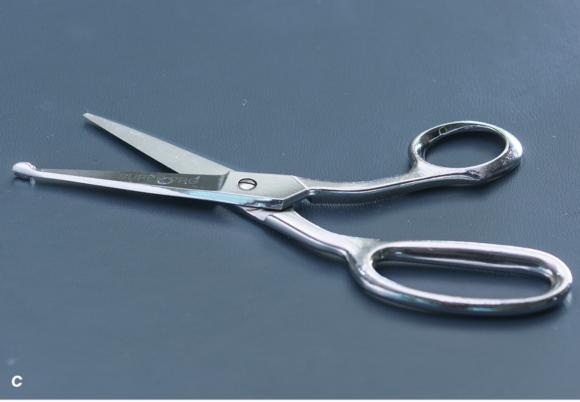
Figure 1.23 (a) Cast saw, (b) cast spreader, and (c) bandage scissors that are necessary for cast removal.
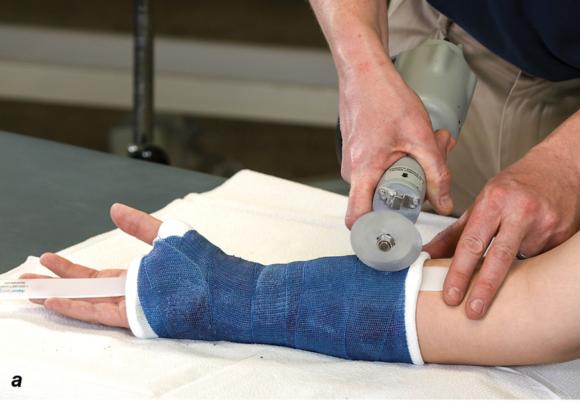
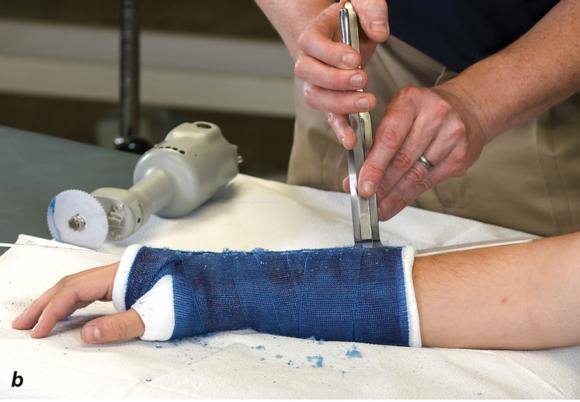
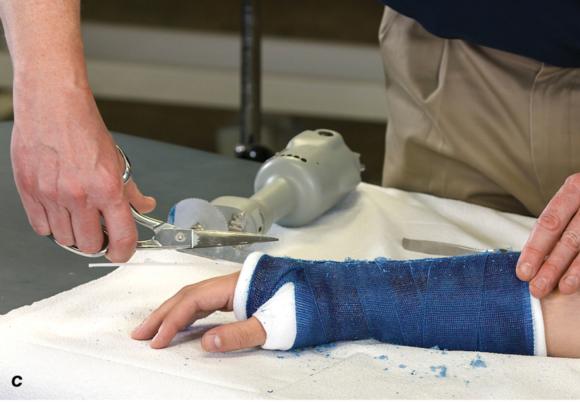
Figure 1.24 (a) Hold the cast saw blade perpendicular to the cast. (b) Cast spreaderis used to separate the opposing edges of the cast. (c) Bandage scissors are used to cut the underlying cast padding and stockinette.
Cast removal is accomplished by making a longitudinal cut along the entire length of the cast followed by a similar cut on the opposing side of the cast. Once both cuts have been completed, a cast spreader (see figures 1.23b and 1.24b) can be used to separate the opposing halves of the cast, making it much easier to use bandage scissors (see figures 1.23c and 1.24c) to cut along the length of the underlying cast padding and stockinette.
Video 1.3 demonstrates cast removal.
Splint removal is accomplished by first removing the elastic wrap that secures the splint in place. Next, the rigid splint is removed. When doing so it is extremely important to support the injured extremity to minimize any type of movement or stress that could compromise the healing that has taken place. Bandage scissors are used to cut along the entire length of the cast padding and stockinette, which is then removed.
We've included this general competency checklist to help instructors and students alike evaluate the knowledge, skills, and techniques necessary for effective injury assessment and casting or splinting.
The principles we have presented in this chapter will prepare you for the specific treatments that we discuss in the remaining chapters. Good luck as you begin your training in these gratifying psychomotor skills!
Visit the web resource for checklists and video clips related to topics discussed in this chapter.
Casting and Splinting Competency Checklist
- Determines mechanism of injury
- Ensures a clean body part that is free from open wounds
- Checks distal neurovascular status
- Selects appropriate splint or cast
- Properly positions patient and body part
- Correctly applies appropriate splinting or casting or combination procedure
- Checks distal neurovascular status
- Educates patient on signs and symptoms that would warrant removal of the splint or cast
- Correctly instructs patient on how to remove splint or how to seek assistance with removing a cast
Learn more about Athletic Taping, Bracing, and Casting, Fourth Edition.
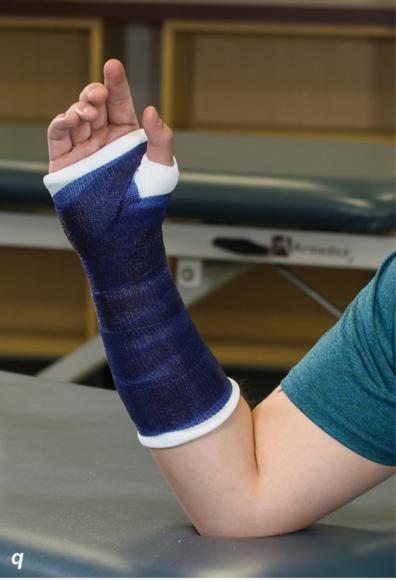
Methods for immobilizing the fractured foot and ankle
Immobilization of the fractured foot and ankle can be accomplished with splints or casts such as a posterior splint (figure 2.32), non-weight-bearing short leg cast (figure 2.33), and weight-bearing short leg cast (figure 2.34).
Immobilization of the fractured foot and ankle can be accomplished with splints or casts such as a posterior splint (figure 2.32), non-weight-bearing short leg cast (figure 2.33), and weight-bearing short leg cast (figure 2.34).
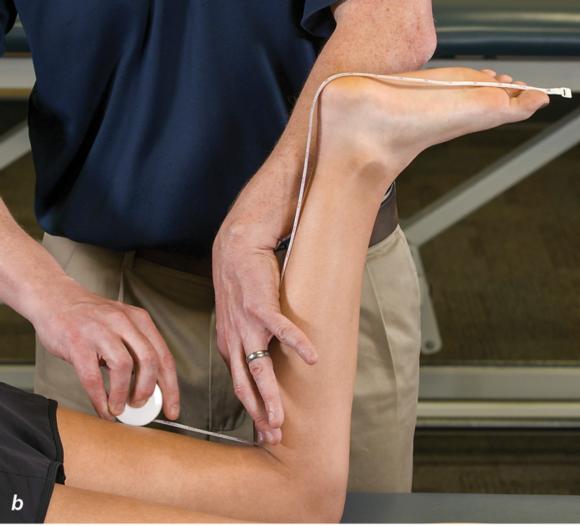
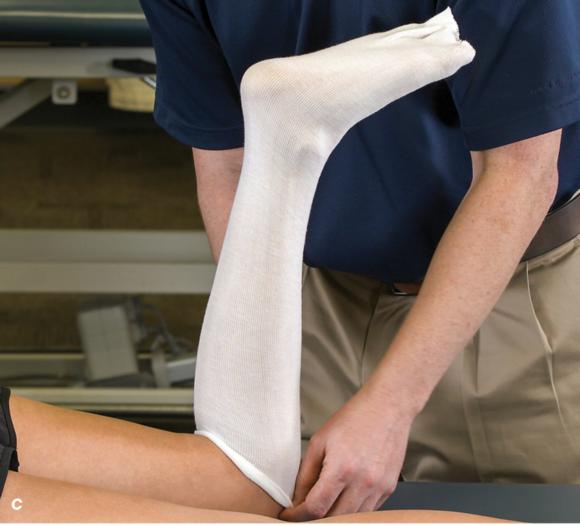
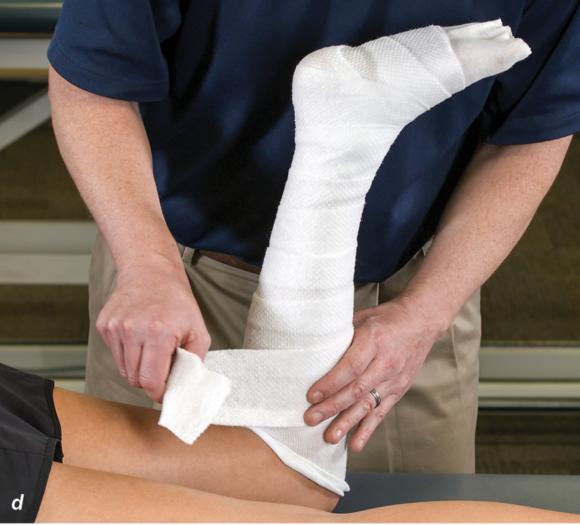
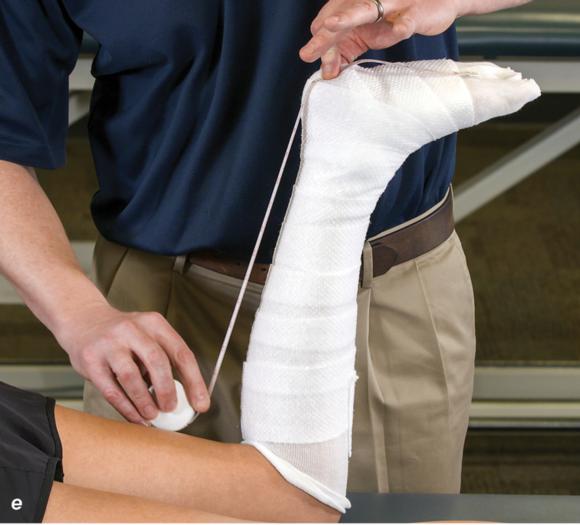
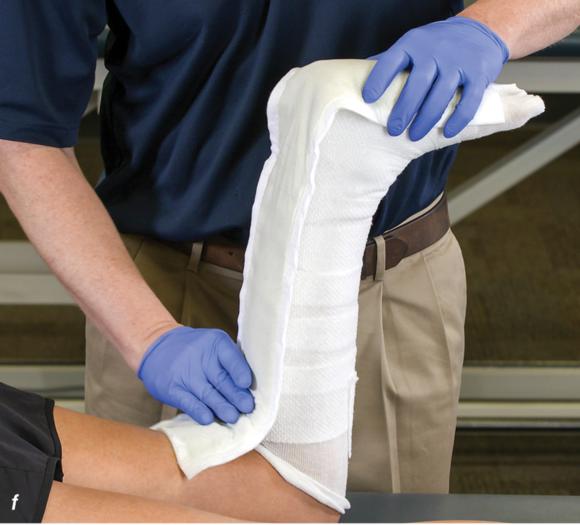
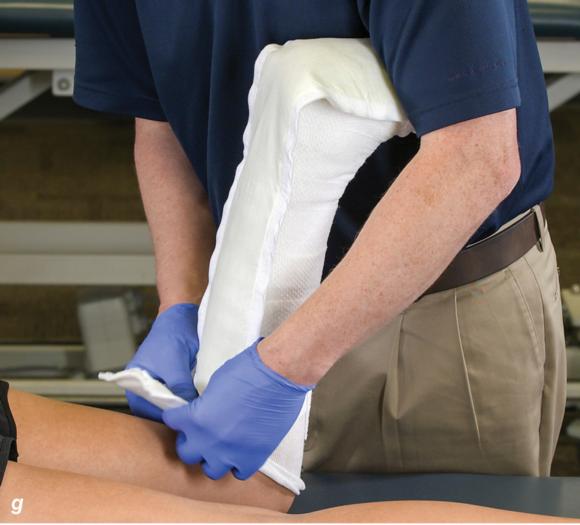
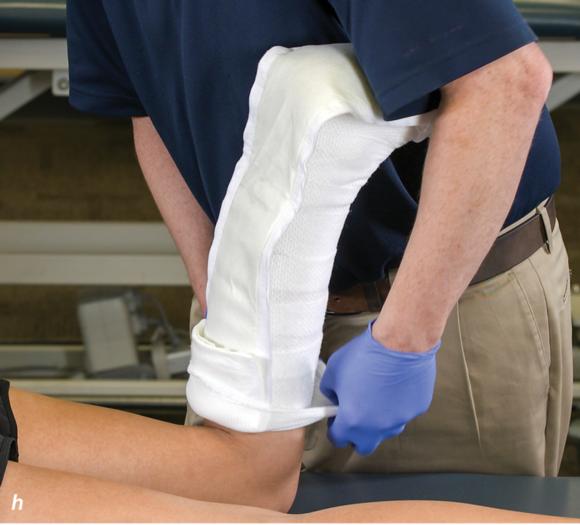
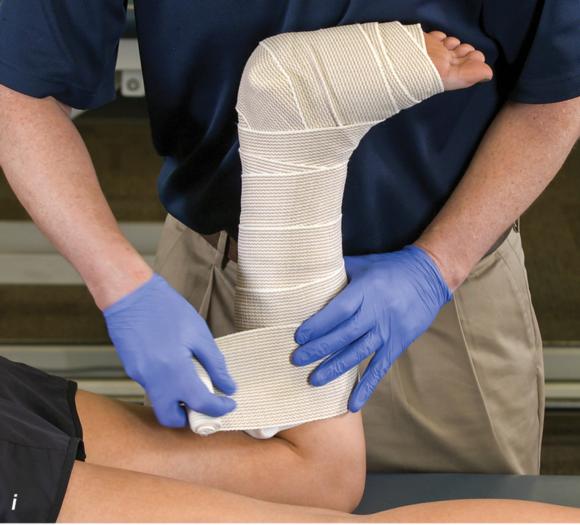
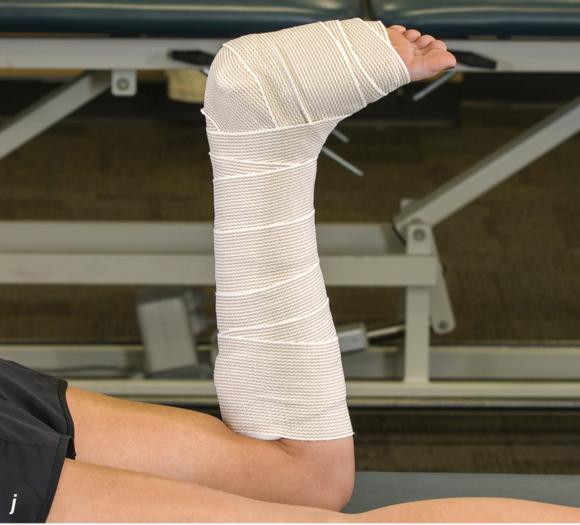
Figure 2.32 Posterior splinting procedure applied to immobilize the foot and ankle. (a) Position the foot and ankle in the functional position, which is 0° of dorsiflexion. (b) Measure 4 inches (10 cm) beyond the base of the popliteal fossa and 4 inches (10 cm) beyond the metatarsal heads to determine the amount of stockinette needed. (c) Apply the stockinette. (d) Beginning at the metatarsal heads, roll the cast padding circumferentially from distal to proximal ending at the base of the popliteal fossa. (e) Measure from the base of the popliteal fossa to the metatarsal heads to determine the length of the splint. (f) Starting at the metatarsal heads, position the posterior splint against the plantar surface of the foot and posterior aspect of the leg. (g) Fold down any excess splint material at the knee. (h) Fold the stockinette and cast padding over the ends of the fiberglass splint. (i) Starting distally, secure the splint in place with an elastic wrap. (j) Completed posterior splint.
Video 2.11 demonstrates the application of a posterior leg splint.
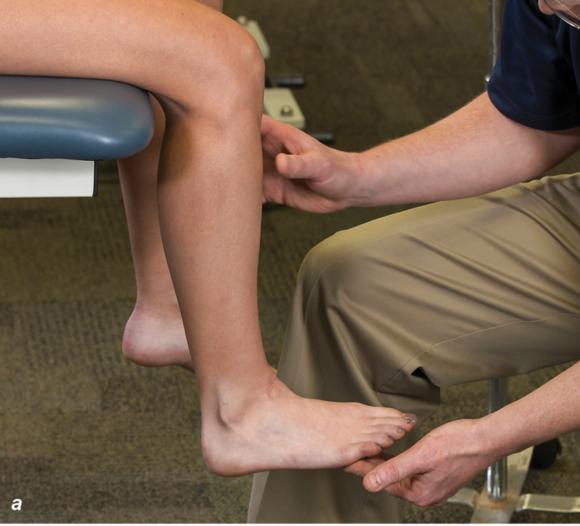
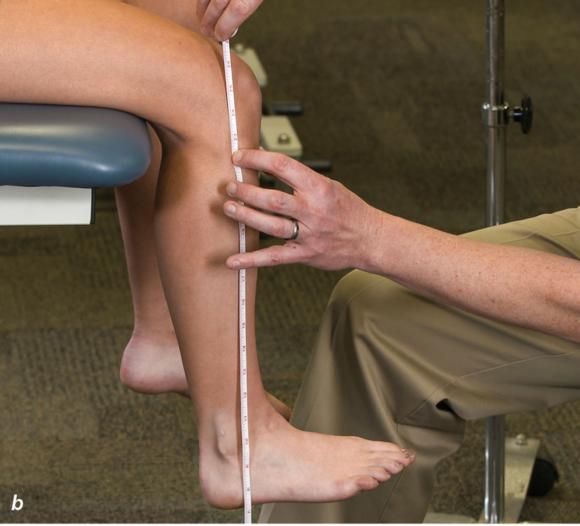
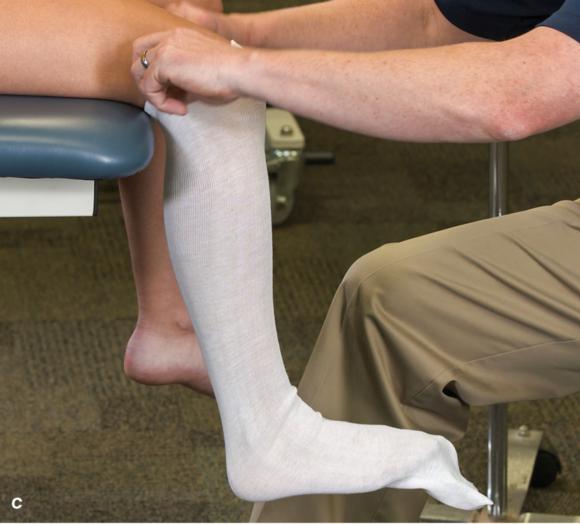
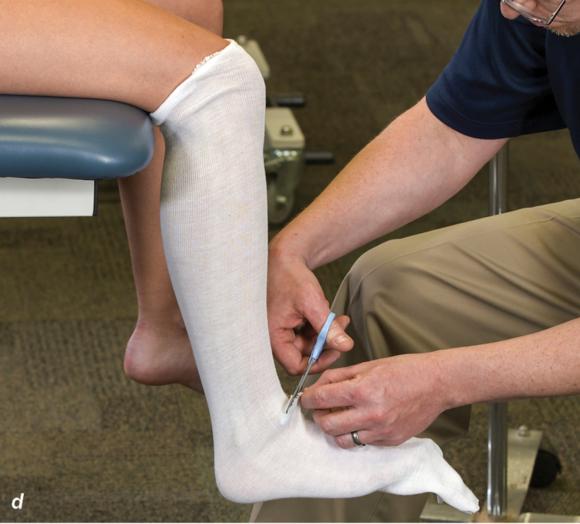
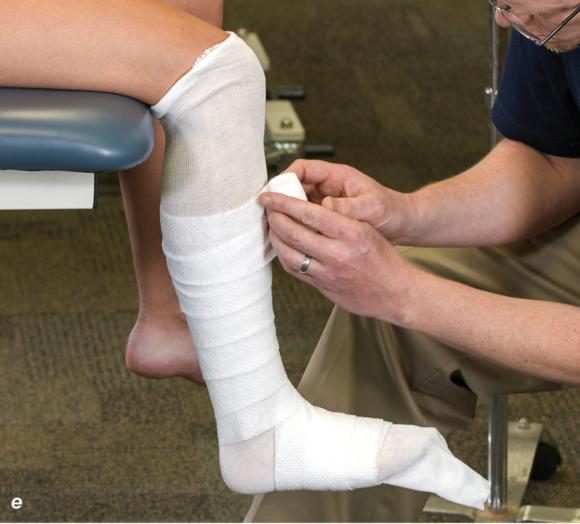

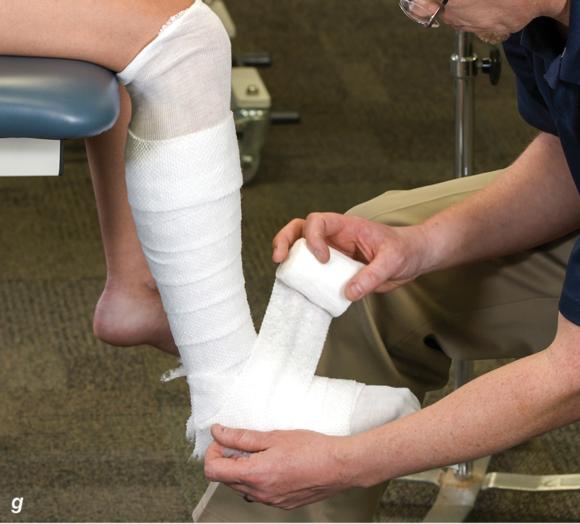
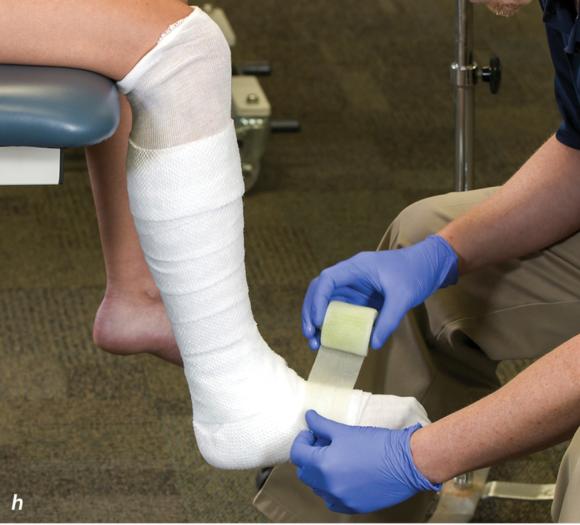
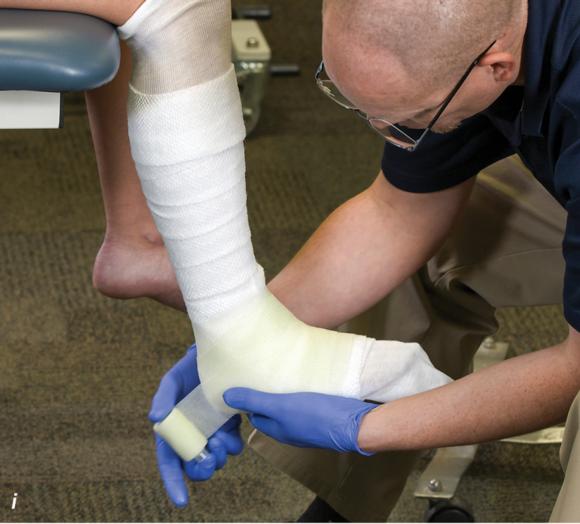
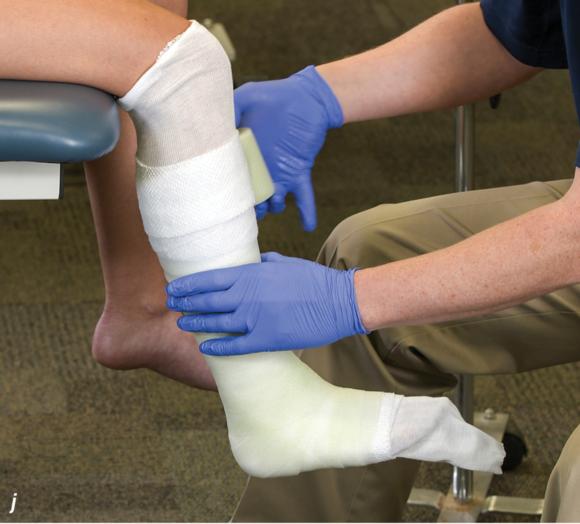

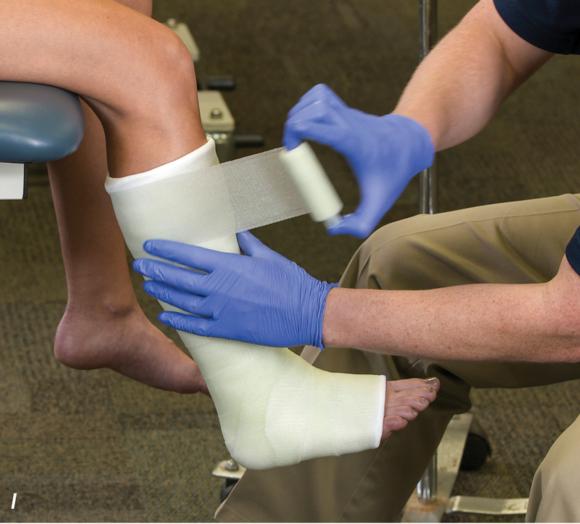
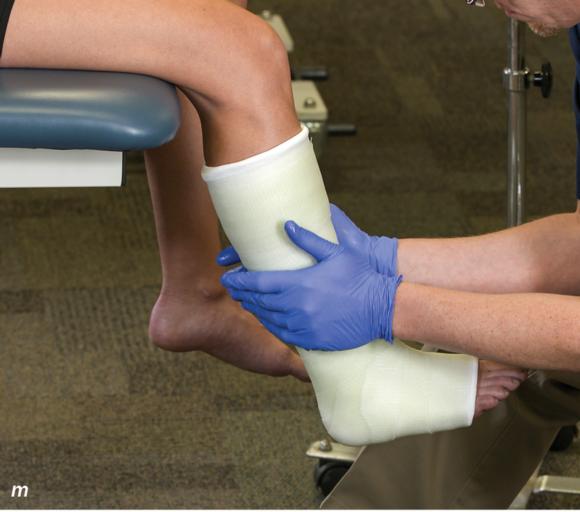
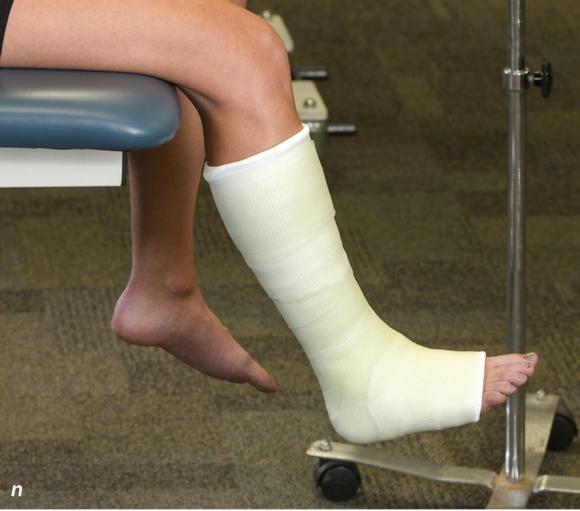
Figure 2.33 Non-weight-bearing short leg cast to immobilize the foot and ankle. (a) Position the foot and ankle in the functional position, which is 0° of dorsiflexion. (b) Measure 4 inches (10 cm) beyond the tibial tubercle and 4 inches (10 cm) beyond the metatarsal heads to determine the amount of stockinette needed. (c) Apply the stockinette, and (d) cut a slit in the stockinette across the front part of the ankle to eliminate any folds. (e) Beginning at the metatarsal heads, roll the cast padding circumferentially from distal to proximal, overlapping by 50% to end at the tibial tubercle. Do not cover the heel at this time. (f) Apply extra padding to protect the malleoli. (g) Cast padding should now be applied to the heel. (h) Starting at the metatarsal heads, begin applying the fiberglass from distal to proximal, overlapping the previous layer by 50%. (i) Initially close in the foot and ankle with fiberglass, (j) followed by the lower leg. (k) Fold down the stockinette and (l) secure the ends of the stockinette with the final layers of fiberglass. (m) Using the palm and heel of your hand, mold the casting material as needed. (n) Completed non-weight-bearing short leg cast.
Learn more about Athletic Taping, Bracing, and Casting, Fourth Edition.
Applying and removing casts and splints
This section details the fundamental steps and important considerations that pertain to applying and removing fiberglass casts and splints.
This section details the fundamental steps and important considerations that pertain to applying and removing fiberglass casts and splints.
Application of a Fiberglass Cast
- Based upon history, physical exam, and imaging studies, determine what type of cast should be applied.
- Inspect the involved extremity and document the presence or absence of skin lesions, open wounds, and swelling.
- Presence of an open wound in an area that will be covered by the cast is a contraindication to applying the cast.
- If post-traumatic swelling is still present and the injury occurred less than 48 hours ago, it is contraindicated to apply a cast. If the injury occurred more than 48 hours ago, swelling is gradually decreasing, and the patient is capable of elevating the involved extremity, a cast can be applied. Manifestations of compartment syndrome must be reviewed.
- Check and document distal neurovascular status for the involved and uninvolved extremity.
- Cover the patient's clothing with a protective barrier.
- To determine the amount of stockinette needed, measure about 4 inches (10 cm) beyond each end of the area that will be casted.
- Apply stockinette and place each joint that will be immobilized in a functional position. Specific positions are as follows:
- Elbow: 90º of flexion (see figure 6.13a)
- Wrist: 30º of extension (see figure 7.22a)
- Thumb: midway between maximal radial and palmar abduction (see figure 7.22a)
- Hand: metacarpophalangeal joints in 70º of flexion and interphalangeal joints in full extension (see figure 7.19a)
- Knee: 15º to 30º of flexion
- Ankle: 0º of dorsiflexion (see figure 2.33a)
- Smooth out any wrinkles in the stockinette. If needed, trim the stockinette over flexor surfaces.
- Apply cast padding by beginning about 1 inch (2-3 cm) beyond the distal end of the area that will be casted. Roll the cast padding circumferentially from distal to proximal, making sure to overlap the previous layer by 50%. This will provide two layers of padding. Ideally you should have two to three layers of padding. The cast padding should extend about 1 inch (2-3 cm) beyond the proximal end of the area that will be casted (see figure 2.33e).
- Extra padding can be applied to protect bony prominences (e.g., ulnar styloid, olecranon process, medial malleoli, and lateral malleoli).
- Place extra padding at the proximal and distal edges of the area that will be casted.
- Too much padding on the flexor surface of a joint will increase the risk of skin irritation and skin breakdown.
- Excessive padding can compromise the ability of the cast to immobilize the injured area.
- Apply fiberglass casting material by beginning about 1 inch (2-3 cm) in from the distal end of the cast padding. The fiberglass material should be rolled circumferentially from distal to proximal, overlapping the previous layer by 50%. Maintaining a small amount of uniform tension will reduce the risk of skin irritation, neurological injury, and vascular compromise (see figure 2.33h).
- After applying two to three layers of fiberglass, confirm that functional positioning of the joints has been maintained. Using the palm and heel of the hand, mold the casting material as needed. Never use the fingertips when molding because they may create focal pressure points that increase the risk of skin irritation and pressure sores.
- Prior to applying the final layer of fiberglass, fold the stockinette back over the previously applied fiberglass. The final layer of fiberglass should be applied in a distal to proximal direction. If necessary, mold the final layers of casting material.
- Following cast application. recheck and document distal neurovascular status for the involved and uninvolved extremity.
Video 1.1 demonstrates the preparation and application of a fiberglass cast.
Cast removal is best accomplished with use of a cast saw (see figure 1.23a) because it has an oscillating blade that is specially designed to cut hardened fiberglass and plaster. While the oscillating blade can damage the underlying soft tissue, the risk of injury is significantly less in comparison to that of a rotating saw blade. As the oscillating blade cuts the hard cast material, a significant amount of heat is generated, which has the potential to burn the patient. Inserting a plastic cutting guard between the stockinette and skin and using proper cutting technique reduces the risk of soft-tissue injury. When cutting the fiberglass it is best to use the "up, over, and down" technique described here:
- While holding the saw blade perpendicular to the cast (see figure 1.24a), apply gentle downward pressure until there is a sudden decrease in resistance, which indicates that the saw blade has cut through the cast.
- Lift upwards to remove the saw blade. Once the saw blade is clear of the cast, move it over to the adjacent portion of the cast.
- Once again, apply gentle downward pressure until the blade cuts through the cast.
- Repeat this technique along the entire length of the cast.
- Resist the temptation to "drag" or "push" the saw blade along the length of the cast because doing so significantly increases the risk of soft-tissue injury.
Figure 1.23 (a) Cast saw, (b) cast spreader, and (c) bandage scissors that are necessary for cast removal.
Figure 1.24 (a) Hold the cast saw blade perpendicular to the cast. (b) Cast spreaderis used to separate the opposing edges of the cast. (c) Bandage scissors are used to cut the underlying cast padding and stockinette.
Cast removal is accomplished by making a longitudinal cut along the entire length of the cast followed by a similar cut on the opposing side of the cast. Once both cuts have been completed, a cast spreader (see figures 1.23b and 1.24b) can be used to separate the opposing halves of the cast, making it much easier to use bandage scissors (see figures 1.23c and 1.24c) to cut along the length of the underlying cast padding and stockinette.
Video 1.3 demonstrates cast removal.
Splint removal is accomplished by first removing the elastic wrap that secures the splint in place. Next, the rigid splint is removed. When doing so it is extremely important to support the injured extremity to minimize any type of movement or stress that could compromise the healing that has taken place. Bandage scissors are used to cut along the entire length of the cast padding and stockinette, which is then removed.
We've included this general competency checklist to help instructors and students alike evaluate the knowledge, skills, and techniques necessary for effective injury assessment and casting or splinting.
The principles we have presented in this chapter will prepare you for the specific treatments that we discuss in the remaining chapters. Good luck as you begin your training in these gratifying psychomotor skills!
Visit the web resource for checklists and video clips related to topics discussed in this chapter.
Casting and Splinting Competency Checklist
- Determines mechanism of injury
- Ensures a clean body part that is free from open wounds
- Checks distal neurovascular status
- Selects appropriate splint or cast
- Properly positions patient and body part
- Correctly applies appropriate splinting or casting or combination procedure
- Checks distal neurovascular status
- Educates patient on signs and symptoms that would warrant removal of the splint or cast
- Correctly instructs patient on how to remove splint or how to seek assistance with removing a cast
Learn more about Athletic Taping, Bracing, and Casting, Fourth Edition.
Methods for immobilizing the fractured foot and ankle
Immobilization of the fractured foot and ankle can be accomplished with splints or casts such as a posterior splint (figure 2.32), non-weight-bearing short leg cast (figure 2.33), and weight-bearing short leg cast (figure 2.34).
Immobilization of the fractured foot and ankle can be accomplished with splints or casts such as a posterior splint (figure 2.32), non-weight-bearing short leg cast (figure 2.33), and weight-bearing short leg cast (figure 2.34).
Figure 2.32 Posterior splinting procedure applied to immobilize the foot and ankle. (a) Position the foot and ankle in the functional position, which is 0° of dorsiflexion. (b) Measure 4 inches (10 cm) beyond the base of the popliteal fossa and 4 inches (10 cm) beyond the metatarsal heads to determine the amount of stockinette needed. (c) Apply the stockinette. (d) Beginning at the metatarsal heads, roll the cast padding circumferentially from distal to proximal ending at the base of the popliteal fossa. (e) Measure from the base of the popliteal fossa to the metatarsal heads to determine the length of the splint. (f) Starting at the metatarsal heads, position the posterior splint against the plantar surface of the foot and posterior aspect of the leg. (g) Fold down any excess splint material at the knee. (h) Fold the stockinette and cast padding over the ends of the fiberglass splint. (i) Starting distally, secure the splint in place with an elastic wrap. (j) Completed posterior splint.
Video 2.11 demonstrates the application of a posterior leg splint.
Figure 2.33 Non-weight-bearing short leg cast to immobilize the foot and ankle. (a) Position the foot and ankle in the functional position, which is 0° of dorsiflexion. (b) Measure 4 inches (10 cm) beyond the tibial tubercle and 4 inches (10 cm) beyond the metatarsal heads to determine the amount of stockinette needed. (c) Apply the stockinette, and (d) cut a slit in the stockinette across the front part of the ankle to eliminate any folds. (e) Beginning at the metatarsal heads, roll the cast padding circumferentially from distal to proximal, overlapping by 50% to end at the tibial tubercle. Do not cover the heel at this time. (f) Apply extra padding to protect the malleoli. (g) Cast padding should now be applied to the heel. (h) Starting at the metatarsal heads, begin applying the fiberglass from distal to proximal, overlapping the previous layer by 50%. (i) Initially close in the foot and ankle with fiberglass, (j) followed by the lower leg. (k) Fold down the stockinette and (l) secure the ends of the stockinette with the final layers of fiberglass. (m) Using the palm and heel of your hand, mold the casting material as needed. (n) Completed non-weight-bearing short leg cast.
Learn more about Athletic Taping, Bracing, and Casting, Fourth Edition.
Related Books


