
- Home
- Massage Therapy
- Health Care in Exercise and Sport
- Athletic Training and Therapy
- Soft Tissue and Trigger Point Release

Soft Tissue and Trigger Point Release
by Jane Johnson
Series: Hands-On Guides for Therapists
288 Pages
Soft Tissue and Trigger Point Release, Second Edition, is a practical guide to understanding and applying soft tissue release (STR), including how it can be used to deactivate trigger points and maximize patient outcomes of treatment and rehabilitation. Whether you are a student or a professional, the detailed instruction and numerous photos will help you gain proficiency and confidence in applying these techniques.
Soft Tissue and Trigger Point Release thoroughly explains the differences between the three types of STR—passive (clients do not help), active-assisted (clients and therapists work together), and active (clients do it on their own)—and provides step-by-step descriptions for performing each type. This edition incorporates new content on how soft tissue release may be used to deactivate trigger points, aiding in the treatment of musculoskeletal pain. Additional updates include the following:
• More than 150 new photographs and 21 new anatomical illustrations
• Guiding arrows overlaid on photos to show the direction in which to apply pressure
• Illustrations of trigger points found in 21 muscles
• New descriptions of the use of active-assisted STR on the iliotibial band (ITB), infraspinatus, biceps brachii, and triceps
• New sections describing how to apply active STR to gluteals, trapezius, scalenes, rhomboid, and pectoral muscles
• Instruction for applying passive STR to shoulder adductors
• Case studies providing examples of how STR was used with four clients with differing problems
Complementing each technique are information on the key holds, moves, and stances for various muscles and handy reference charts indicating the types of clients and situations for which each technique is particularly useful. The full-color photos depict the locks and stretches, while some of the more difficult techniques are accompanied by photos showing the position of the therapist and a skeletal overlay on the client so you can pinpoint the specific muscle being targeted. The book also explains how to use alternative options—such as massage tools and forearms, fists, and elbows—to protect your hands and thumbs from overuse. Tip boxes offer practical comments on applying the techniques, while Client Talk boxes provide insight into real-world situations.
Soft Tissue and Trigger Point Release also shows you how to incorporate the proper techniques into a treatment program. It guides you through the consultation process and provides examples of initial questions to ask clients and various assessment forms to use in identifying clients’ needs. Using case studies and comparisons, you will learn how the data gleaned from clients can guide the design of an effective treatment program.
Soft Tissue and Trigger Point Release, Second Edition, is part of the Hands-On Guides for Therapists series, developed to provide the best clinical and educational resources available for those in bodywork professions.
Part I. Getting Started With Soft Tissue Release
Chapter 1. Introduction to Soft Tissue Release
Who Should Have Soft Tissue Release
How Soft Tissue Release Works
Where to Perform Soft Tissue Release
When to Perform Soft Tissue Release
Benefits of Soft Tissue Release
Soft Tissue Release and Trigger Points
Closing Remarks
Quick Questions
Chapter 2. Preparing for Soft Tissue Release
Using Your Body to Apply STR
Using Tools to Apply STR
Consultation With the Client
Caution and Safety Issues
Three Methods of STR
Measuring the Effectiveness of STR
Frequently Asked Questions and Troubleshooting Tips
Closing Remarks
Quick Questions
Part II. Soft Tissue Release Techniques
Chapter 3. Passive Soft Tissue Release
Introduction to Passive Soft Tissue Release
Key Holds, Moves and Stances for Passive STR
Safety Guidelines for Passive STR
When Is Passive STR Indicated?
Using Passive STR to Treat Trigger Points
How to Become Proficient in the Use of Passive STR
Quick Questions
Chapter 4. Active-Assisted Soft Tissue Release
Introduction to Active-Assisted Soft Tissue Release
Key Holds, Moves and Stances for Active-Assisted STR
Safety Guidelines for Active-Assisted STR
When Is Active-Assisted STR Indicated?
Using Active-Assisted STR to Treat Trigger Points
How to Become Proficient in the Use of Active-Assisted STR
Quick Questions
Chapter 5. Active Soft Tissue Release
Introduction to Active Soft Tissue Release
Key Holds, Moves and Stances for Active STR
Safety Guidelines for Active STR
When Is Active STR Indicated?
Using Active STR to Treat Trigger Points
How to Become Proficient in the Use of Active STR
Quick Questions
Part III. Applying Soft Tissue Release
Chapter 6. Soft Tissue Release for the Trunk
Rhomboids
Pectoralis Major and Minor
Levator Scapulae
Upper Trapezius
Erector Spinae (Upper)
Scalenes
Quick Questions
Chapter 7. Soft Tissue Release for the Lower Limbs
Hamstrings
Calf
Foot
Quadriceps
Tibialis Anterior
Peroneals (Fibulari)
Gluteals
Iliotibial Band (ITB)/Vastus Lateralis
Iliacus
Quick Questions
Chapter 8. Soft Tissue Release for the Upper Limbs
Triceps
Biceps Brachii
Shoulder Adductors
Infraspinatus
Wrist and Finger Extensors
Wrist and Finger Flexors
Quick Questions
Part IV. Soft Tissue Release Programmes
Chapter 9. Creating a Soft Tissue Release Programme
Initial Questions
Client’s Medical History
Using a Body Map
Measuring Subjective Sensations
Postural Assessment
Range of Motion and Other Special Tests
Programme for Treatment
Case Studies
Closing Remarks
Quick Questions
Jane Johnson, MSc, PhD, is a chartered physiotherapist and sport massage therapist specializing in occupational health and massage. In this role she spends much time assessing the posture of clients and examining whether work, sport, or recreational postures may be contributing to their symptoms. She devises postural correction plans that include both hands-on and hands-off techniques.
Johnson has taught continuing professional development (CPD) workshops for many organizations both in the UK and abroad. This experience has brought her into contact with thousands of therapists of all disciplines and informed her own practice. Johnson has a passion for inspiring and supporting students and newly qualified therapists to gain confidence in the use of assessment and treatment techniques.
Johnson is a member of the Chartered Society of Physiotherapy and is registered with the Health Professions Council. A member of the Medico Legal Association of Chartered Physiotherapists, she provides expert witness reports on cases involving soft tissue therapies. Johnson is the author of six titles in the Hands-On Guides for Therapists series. These are, Postural Assessment, Postural Correction, Therapeutic Stretching, Soft Tissue Release, Deep Tissue Massage and Soft Tissue and Trigger Point Release. Postural Assessment has sold over 10,000 copies. She is also the author of The Big Back Book: Tips & Tricks for Therapists.
Jane regularly delivers webinars on popular musculoskeletal topics, as well as on life working as a therapist. In her Facebook group (Jane Johnson The Friendly Physio), she shares tips and tricks in her usual, friendly manner.
Johnson lives in the north of England in an unmodernized house where she creates books and webinars, makes art and rehomes big rescue dogs.
How soft tissue release works
Take a look at the pictures shown in figures 1.1 through 1.3. They represent what happens when a gross stretch is applied to a muscle.
Take a look at the pictures shown in figures 1.1 through 1.3. They represent what happens when a gross stretch is applied to a muscle. The therapist is holding two resistance bands tied together—one red, the other black. The red resistance band is extremely stretchy; the black is tough and less stretchy. The red resistance band represents normal, healthy muscle tissue; the black resistance band represents an area of tight muscle tissue. Together these bands represent one whole muscle. Look at what happens in figure 1.1 when the therapist moves his right hand. Which part of the muscle does the stretching—the pliable (red) part or the tough (black) part? Clearly, the pliable band is doing the most stretching.

Figure 1.1 Notice which band is doing the stretching.
Now look at figure 1.2. What happens when the therapist moves his left hand? Which part of the muscle stretches the most—the pliable (red) part or the tough (black) part? Again, the pliable band is doing most of the stretching.
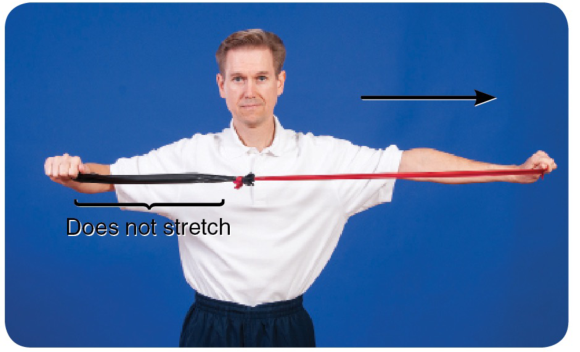
Figure 1.2 Which band is doing the stretching now?
Finally, notice what happens when the therapist moves both his right and left hands apart so they are equidistant (figure 1.3).
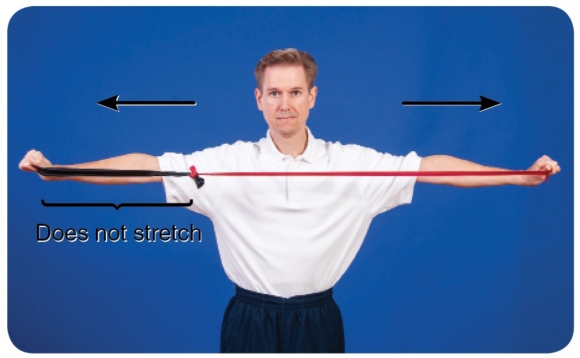
Figure 1.3 Even with an equidistant stretch, the more pliable band does the most stretching.
You can see from the illustrations that the pliable part of the muscle (the red band) does most of the stretching, irrespective of which end of the muscle is moved. To target the less pliable part of the muscle—the area of palpable tightness—you need to localize the stretch. This is exactly what STR does.
To localize the stretch, you need to ‘fix' part of the muscle against underlying structures to create a false insertion point. The fixing—described throughout this book as a lock—prevents some parts of the muscle from moving and is achieved when a therapist uses his or her own upper body or a massage tool. When a muscle is stretched, its insertion points are moved apart from one another; that is, the area of tissue between the insertion points stretches. Creating false insertion points results in a more intense stretch in some parts of the muscle.
Look at figure 1.4a, which is an illustration of the soleus. You probably already know that the soleus originates from the posterior shaft of the tibia and inserts into the calcaneus. When resting in the prone position, the foot naturally falls into plantar flexion (figure 1.4b). If you pull up your toes (dorsiflexing your foot and ankle), it stretches the muscles of the calf (which are the plantar flexors). Dorsiflexion is therefore a way of applying a gross stretch to the soleus and may be achieved passively, as illustrated in figure 1.4c.
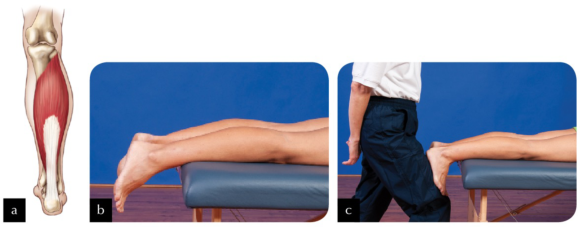
Figure 1.4 (a) The soleus; (b) the ankle falls into plantar flexion in the prone position; (c) performing a passive calf stretch.
Now look at figure 1.5a. Imagine locking the muscle to the tibia slightly distal to its actual origin (lock A; figure 1.5b). Can you see that if you were to stretch the muscle now (figure 1.5c), only those fibres running from the new origin (lock A) to the calcaneus would be able to stretch? Would you agree that, providing you are able to dorsiflex through the same range of motion as in the first stretch, greater force has been placed on those fibres being stretched? This occurs because the small amount of muscle tissue superior to lock A is no longer being stretched.

Figure 1.5 (a) Locking the soleus muscle slightly distal to its actual origin (lock A); (b) applying the lock; (c) performing the stretch.
Now look at figure 1.6a. A second imaginary origin (lock B) for the soleus is even more distal on the tibia, broadly locking it to the underlying structures (figure 1.6b). Performing a stretch now (figure 1.6c) will place even greater tension on the stretching fibres than if the lock had remained at lock A.

Figure 1.6 (a) Locking the soleus more distal on the tibia (lock B); (b) applying the lock; (c) performing the stretch.
Finally, you could create a third false origin (lock C) yet more distal to the actual origin (see figures 1.7a and 1.7b). In this example, only the most distal portion of the soleus stretches when the foot and ankle are dorsiflexed (figure 1.7c).

Figure 1.7 (a) Locking the soleus even more distal on the tibia (lock C); (b) applying the lock; (c) performing the stretch.
In reality it is not possible—or advisable—to lock the entire breadth of the muscle, but this is the principle behind how STR works. An alternative is to apply a specific rather than a broad lock—for example, on the biceps brachii, as illustrated in figure 1.8. The areas of muscle fibre distal to each of the locks are put under greater stretch each time the elbow is extended. To understand this concept of a specific stretch, think of muscle fibres as the strings of a guitar. Placing your finger across all of the strings, as in the previous example of the soleus, is quite different from placing your finger across one string, as in the case of using your elbow to apply a lock to the biceps. For a start, it is quite difficult to exert the same pressure across all strings that you would use to fix just one string. When playing the guitar, if you use the tip and pad of your finger to fix just one string, with one specific lock, only that string is affected, yet it is affected intensely. However, if you use more of your finger in an attempt to make a lock across all of the strings, you affect all of the strings when you play, though perhaps not as intensely.
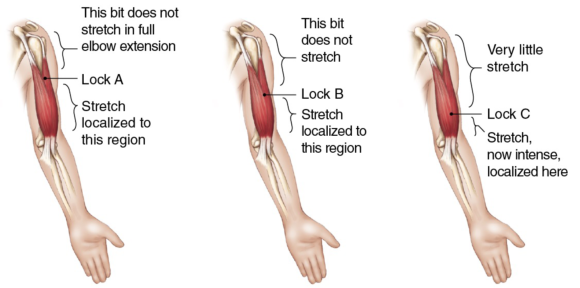
Figure 1.8 In applying specific locks, the areas of muscle fibre distal to each of the locks are put under greater stretch each time the elbow is extended.
Incorporating active-assisted STR with oil massage
The easiest way to incorporate active-assisted STR with an oil massage is to keep a facecloth or very small towel to hand and, at the time when you are ready to apply STR, cover the area with the facecloth and apply your locks through it, adjusting it if necessary as you move along the muscle.
The easiest way to incorporate active-assisted STR with an oil massage is to keep a facecloth or very small towel to hand and, at the time when you are ready to apply STR, cover the area with the facecloth and apply your locks through it, adjusting it if necessary as you move along the muscle. The facecloth helps provide grip to the tissues. Without a cloth, tissues cannot be locked if a massage medium has been applied. Once you have finished applying STR, remove the cloth and continue to massage the area.
An alternative is to use gliding STR. Figures 4.10 through 4.12 illustrate three examples of when gliding might be used with active-assisted STR. Active-assisted STR gliding requires the client to dorsiflex and plantar flex repeatedly as you glide along the tibialis anterior muscle from ankle to knee.

Figure 4.10 Using gliding STR on tibialis anterior.
Similarly, to work on the medial aspect of the calf when the client is in a side-lying position, glide gently from ankle to knee as the client dorsiflexes and plantar flexes. In the photograph the therapist has chosen to keep the client's foot and ankle on the couch, but other therapists encounter less resistance if either the foot is or foot and ankle are off the couch, providing the leg itself is supported.

Figure 4.11 Applying gliding STR to the medial side of the calf.
In this third example, the therapist is using gliding active-assisted STR whilst running a cupped fist along the ITB from knee to hip as the client repeatedly flexes and extends the knee. As you can see, when gliding is used on the ITB the client needs to be in a comfortable side-lying position, the knee able to flex and extend, taking the leg off and onto the couch.

Figure 4.12 Applying gliding STR to the iliotibial band (ITB).
Trigger points in the rhomboids
Trigger points in the rhomboid muscles (figure 6.1) cause pain in the rhomboid area but can also cause symptoms in the region of the supraspinatus.
Trigger points in the rhomboid muscles (figure 6.1) cause pain in the rhomboid area but can also cause symptoms in the region of the supraspinatus. The best way to palpate rhomboid muscles to locate trigger points is with the shoulder flexed and the scapula protracted. The application of STR to the rhomboid muscles lends itself well to the identification of trigger points as, whether STR is performed with the client prone (passive STR), seated (active-assisted STR), or standing (active STR), the scapula can be protracted. You can find trigger points throughout the rhomboid muscles between the medial border of the scapula and the spine. In many people, the rhomboids are lengthened and weak, so whilst STR can be applied to them, it is important to ask yourself whether it should be applied to them. Before you begin, note whether your client has a kyphotic posture, the posture associated with protraction of the scapulae with stretched and weak rhomboids. If you are not sure how assess the client's posture, refer to a text such as Postural Assessment (Johnson, 2012).
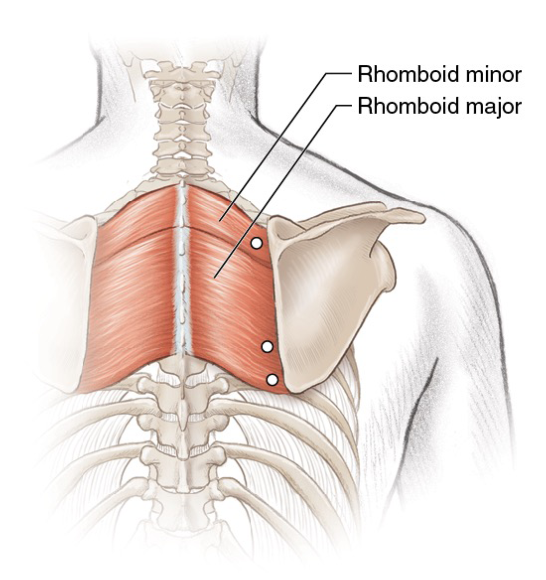
Figure 6.1 Trigger points in the rhomboid muscles.
When treating a client with a typical thoracic curve, you may apply STR to trigger points by following any of the methods (passive, active-assisted or active). Locate the trigger points and, whilst maintaining your lock, stretch the tissues. Clients with active trigger points in the rhomboid muscles often also have active points in the upper fibres of trapezius too, so to be fully effective it is important to deactivate those trigger points. If your client has a kyphotic posture, then trigger points can be deactivated through gentle pressure, but avoid overstretching the muscles afterwards. Instead, encourage your client to engage in a programme for strengthening the rhomboids and the lower fibres of trapezius.
Tewari et al. (2017) report how they deactivated two trigger points in the left rhomboids and left erector spinae of a person with Ehlers-Danlos syndrome (a form of hypermobility) who had chronic upper-back pain. They injected the triggers with lignocaine, and they prescribed the application of heat and 10 minutes of deep massage twice a day. Seven days later, the subject reported a 60 to 80 percent relief from pain, which had been measured using a visual analogue scale (VAS).
Botha (2017) compared ischaemic compression with the use of a foam roller for the deactivation of trigger points in the rhomboid muscle; 30 participants were randomly split into either the compression or foam roller group. Six treatments were delivered over a period of 6 weeks, and both subjective (questionnaire and VAS) and objective (pressure algometer) measurements were taken. Botha concluded that both treatments were equally effective at reducing trigger points with neither being superior.
How soft tissue release works
Take a look at the pictures shown in figures 1.1 through 1.3. They represent what happens when a gross stretch is applied to a muscle.
Take a look at the pictures shown in figures 1.1 through 1.3. They represent what happens when a gross stretch is applied to a muscle. The therapist is holding two resistance bands tied together—one red, the other black. The red resistance band is extremely stretchy; the black is tough and less stretchy. The red resistance band represents normal, healthy muscle tissue; the black resistance band represents an area of tight muscle tissue. Together these bands represent one whole muscle. Look at what happens in figure 1.1 when the therapist moves his right hand. Which part of the muscle does the stretching—the pliable (red) part or the tough (black) part? Clearly, the pliable band is doing the most stretching.
Figure 1.1 Notice which band is doing the stretching.
Now look at figure 1.2. What happens when the therapist moves his left hand? Which part of the muscle stretches the most—the pliable (red) part or the tough (black) part? Again, the pliable band is doing most of the stretching.
Figure 1.2 Which band is doing the stretching now?
Finally, notice what happens when the therapist moves both his right and left hands apart so they are equidistant (figure 1.3).
Figure 1.3 Even with an equidistant stretch, the more pliable band does the most stretching.
You can see from the illustrations that the pliable part of the muscle (the red band) does most of the stretching, irrespective of which end of the muscle is moved. To target the less pliable part of the muscle—the area of palpable tightness—you need to localize the stretch. This is exactly what STR does.
To localize the stretch, you need to ‘fix' part of the muscle against underlying structures to create a false insertion point. The fixing—described throughout this book as a lock—prevents some parts of the muscle from moving and is achieved when a therapist uses his or her own upper body or a massage tool. When a muscle is stretched, its insertion points are moved apart from one another; that is, the area of tissue between the insertion points stretches. Creating false insertion points results in a more intense stretch in some parts of the muscle.
Look at figure 1.4a, which is an illustration of the soleus. You probably already know that the soleus originates from the posterior shaft of the tibia and inserts into the calcaneus. When resting in the prone position, the foot naturally falls into plantar flexion (figure 1.4b). If you pull up your toes (dorsiflexing your foot and ankle), it stretches the muscles of the calf (which are the plantar flexors). Dorsiflexion is therefore a way of applying a gross stretch to the soleus and may be achieved passively, as illustrated in figure 1.4c.
Figure 1.4 (a) The soleus; (b) the ankle falls into plantar flexion in the prone position; (c) performing a passive calf stretch.
Now look at figure 1.5a. Imagine locking the muscle to the tibia slightly distal to its actual origin (lock A; figure 1.5b). Can you see that if you were to stretch the muscle now (figure 1.5c), only those fibres running from the new origin (lock A) to the calcaneus would be able to stretch? Would you agree that, providing you are able to dorsiflex through the same range of motion as in the first stretch, greater force has been placed on those fibres being stretched? This occurs because the small amount of muscle tissue superior to lock A is no longer being stretched.
Figure 1.5 (a) Locking the soleus muscle slightly distal to its actual origin (lock A); (b) applying the lock; (c) performing the stretch.
Now look at figure 1.6a. A second imaginary origin (lock B) for the soleus is even more distal on the tibia, broadly locking it to the underlying structures (figure 1.6b). Performing a stretch now (figure 1.6c) will place even greater tension on the stretching fibres than if the lock had remained at lock A.
Figure 1.6 (a) Locking the soleus more distal on the tibia (lock B); (b) applying the lock; (c) performing the stretch.
Finally, you could create a third false origin (lock C) yet more distal to the actual origin (see figures 1.7a and 1.7b). In this example, only the most distal portion of the soleus stretches when the foot and ankle are dorsiflexed (figure 1.7c).
Figure 1.7 (a) Locking the soleus even more distal on the tibia (lock C); (b) applying the lock; (c) performing the stretch.
In reality it is not possible—or advisable—to lock the entire breadth of the muscle, but this is the principle behind how STR works. An alternative is to apply a specific rather than a broad lock—for example, on the biceps brachii, as illustrated in figure 1.8. The areas of muscle fibre distal to each of the locks are put under greater stretch each time the elbow is extended. To understand this concept of a specific stretch, think of muscle fibres as the strings of a guitar. Placing your finger across all of the strings, as in the previous example of the soleus, is quite different from placing your finger across one string, as in the case of using your elbow to apply a lock to the biceps. For a start, it is quite difficult to exert the same pressure across all strings that you would use to fix just one string. When playing the guitar, if you use the tip and pad of your finger to fix just one string, with one specific lock, only that string is affected, yet it is affected intensely. However, if you use more of your finger in an attempt to make a lock across all of the strings, you affect all of the strings when you play, though perhaps not as intensely.
Figure 1.8 In applying specific locks, the areas of muscle fibre distal to each of the locks are put under greater stretch each time the elbow is extended.
Incorporating active-assisted STR with oil massage
The easiest way to incorporate active-assisted STR with an oil massage is to keep a facecloth or very small towel to hand and, at the time when you are ready to apply STR, cover the area with the facecloth and apply your locks through it, adjusting it if necessary as you move along the muscle.
The easiest way to incorporate active-assisted STR with an oil massage is to keep a facecloth or very small towel to hand and, at the time when you are ready to apply STR, cover the area with the facecloth and apply your locks through it, adjusting it if necessary as you move along the muscle. The facecloth helps provide grip to the tissues. Without a cloth, tissues cannot be locked if a massage medium has been applied. Once you have finished applying STR, remove the cloth and continue to massage the area.
An alternative is to use gliding STR. Figures 4.10 through 4.12 illustrate three examples of when gliding might be used with active-assisted STR. Active-assisted STR gliding requires the client to dorsiflex and plantar flex repeatedly as you glide along the tibialis anterior muscle from ankle to knee.
Figure 4.10 Using gliding STR on tibialis anterior.
Similarly, to work on the medial aspect of the calf when the client is in a side-lying position, glide gently from ankle to knee as the client dorsiflexes and plantar flexes. In the photograph the therapist has chosen to keep the client's foot and ankle on the couch, but other therapists encounter less resistance if either the foot is or foot and ankle are off the couch, providing the leg itself is supported.
Figure 4.11 Applying gliding STR to the medial side of the calf.
In this third example, the therapist is using gliding active-assisted STR whilst running a cupped fist along the ITB from knee to hip as the client repeatedly flexes and extends the knee. As you can see, when gliding is used on the ITB the client needs to be in a comfortable side-lying position, the knee able to flex and extend, taking the leg off and onto the couch.
Figure 4.12 Applying gliding STR to the iliotibial band (ITB).
Trigger points in the rhomboids
Trigger points in the rhomboid muscles (figure 6.1) cause pain in the rhomboid area but can also cause symptoms in the region of the supraspinatus.
Trigger points in the rhomboid muscles (figure 6.1) cause pain in the rhomboid area but can also cause symptoms in the region of the supraspinatus. The best way to palpate rhomboid muscles to locate trigger points is with the shoulder flexed and the scapula protracted. The application of STR to the rhomboid muscles lends itself well to the identification of trigger points as, whether STR is performed with the client prone (passive STR), seated (active-assisted STR), or standing (active STR), the scapula can be protracted. You can find trigger points throughout the rhomboid muscles between the medial border of the scapula and the spine. In many people, the rhomboids are lengthened and weak, so whilst STR can be applied to them, it is important to ask yourself whether it should be applied to them. Before you begin, note whether your client has a kyphotic posture, the posture associated with protraction of the scapulae with stretched and weak rhomboids. If you are not sure how assess the client's posture, refer to a text such as Postural Assessment (Johnson, 2012).
Figure 6.1 Trigger points in the rhomboid muscles.
When treating a client with a typical thoracic curve, you may apply STR to trigger points by following any of the methods (passive, active-assisted or active). Locate the trigger points and, whilst maintaining your lock, stretch the tissues. Clients with active trigger points in the rhomboid muscles often also have active points in the upper fibres of trapezius too, so to be fully effective it is important to deactivate those trigger points. If your client has a kyphotic posture, then trigger points can be deactivated through gentle pressure, but avoid overstretching the muscles afterwards. Instead, encourage your client to engage in a programme for strengthening the rhomboids and the lower fibres of trapezius.
Tewari et al. (2017) report how they deactivated two trigger points in the left rhomboids and left erector spinae of a person with Ehlers-Danlos syndrome (a form of hypermobility) who had chronic upper-back pain. They injected the triggers with lignocaine, and they prescribed the application of heat and 10 minutes of deep massage twice a day. Seven days later, the subject reported a 60 to 80 percent relief from pain, which had been measured using a visual analogue scale (VAS).
Botha (2017) compared ischaemic compression with the use of a foam roller for the deactivation of trigger points in the rhomboid muscle; 30 participants were randomly split into either the compression or foam roller group. Six treatments were delivered over a period of 6 weeks, and both subjective (questionnaire and VAS) and objective (pressure algometer) measurements were taken. Botha concluded that both treatments were equally effective at reducing trigger points with neither being superior.
Related Books


