

Choose from 46 exercises to target a particular body region and delve deeper to stretch, strengthen, and finely coordinate specific muscles. See which key muscles are activated, how variations and minor adjustments can influence effectiveness, and how breathing, alignment, and movement are all fundamentally linked as you work to tone the body, stabilize the core, improve balance, and increase flexibility.
Use the Personalize Your Practice section for each exercise to vary your practice and customize your workouts to fit your needs. Here you’ll find modifications to make each exercise more accessible when there are limitations such as tight hamstrings or underdeveloped core strength. Variations provide variety, and progressions are offered to add more challenge to each exercise and serve as valuable stepping stones on your journey to more advanced Pilates exercise.
Also included are techniques for breathing, concentration, and self-awareness, providing a unique exercise experience that enhances your body and your mind.
Whether you are just beginning to explore the beauty and benefits of Pilates or have been practicing for years, Pilates Anatomy is a one-of-a-kind resource that you’ll refer to again and again.
Earn continuing education credits/units! A continuing education exam that uses this book is also available. It may be purchased separately or as part of a package that includes both the book and exam.
Chapter 2. Spine, Core, and Body Alignment
Chapter 3. Muscles, Movement Analysis, and Mat Work
Chapter 4. Foundation for a Mat Session
Chapter 5. Abdominal Work for Movement and Stabilization
Chapter 6. Fine Articulation for a Flexible Spine
Chapter 7. Bridging for a Functional Spine
Chapter 8. Side Exercises for an Effective Core
Chapter 9. Extension Exercises for a Strong Back
Chapter 10. Customizing Your Pilates Program
Rael Isacowitz is a world-renowned practitioner and teacher of Pilates. With over four decades of Pilates practice and achievement, he is a prominent lecturer and teacher at symposia, universities, colleges, and studios around the globe. He received his bachelor’s degree and teaching credentials from Israel's prestigious Wingate Institute, where he subsequently joined the teaching faculty. He later earned a master’s degree in dance from the University of Surrey in England.
Isacowitz has mastered all levels of the Pilates repertoire and is noted in the industry for his unique athleticism; synthesis of body, mind, and spirit; and passion for teaching. In 1989, he founded Body Arts and Science International (BASI) Pilates, which has developed into one of the foremost Pilates education organizations in the world. BASI Pilates is currently represented in more than 120 host locations spanning over 40 countries.
Isacowitz has authored the definitive book on Pilates (Pilates, Human Kinetics), published a series of workbooks on Pilates apparatus, produced DVDs, conceived designs of equipment manufactured by BASI Systems, and created the groundbreaking Pilates software BASI Interactive. He was a founding board member of the Pilates Method Alliance and is a regular contributor to several industry publications.
Karen Clippinger is a professor emerita at California State University–Long Beach, where she taught for 19 years. Her courses included functional anatomy for dance, body placement, and Pilates. She also taught anatomy and kinesiology courses at other prestigious universities such as UCLA and Scripps College, as well as Pilates teacher training programs for Body Arts and Science International (BASI).
Clippinger holds a master’s degree in exercise science from the University of Washington. Before joining academia, she worked as a clinical kinesiologist for 20 years at Loma Linda University Medical Center and several sports medicine clinics in Seattle. She has worked with a wide range of clients and consulted for the U.S. Weightlifting Federation, the U.S. race walking team, Pacific Northwest Ballet, and the Danish Wounded Warrior Project.
Clippinger is a highly respected international speaker who has given over 400 presentations, including at conferences for BASI Pilates, Balanced Body, Pilates Alliance of Australasia, and Pilates Method Alliance. Clippinger was an exercise columnist for Shape magazine for four years and has authored numerous other articles, several book chapters, and the textbook Dance Anatomy and Kinesiology.
"Karen and Rael are two of the most respected names in the Pilates field, and Pilates Anatomy, Second Edition, brings together their clarity and passion. This book is at the top of my list."
—Nora St. John, Education Program Director for Balanced Body University
“Anatomy is a fundamental science that is absolutely necessary to truly understand human movement. Rael and Karen do an amazing job of bringing anatomy to life for Pilates teachers. This second edition brings the Pilates teacher updated information, including functional muscular and skeletal anatomy combined with planes of movement and the application of anatomy to basic Pilates principles. Rael’s ability to bring order to the exercise and its corresponding anatomy is a gift. We are looking forward to adding the second edition of Pilates Anatomy to our must-read list.”
—Brent Anderson, PhD, PT, OCS, PMA®-CPT, President of Polestar Life Retreats and Southwind Retreat Center
"Karen Clippinger and Rael Isacowitz have done an excellent job of honoring the past of Joseph Pilates’ great body of work, acknowledging the present, and forging into the future. The technique cues and exercise notes after each segment in Pilates Anatomy, Second Edition, are invaluable for every student of Pilates, from beginner to advanced.”
—Marika Molnar, PT, LAc, FIADMS, Director of Westside Dance Physical Therapy and Clinical Advisor for the PhysicalMind Institute
Pilates one-leg stretch
Fundamental
5-5
One-Leg Stretch
(Single-Leg Stretch)
Execution
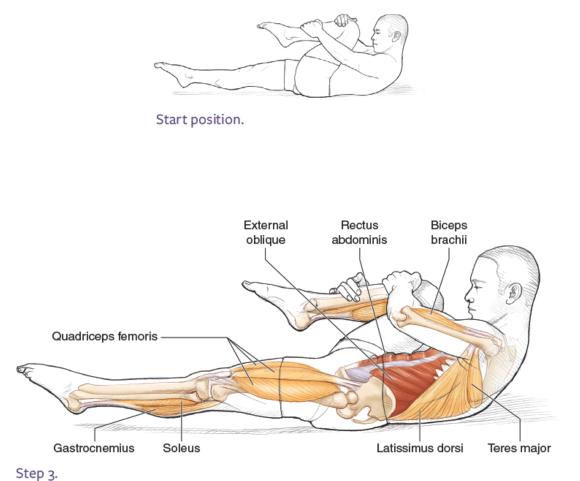
- Start position. Lie supine with the head and scapulae off the mat in Chest Lift (exercise 4-2) position and one knee pulled into your chest. The hand on the side of the bent knee holds the shin just above the ankle. The other arm is bent, with the hand on the knee. The straight leg is at a height at which the lower back can maintain contact with the mat. Both feet are gently pointed.
- Inhale. Begin to bend the outstretched leg and straighten the bent leg.
- Exhale. Complete the switch, using an exhale as the leg fully straightens and the hands switch to the other knee as shown in the main muscle illustration. The hand on the side of the bent knee grasps the shin near the ankle, and the other hand holds the knee that is pulled toward the chest. Repeat this alternating sequence 5 times on each leg, for a total of 10 times, switching the legs with each repetition.
Targeted Muscles
Spinal flexors: rectus abdominis, external oblique, internal oblique
Accompanying Muscles
Anterior spinal stabilizer: transversus abdominis
Hip flexors: iliopsoas, rectus femoris
Hip extensors: gluteus maximus, hamstrings
Knee extensors: quadriceps femoris
Ankle-foot plantar flexors: gastrocnemius, soleus
Shoulder flexors: anterior deltoid, pectoralis major (clavicular)
Shoulder extensors: latissimus dorsi, teres major, pectoralis major (sternal)
Elbow flexors: biceps brachii, brachialis
Elbow extensors: triceps brachii
Technique Cues
- In step 1, firmly pull the abdominal wall toward the spine. Maintain solid contact of the lower back and sacrum with the mat and a stationary position of the ASIS as you use the hip flexors and extensors to switch the legs in steps 2 and 3.
- Think of constantly lifting the upper trunk up and forward off the mat with a firm contraction of the abdominals so that it stays lifted at the same height instead of dropping as the legs switch.
- While maintaining this core stability, reach one leg out in space. The knee extensors that straighten the knee and the ankle-foot plantar flexors that point the foot help to create the desired long line.
- Keep the scapulae neutral, and avoid lifting them toward the ears while the shoulder flexors work to keep the arms from dropping toward the mat when the arms switch to the opposite leg. The elbow extensors straighten the arm that reaches for the ankle while the elbow flexors start bending the arm to bring it to the opposite knee. Use the elbow flexors on both arms to help pull the knee close to the chest. Then keep the knee stationary as the hands press down on the lower leg, and bring the elbows down toward the mat so that the shoulder extensors assist with keeping the trunk lifted off the mat.
- Imagine. Imagine that your legs are moving precisely like pistons of an engine while the engine itself, the powerhouse of your body, remains as stationary as possible.
Exercise Notes
One-Leg Stretch is a valuable stability exercise that emphasizes the abdominals. The abdominals work in multiple roles to keep the trunk lifted, maintain contact between the lower back and the mat, and keep the abdominal wall pulled in. This abdominal action is necessary for maintaining pelvic and spinal stability, which the vigorous movement of the legs can easily disrupt.
Personalize Your Practice
Variation
This exercise can also be performed with the thigh of the bent leg just beyond vertical rather than close into the chest. Both hands are on that knee, with the lower part of the bent leg parallel to the mat. This alternative position can be used to emphasize curling the trunk higher to better challenge the abdominals, as well as to practice maintenance of a neutral position of the lumbar spine and pelvis.

Progression
Use the variation as described but instead of holding onto the leg, place the hands behind the head with the elbows wide. Allow the head to sit comfortably in the hands so that they can take much of the weight of the head, rather than relying solely on the muscles of the neck to support the head. This progression makes the One-Leg Stretch more difficult in terms of muscular activity and load because of the increased effective resistance created by holding the arms behind the head instead of on the leg. In addition, the support gained from holding onto the bent leg has been eliminated. Yet it does offer support for the head that helps alleviate the often-felt discomfort in the neck caused by excessive muscle tension.

Putting alignment into action in Pilates mat work
Many of the Pilates exercises in this book are designed to strengthen muscles that are important for alignment and core stability. However, strength alone will not necessarily create the desired results. It also is important to learn to feel correct alignment and core stability, to hone skills for quickly achieving this alignment, and to practice using this alignment in the exercises in this book as well as during other activities in your life. Research suggests that with repetitive activation of the desired muscles in the appropriate manner, over time your body will automatically start using these more optimal strategies.
Many common cues are used with Pilates to try to achieve the desired static or dynamic alignment in a given exercise. These cues, or directives, offer practical ways to help you apply many of the principles discussed in chapter 1 and in this chapter. Some cues used with the exercises in this book are described in this section. Others are described in the chapter introductions or with the specific exercises in chapters 4 through 9. In the original Pilates approach, many of these cues were exaggerated and emphasized lumbar flexion and a posterior pelvic tilt. However, the desire to create strategies that are more similar to those needed in functional movements has led various current approaches to apply some of these cues in a modified or less rigorous manner. This functional emphasis also led to the development of additional cues to encourage a neutral position of the pelvis or spine in appropriate exercises.
- Draw the navel or abdominal wall toward the spine, or scoop. These cues are designed to counter the common error of allowing the abdominal wall to bulge outward when the abdominals are activated and to encourage a flattening or pulling inward of the abdomen. Drawing the navel or abdominal wall inward toward the spine can be thought of as scooping or hollowing the abdominal area inward. If you have difficulty finding this muscular control, place the palm of one hand on your lower abdomen, and press the wall outward into your hand to feel the undesired position; then draw the abdominal wall inward as you think of the hand pressing flat toward the spine or the hand scooping the abdomen, as if making a hollow in the sand at the beach. The cue of drawing the abdominal wall inward can help you recruit the deeper abdominals, including the transversus abdominis, as well as help you achieve the aesthetic goal of a flatter abdomen. This cue commonly is used when performing an exercise lying on your back such as the Pelvic Curl (exercise 4-1), but can also be used in other positions to help create a C curve.
- Make a C curve. A common error when flexing the spine is creating most of the curve in the thoracic spine, a region of the spine that is naturally concave to the front but is already excessively rounded (kyphosis) in static alignment in many people. Instead, the intent of this cue is to include flexion of the lumbar spine—a region naturally concave to the back and often tight, making flexion in this area more challenging. Pulling the lower abdominal wall inward encourages rounding the lower back and aids in distributing the curvature throughout the spine as much as possible so the head, spine, and pelvis attempt to form a C shape that is concave to the front.
- Bring the spine to the mat. When lying on your back, firmly draw the abdominal wall inward to bring the lumbar spine closer toward or in touch with the mat, depending on your natural curve and flexibility. The change in the contact of the spine with the mat can be used to help maintain and monitor core stability. For example, when the legs are held off the mat in exercises such as Hundred (exercise 5-4), inadequate abdominal stabilization would cause an anterior tilt of the pelvis and arching of the lower back, lifting the lower back farther off the mat and potentially injuring the lower spine. Therefore in exercises like this, the cue is often given to keep the legs at a height (the closer to vertical, the easier the exercise) at which the lower spine can remain close to or touching the mat, with the pelvis stationary. This directive involves an intentional decrease in the natural lumbar curve and, generally, a slight posterior tilt of the pelvis to help prevent lumbar hyperextension.
- Maintain a neutral pelvis and lower back, or bracing. While the first three cues reflect the original Pilates approach, this cue is used by those who believe that training to stabilize in a neutral position is also important to allow transfer to many everyday movements that do not involve spinal flexion. This cue generally involves a coordinated cocontraction of many muscles of the core including both the abdominals and spinal extensors such that the natural curve of the lumbar spine and neutral position of the pelvis are achieved. This coordinated cocontraction of the abdominals and spinal extensors to maintain a neutral position of the pelvis and lower back is also termed bracing. When lying on your back, pulling up the front of the pelvis with the abdominals while simultaneously pulling up the back of the pelvis with the spinal extensors, pressing the sacrum into the mat, or reaching the sit bones away from the back of the ribcage can help you achieve this desired bracing.
- Pull up with the abdominals. Pulling the lower attachment of the abdominals (rectus abdominis and obliques) upward can produce a posterior pelvic tilt. Often this cue is used to encourage creation of a posterior pelvic tilt and flexion of the lumbar spine in exercises that require this full rounding, such as Rolling Back (exercise 6-2). The cue is also used to prevent or limit an anterior pelvic tilt in exercises in which the limbs are moving or the back is arching, such as Double Kick (exercise 9-3), or to help achieve a neutral position of the pelvis with bracing.
- Pull up your lower back. Sometimes, pulling the lower attachment of the spinal extensors upward is used to encourage extension of the lumbar spine in exercises that require a full arching of the spine, such as Rocking (exercise 9-5). The cue is more commonly used to prevent or limit a posterior pelvic tilt and excessive flexion of the lumbar spine in sitting exercises (see the next cue “Sit tall”) or to help achieve a neutral position of the pelvis with bracing.
- Sit tall. A common alignment error in sitting is to let the spine collapse downward, with the lumbar spine going into flexion and the pelvis posteriorly tilting. Think of lifting the upper back and the area of the head just behind the ears toward the ceiling, with the weight of the trunk right over the sit bones. Anatomically, slight use of the upper back extensors balanced with the abdominals can produce the desired lift in the thoracic spine without rib-leading. Another desired strategy, similar to that described in the last cue, is to think of slightly pulling up the lower attachment of the abdominals onto the pelvis while simultaneously lifting the center of the back of the pelvis upward to encourage use of the spinal extensors, particularly the multifidus. This cocontraction provides deep segmental support to the lower spine and encourages the maintenance of some of the natural lumbar curve.
- Maintain a flat back. The term flat back refers to a position in which the trunk is approximately straight when viewed from the side; the side of the shoulder, rib cage, and pelvis are in line. This term can be used to describe the trunk in various positions including kneeling, being supported on the hands and feet, or sitting. The term is not literal—the spine still maintains some of its natural curvatures—but there is a feeling of being elongated as just described in the cue sit tall. Achievement of this flat-back position involves a skillful simultaneous contraction of the abdominals and spinal extensors.
- Keep the rib cage down and back. When thinking of pulling up with the abdominals or lower back, as well as when trying to achieve a flat-back position, a common mistake is to contract the spinal extensors so the rib cage juts forward (rib-leading). The upper attachment of the abdominals onto the rib cage can pull the front of the rib cage slightly down and back to prevent this undesired rib-leading and hold the rib cage in its desired neutral alignment in many exercises. In other exercises involving spinal flexion, pulling the front of the lower rib cage down and back can aid in attaining the desired maximum spinal flexion to help with achieving a full C curve.
- Lengthen your neck. A common alignment problem is an excessive arch in the neck so that the chin projects forward in static alignment (forward head posture) or during movement. Thinking of lengthening or stretching the back of the neck can help counter this tendency. For example, when lying on your back, bring your chin slightly down and back while rotating your head slightly forward so that the contact with the mat moves from the top of the back of the head to the middle of the back of the head. Anatomically, this involves using the neck flexors while focusing on relaxing often excessively tight neck extensors.
- Bring your chin to your chest. The cue to lengthen the neck is also linked to the cue to bring the chin to the chest. In original Pilates work, the cue to flex the neck so that the chin comes toward the sternum while the back of the neck lengthens was often exaggerated in many exercises involving spinal flexion. Bringing the head closer to the chest emphasizes greater use of the abdominals while producing less stress on some of the neck muscles in many supine abdominal exercises. However, many current approaches encourage a moderate use of this cue so that the head is in line with an arc created by the thoracic spine (a small fist or lemon could fit between the chin and chest).
- Move one vertebra at a time, or use a smooth sequential movement of each vertebra. A common error is to move a large section of the spine as a solid unit, often causing jerky movements or making a portion of the spine appear flat rather than arched or curved. In contrast, the desire is precise consecutive movement of one vertebra relative to the next vertebra, aimed at achieving full movement in each segment of the spine that is involved in the exercise, regardless of whether the movement is spinal flexion, extension, or lateral flexion. For example, during the up phase of Roll-Up (exercise 5-2), ideally the vertebrae should lift one at a time off the mat from top to bottom and lower sequentially in the reverse order on the down phase.
- Keep the scapulae down in neutral. This cue can be used to prevent the common alignment error of lifting the shoulder blades toward the ears as the arms move. Anatomically, think of using the scapular depressors to pull the scapulae slightly downward before lifting the arms to encourage use of these muscles as the arms move. However, the goal is not to hold the scapulae excessively downward or in place, but rather to help establish a neutral position of the scapulae as they naturally rotate upward. This is achieved by balancing the use of the upper trapezius, which elevates the scapulae, and the lower trapezius, which depresses the scapulae, as shown in figure 2.12. You can also focus on keeping distance between the shoulders and the ears by using a less forceful contraction of the upper trapezius to prevent excessive undesired elevation of the scapulae with overhead movement of the arms.
- Stretch or reach your arms and legs. The cue of reaching the limbs outward is used to achieve the desired long line and dynamic of many Pilates exercises. Anatomically the joints of the limbs are in a straight line rather than bent or hyperextended. When the body is straight with arms overhead and legs elongated, such as the beginning position of Roll-Up (exercise 5-2), imagine someone gently pulling on your fingertips while someone else gently pulls on your toes in the opposite direction as you maintain strong core stability.
Pilates side kick kneeling
Intermediate
8-2
Side Kick Kneeling
Execution
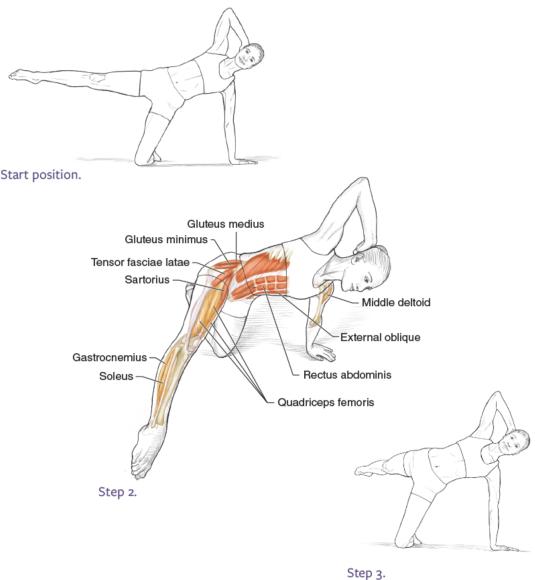
- Start position. Kneel and bend the trunk to the side. Place one palm on the mat, with the fingers pointing away from the knee. Place the other hand behind the head, with the elbow bent and pointing toward the ceiling. Lift the top leg (the leg farthest from the support arm) to about hip height.
- Inhale. Bring the raised leg forward. See the main muscle illustration.
- Exhale. Bring the raised leg backward as shown. Repeat the sequence five times. Do the same on the opposite leg.
Targeted Muscles
Spinal lateral flexors and stabilizers: external oblique, internal oblique, quadratus lumborum, erector spinae (spinalis, longissimus, iliocostalis), semispinalis, deep posterior spinal group, rectus abdominis, transversus abdominis
Hip abductors: gluteus medius, gluteus minimus, tensor fasciae latae, sartorius
Accompanying Muscles
Hip flexors: iliopsoas, rectus femoris
Hip extensors: gluteus maximus, hamstrings
Knee extensors: quadriceps femoris
Ankle-foot plantar flexors: gastrocnemius, soleus
Shoulder abductors: middle deltoid, supraspinatus
Scapular depressors: lower trapezius, serratus anterior (lower fibers)
Scapular abductors: serratus anterior
Elbow extensors: triceps brachii
Technique Cues
- Throughout the exercise, think of the body forming an arc from the head to the support knee. Press into the mat with the hand, and use the shoulder abductors to help lift the upper trunk, the spinal lateral flexors on the side of the body closest to the mat to lift the spine, and the hip abductors to lift the lower side of the pelvis, all to help form this arc.
- As you press into the mat, use the elbow extensors to keep the elbow straight while keeping the lower scapula down and reaching toward the mat with the use of the scapular depressors and abductors, particularly the serratus anterior.
- Maintain a long line of the raised leg as it swings, using the knee extensors to straighten the knee and the ankle-foot plantar flexors to point the foot.
- Focus on keeping the raised leg at the appropriate height by using the hip abductors of the top leg while the hip flexors bring the leg forward and the hip extensors bring it slightly back.
- Imagine. Think of the body as an arched bridge, with the arm providing an upright support as the leg swings freely forward and backward without disrupting the strong bridge structure.
Exercise Notes
Side Kick Kneeling offers many of the same benefits as Side Kick (exercise 8-1), but it increases the stability challenge because you are supported by just one knee and one straight arm. It also increases the work of the spinal lateral flexors on the side closest to the mat, particularly the obliques, to maintain the side-arched position of the trunk. Last, it provides important practice for using the shoulder abductors and scapular stabilizers on the support arm, a skill that is used in a much more difficult manner in the Side Bend (exercise 8-3) and Twist (exercise 8-6).
Personalize Your Practice
Modification
One of the difficult aspects of Side Kick Kneeling is maintaining a consistent height of the moving leg. The leg tends to dip as it transitions from front to back and vice versa. To practice keeping the leg at a consistent height, choose a less challenging height, even if it is below the level of the upper hip joint. Now move the leg as described in steps 2 and 3, maintaining the same distance to the mat as if sliding along a tabletop.
Variations
Perform the exercise with the support knee almost directly under the hip joint and the swinging leg held as high as possible to add greater challenge to the hip abductors. A double-leg pulse and the foot positioning and percussive breath pattern described in the Side Kick (exercise 8-1) variations can also be used.
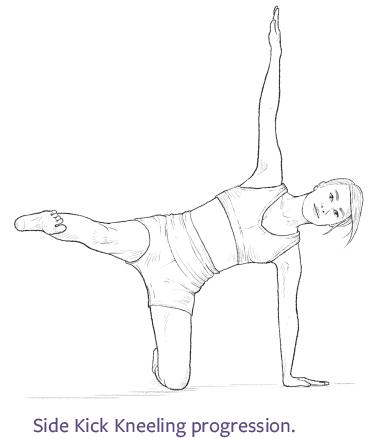
Progression
Using the position described in Side Kick Kneeling variations, reach the fingers of the upper arm toward the ceiling instead of keeping them behind the head. This position, besides being interesting aesthetically, further challenges the stability of the body, helps maintain an open position of the chest, and works the upper shoulder in keeping the arm up and stable.
Pilates one-leg stretch
Fundamental
5-5
One-Leg Stretch
(Single-Leg Stretch)
Execution
- Start position. Lie supine with the head and scapulae off the mat in Chest Lift (exercise 4-2) position and one knee pulled into your chest. The hand on the side of the bent knee holds the shin just above the ankle. The other arm is bent, with the hand on the knee. The straight leg is at a height at which the lower back can maintain contact with the mat. Both feet are gently pointed.
- Inhale. Begin to bend the outstretched leg and straighten the bent leg.
- Exhale. Complete the switch, using an exhale as the leg fully straightens and the hands switch to the other knee as shown in the main muscle illustration. The hand on the side of the bent knee grasps the shin near the ankle, and the other hand holds the knee that is pulled toward the chest. Repeat this alternating sequence 5 times on each leg, for a total of 10 times, switching the legs with each repetition.
Targeted Muscles
Spinal flexors: rectus abdominis, external oblique, internal oblique
Accompanying Muscles
Anterior spinal stabilizer: transversus abdominis
Hip flexors: iliopsoas, rectus femoris
Hip extensors: gluteus maximus, hamstrings
Knee extensors: quadriceps femoris
Ankle-foot plantar flexors: gastrocnemius, soleus
Shoulder flexors: anterior deltoid, pectoralis major (clavicular)
Shoulder extensors: latissimus dorsi, teres major, pectoralis major (sternal)
Elbow flexors: biceps brachii, brachialis
Elbow extensors: triceps brachii
Technique Cues
- In step 1, firmly pull the abdominal wall toward the spine. Maintain solid contact of the lower back and sacrum with the mat and a stationary position of the ASIS as you use the hip flexors and extensors to switch the legs in steps 2 and 3.
- Think of constantly lifting the upper trunk up and forward off the mat with a firm contraction of the abdominals so that it stays lifted at the same height instead of dropping as the legs switch.
- While maintaining this core stability, reach one leg out in space. The knee extensors that straighten the knee and the ankle-foot plantar flexors that point the foot help to create the desired long line.
- Keep the scapulae neutral, and avoid lifting them toward the ears while the shoulder flexors work to keep the arms from dropping toward the mat when the arms switch to the opposite leg. The elbow extensors straighten the arm that reaches for the ankle while the elbow flexors start bending the arm to bring it to the opposite knee. Use the elbow flexors on both arms to help pull the knee close to the chest. Then keep the knee stationary as the hands press down on the lower leg, and bring the elbows down toward the mat so that the shoulder extensors assist with keeping the trunk lifted off the mat.
- Imagine. Imagine that your legs are moving precisely like pistons of an engine while the engine itself, the powerhouse of your body, remains as stationary as possible.
Exercise Notes
One-Leg Stretch is a valuable stability exercise that emphasizes the abdominals. The abdominals work in multiple roles to keep the trunk lifted, maintain contact between the lower back and the mat, and keep the abdominal wall pulled in. This abdominal action is necessary for maintaining pelvic and spinal stability, which the vigorous movement of the legs can easily disrupt.
Personalize Your Practice
Variation
This exercise can also be performed with the thigh of the bent leg just beyond vertical rather than close into the chest. Both hands are on that knee, with the lower part of the bent leg parallel to the mat. This alternative position can be used to emphasize curling the trunk higher to better challenge the abdominals, as well as to practice maintenance of a neutral position of the lumbar spine and pelvis.
Progression
Use the variation as described but instead of holding onto the leg, place the hands behind the head with the elbows wide. Allow the head to sit comfortably in the hands so that they can take much of the weight of the head, rather than relying solely on the muscles of the neck to support the head. This progression makes the One-Leg Stretch more difficult in terms of muscular activity and load because of the increased effective resistance created by holding the arms behind the head instead of on the leg. In addition, the support gained from holding onto the bent leg has been eliminated. Yet it does offer support for the head that helps alleviate the often-felt discomfort in the neck caused by excessive muscle tension.
Putting alignment into action in Pilates mat work
Many of the Pilates exercises in this book are designed to strengthen muscles that are important for alignment and core stability. However, strength alone will not necessarily create the desired results. It also is important to learn to feel correct alignment and core stability, to hone skills for quickly achieving this alignment, and to practice using this alignment in the exercises in this book as well as during other activities in your life. Research suggests that with repetitive activation of the desired muscles in the appropriate manner, over time your body will automatically start using these more optimal strategies.
Many common cues are used with Pilates to try to achieve the desired static or dynamic alignment in a given exercise. These cues, or directives, offer practical ways to help you apply many of the principles discussed in chapter 1 and in this chapter. Some cues used with the exercises in this book are described in this section. Others are described in the chapter introductions or with the specific exercises in chapters 4 through 9. In the original Pilates approach, many of these cues were exaggerated and emphasized lumbar flexion and a posterior pelvic tilt. However, the desire to create strategies that are more similar to those needed in functional movements has led various current approaches to apply some of these cues in a modified or less rigorous manner. This functional emphasis also led to the development of additional cues to encourage a neutral position of the pelvis or spine in appropriate exercises.
- Draw the navel or abdominal wall toward the spine, or scoop. These cues are designed to counter the common error of allowing the abdominal wall to bulge outward when the abdominals are activated and to encourage a flattening or pulling inward of the abdomen. Drawing the navel or abdominal wall inward toward the spine can be thought of as scooping or hollowing the abdominal area inward. If you have difficulty finding this muscular control, place the palm of one hand on your lower abdomen, and press the wall outward into your hand to feel the undesired position; then draw the abdominal wall inward as you think of the hand pressing flat toward the spine or the hand scooping the abdomen, as if making a hollow in the sand at the beach. The cue of drawing the abdominal wall inward can help you recruit the deeper abdominals, including the transversus abdominis, as well as help you achieve the aesthetic goal of a flatter abdomen. This cue commonly is used when performing an exercise lying on your back such as the Pelvic Curl (exercise 4-1), but can also be used in other positions to help create a C curve.
- Make a C curve. A common error when flexing the spine is creating most of the curve in the thoracic spine, a region of the spine that is naturally concave to the front but is already excessively rounded (kyphosis) in static alignment in many people. Instead, the intent of this cue is to include flexion of the lumbar spine—a region naturally concave to the back and often tight, making flexion in this area more challenging. Pulling the lower abdominal wall inward encourages rounding the lower back and aids in distributing the curvature throughout the spine as much as possible so the head, spine, and pelvis attempt to form a C shape that is concave to the front.
- Bring the spine to the mat. When lying on your back, firmly draw the abdominal wall inward to bring the lumbar spine closer toward or in touch with the mat, depending on your natural curve and flexibility. The change in the contact of the spine with the mat can be used to help maintain and monitor core stability. For example, when the legs are held off the mat in exercises such as Hundred (exercise 5-4), inadequate abdominal stabilization would cause an anterior tilt of the pelvis and arching of the lower back, lifting the lower back farther off the mat and potentially injuring the lower spine. Therefore in exercises like this, the cue is often given to keep the legs at a height (the closer to vertical, the easier the exercise) at which the lower spine can remain close to or touching the mat, with the pelvis stationary. This directive involves an intentional decrease in the natural lumbar curve and, generally, a slight posterior tilt of the pelvis to help prevent lumbar hyperextension.
- Maintain a neutral pelvis and lower back, or bracing. While the first three cues reflect the original Pilates approach, this cue is used by those who believe that training to stabilize in a neutral position is also important to allow transfer to many everyday movements that do not involve spinal flexion. This cue generally involves a coordinated cocontraction of many muscles of the core including both the abdominals and spinal extensors such that the natural curve of the lumbar spine and neutral position of the pelvis are achieved. This coordinated cocontraction of the abdominals and spinal extensors to maintain a neutral position of the pelvis and lower back is also termed bracing. When lying on your back, pulling up the front of the pelvis with the abdominals while simultaneously pulling up the back of the pelvis with the spinal extensors, pressing the sacrum into the mat, or reaching the sit bones away from the back of the ribcage can help you achieve this desired bracing.
- Pull up with the abdominals. Pulling the lower attachment of the abdominals (rectus abdominis and obliques) upward can produce a posterior pelvic tilt. Often this cue is used to encourage creation of a posterior pelvic tilt and flexion of the lumbar spine in exercises that require this full rounding, such as Rolling Back (exercise 6-2). The cue is also used to prevent or limit an anterior pelvic tilt in exercises in which the limbs are moving or the back is arching, such as Double Kick (exercise 9-3), or to help achieve a neutral position of the pelvis with bracing.
- Pull up your lower back. Sometimes, pulling the lower attachment of the spinal extensors upward is used to encourage extension of the lumbar spine in exercises that require a full arching of the spine, such as Rocking (exercise 9-5). The cue is more commonly used to prevent or limit a posterior pelvic tilt and excessive flexion of the lumbar spine in sitting exercises (see the next cue “Sit tall”) or to help achieve a neutral position of the pelvis with bracing.
- Sit tall. A common alignment error in sitting is to let the spine collapse downward, with the lumbar spine going into flexion and the pelvis posteriorly tilting. Think of lifting the upper back and the area of the head just behind the ears toward the ceiling, with the weight of the trunk right over the sit bones. Anatomically, slight use of the upper back extensors balanced with the abdominals can produce the desired lift in the thoracic spine without rib-leading. Another desired strategy, similar to that described in the last cue, is to think of slightly pulling up the lower attachment of the abdominals onto the pelvis while simultaneously lifting the center of the back of the pelvis upward to encourage use of the spinal extensors, particularly the multifidus. This cocontraction provides deep segmental support to the lower spine and encourages the maintenance of some of the natural lumbar curve.
- Maintain a flat back. The term flat back refers to a position in which the trunk is approximately straight when viewed from the side; the side of the shoulder, rib cage, and pelvis are in line. This term can be used to describe the trunk in various positions including kneeling, being supported on the hands and feet, or sitting. The term is not literal—the spine still maintains some of its natural curvatures—but there is a feeling of being elongated as just described in the cue sit tall. Achievement of this flat-back position involves a skillful simultaneous contraction of the abdominals and spinal extensors.
- Keep the rib cage down and back. When thinking of pulling up with the abdominals or lower back, as well as when trying to achieve a flat-back position, a common mistake is to contract the spinal extensors so the rib cage juts forward (rib-leading). The upper attachment of the abdominals onto the rib cage can pull the front of the rib cage slightly down and back to prevent this undesired rib-leading and hold the rib cage in its desired neutral alignment in many exercises. In other exercises involving spinal flexion, pulling the front of the lower rib cage down and back can aid in attaining the desired maximum spinal flexion to help with achieving a full C curve.
- Lengthen your neck. A common alignment problem is an excessive arch in the neck so that the chin projects forward in static alignment (forward head posture) or during movement. Thinking of lengthening or stretching the back of the neck can help counter this tendency. For example, when lying on your back, bring your chin slightly down and back while rotating your head slightly forward so that the contact with the mat moves from the top of the back of the head to the middle of the back of the head. Anatomically, this involves using the neck flexors while focusing on relaxing often excessively tight neck extensors.
- Bring your chin to your chest. The cue to lengthen the neck is also linked to the cue to bring the chin to the chest. In original Pilates work, the cue to flex the neck so that the chin comes toward the sternum while the back of the neck lengthens was often exaggerated in many exercises involving spinal flexion. Bringing the head closer to the chest emphasizes greater use of the abdominals while producing less stress on some of the neck muscles in many supine abdominal exercises. However, many current approaches encourage a moderate use of this cue so that the head is in line with an arc created by the thoracic spine (a small fist or lemon could fit between the chin and chest).
- Move one vertebra at a time, or use a smooth sequential movement of each vertebra. A common error is to move a large section of the spine as a solid unit, often causing jerky movements or making a portion of the spine appear flat rather than arched or curved. In contrast, the desire is precise consecutive movement of one vertebra relative to the next vertebra, aimed at achieving full movement in each segment of the spine that is involved in the exercise, regardless of whether the movement is spinal flexion, extension, or lateral flexion. For example, during the up phase of Roll-Up (exercise 5-2), ideally the vertebrae should lift one at a time off the mat from top to bottom and lower sequentially in the reverse order on the down phase.
- Keep the scapulae down in neutral. This cue can be used to prevent the common alignment error of lifting the shoulder blades toward the ears as the arms move. Anatomically, think of using the scapular depressors to pull the scapulae slightly downward before lifting the arms to encourage use of these muscles as the arms move. However, the goal is not to hold the scapulae excessively downward or in place, but rather to help establish a neutral position of the scapulae as they naturally rotate upward. This is achieved by balancing the use of the upper trapezius, which elevates the scapulae, and the lower trapezius, which depresses the scapulae, as shown in figure 2.12. You can also focus on keeping distance between the shoulders and the ears by using a less forceful contraction of the upper trapezius to prevent excessive undesired elevation of the scapulae with overhead movement of the arms.
- Stretch or reach your arms and legs. The cue of reaching the limbs outward is used to achieve the desired long line and dynamic of many Pilates exercises. Anatomically the joints of the limbs are in a straight line rather than bent or hyperextended. When the body is straight with arms overhead and legs elongated, such as the beginning position of Roll-Up (exercise 5-2), imagine someone gently pulling on your fingertips while someone else gently pulls on your toes in the opposite direction as you maintain strong core stability.
Pilates side kick kneeling
Intermediate
8-2
Side Kick Kneeling
Execution
- Start position. Kneel and bend the trunk to the side. Place one palm on the mat, with the fingers pointing away from the knee. Place the other hand behind the head, with the elbow bent and pointing toward the ceiling. Lift the top leg (the leg farthest from the support arm) to about hip height.
- Inhale. Bring the raised leg forward. See the main muscle illustration.
- Exhale. Bring the raised leg backward as shown. Repeat the sequence five times. Do the same on the opposite leg.
Targeted Muscles
Spinal lateral flexors and stabilizers: external oblique, internal oblique, quadratus lumborum, erector spinae (spinalis, longissimus, iliocostalis), semispinalis, deep posterior spinal group, rectus abdominis, transversus abdominis
Hip abductors: gluteus medius, gluteus minimus, tensor fasciae latae, sartorius
Accompanying Muscles
Hip flexors: iliopsoas, rectus femoris
Hip extensors: gluteus maximus, hamstrings
Knee extensors: quadriceps femoris
Ankle-foot plantar flexors: gastrocnemius, soleus
Shoulder abductors: middle deltoid, supraspinatus
Scapular depressors: lower trapezius, serratus anterior (lower fibers)
Scapular abductors: serratus anterior
Elbow extensors: triceps brachii
Technique Cues
- Throughout the exercise, think of the body forming an arc from the head to the support knee. Press into the mat with the hand, and use the shoulder abductors to help lift the upper trunk, the spinal lateral flexors on the side of the body closest to the mat to lift the spine, and the hip abductors to lift the lower side of the pelvis, all to help form this arc.
- As you press into the mat, use the elbow extensors to keep the elbow straight while keeping the lower scapula down and reaching toward the mat with the use of the scapular depressors and abductors, particularly the serratus anterior.
- Maintain a long line of the raised leg as it swings, using the knee extensors to straighten the knee and the ankle-foot plantar flexors to point the foot.
- Focus on keeping the raised leg at the appropriate height by using the hip abductors of the top leg while the hip flexors bring the leg forward and the hip extensors bring it slightly back.
- Imagine. Think of the body as an arched bridge, with the arm providing an upright support as the leg swings freely forward and backward without disrupting the strong bridge structure.
Exercise Notes
Side Kick Kneeling offers many of the same benefits as Side Kick (exercise 8-1), but it increases the stability challenge because you are supported by just one knee and one straight arm. It also increases the work of the spinal lateral flexors on the side closest to the mat, particularly the obliques, to maintain the side-arched position of the trunk. Last, it provides important practice for using the shoulder abductors and scapular stabilizers on the support arm, a skill that is used in a much more difficult manner in the Side Bend (exercise 8-3) and Twist (exercise 8-6).
Personalize Your Practice
Modification
One of the difficult aspects of Side Kick Kneeling is maintaining a consistent height of the moving leg. The leg tends to dip as it transitions from front to back and vice versa. To practice keeping the leg at a consistent height, choose a less challenging height, even if it is below the level of the upper hip joint. Now move the leg as described in steps 2 and 3, maintaining the same distance to the mat as if sliding along a tabletop.
Variations
Perform the exercise with the support knee almost directly under the hip joint and the swinging leg held as high as possible to add greater challenge to the hip abductors. A double-leg pulse and the foot positioning and percussive breath pattern described in the Side Kick (exercise 8-1) variations can also be used.
Progression
Using the position described in Side Kick Kneeling variations, reach the fingers of the upper arm toward the ceiling instead of keeping them behind the head. This position, besides being interesting aesthetically, further challenges the stability of the body, helps maintain an open position of the chest, and works the upper shoulder in keeping the arm up and stable.
Related Books


