

Combining the experience of strength and conditioning experts Thomas Baechle and Roger Earle, Weight Training: Steps to Success will maximize your development with a progressive approach to weight training, whether you are using either free weights or weight machines. Learn which exercises target which muscles and how to perform each exercise correctly and safely. As you master technique with lighter loads, you will move on to heavier loads and more challenging exercises, including eight new exercises for this edition that use versatile equipment such as stability balls and kettlebells. Gain insight on the importance of nutrition and follow the step-by-step directions to calculate safe training loads and design an overall training program that fits your interests and training preferences.
The fifth edition also offers options to further advance your training after learning the basics. Improve your performance in recreational or competitive sports with a sport-specific training program or increase your overall fitness with a high-intensity interval training program.
Whether your goal is to improve muscular endurance, build strength, increase muscle mass, tone existing muscles, or reduce body fat, Weight Training: Steps to Success will help you be successful. With over 40 exercises, each explained and demonstrated through full-color photo sequences, along with guidance on how to approach introductory workouts and create a tailored training program, the fifth edition firmly establishes the work as the go-to guide for weight training success.
Step 2. Stretching, Lifting, and Spotting Techniques
Step 3. Selecting Exercises and Determining Training Loads
Step 4. Chest Exercise Options and Loading Guidelines
Step 5. Back Exercise Options and Loading Guidelines
Step 6. Shoulder Exercise Options and Loading Guidelines
Step 7. Upper Arm Exercise Options and Loading Guidelines
Step 8. Leg Exercise Options and Loading Guidelines
Step 9. Core Exercise Options and Loading Guidelines
Step 10. Completing Your First Workout
Step 11. Applying Program Design Principles
Step 12. How to Manipulate the Program Design Variables to Maximize Results
Step 13. How to Design Your Own Basic Program
Step 14. Designing a Sport-Specific Training Program
Step 15. Designing a High-Intensity Interval Training Program
Thomas R. Baechle, EdD, CSCS,*D-R, NSCA-CPT,*D-R, has been an author or editor of 17 books on strength training, some on which have been translated into 10 languages. Perhaps most noteworthy are his publication efforts as the editor of the first three editions of the National Strength and Conditioning Association’s Essentials of Strength Training and Conditioning (which he also contributed several chapters to) and the coeditor of the first edition of NSCA’s Essentials of Personal Training. He has published 80 articles or chapters and has made over 170 presentations related to strength training, fitness, and wellness, 40 of which were international presentations. Baechle is one of the founding fathers of the NSCA and was the association’s second president and director of education. During his time as executive director of the NSCA Certification Commission, he was instrumental in establishing the CSCS and NSCA-CPT certifications as the premier certification credentials. Baechle has received over 40 awards for his contributions to local, national, and international professional organizations and institutions, including recognitions from Human Kinetics and American Alliance for Health, Physical Education, Recreation and Dance (AAHPERD). He was honored with an Outstanding Teaching Award from Creighton University, where he served as chair of the exercise science and pre–health professions department for 38 years. He currently holds the rank of professor emeritus. His NSCA awards and recognitions include Region IV NSCA Strength Coach of the Year in 1982 and 1983; Strength and Conditioning Professional of the Year in 1984; President’s Award in 1986, 1991, and 1993; Lifetime Achievement Award in 1998; Service Award from the NSCA Certification Commission in 2007; NSCA Hall of Fame in 2017; and the Pioneer Award and the Alvin Roy Career Achievement Award in 2019.
Roger W. Earle, MA, CSCS,*D, NSCA-CPT,*D, has over 30 years of experience as a personal fitness trainer, competitive sport conditioning coach, and behavior modification facilitator for people of all ages and fitness levels. In addition to training clients in person and online, he lectures at national and international conferences about weight management, exercise motivation, and the creation of personalized exercise and training programs. Earle is a senior acquisitions editor in the Trade and Professional division at Human Kinetics, the world’s largest publisher of sport and exercise books and online products. He is a coauthor, coeditor, or contributor for 10 fitness- or resistance-training-related books, including Fitness Weight Training and EuropeActive's Foundations for Exercise Professionals. Earle was previously the associate executive director and the director of exam development for the NSCA Certification Commission, a role in which he was responsible for reviewing and editing the CSCS and NSCA-CPT exams and writing study resources, as well as coediting the first edition of NSCA’s Essentials of Personal Training and the second and third editions of Essentials of Strength Training and Conditioning. Before working at the NSCA, Earle was the head strength and conditioning coach at Creighton University in Omaha, Nebraska, for 10 years and was a faculty member in their exercise science and athletic training department for 6 years.
Determine warm-up and trial loads
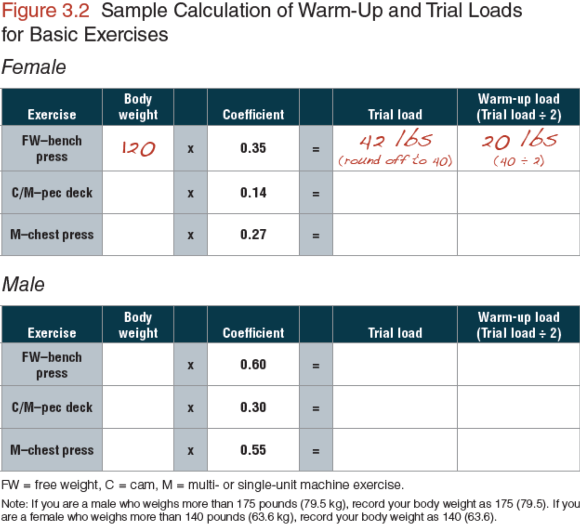
This practice procedure explains how to use the formulas shown in figure 3.2 to determine the warm-up and trial loads for the basic exercises. If you select one of the first three exercises listed in steps 4 through 9, you will need to identify the coefficient (a number that represents a certain percent of the person's body weight) associated with that exercise to determine warm-up and trial loads. Each step includes exercises and coefficients that are specific to a certain muscle group. The example provided in figure 3.2 is associated with the chest muscle area from step 4. Realize that using the coefficients results in an estimated warm-up or trial load. Individual differences, combined with the variation in equipment design, make it difficult, if not impossible, to derive coefficients that are without error. Those presented in this text are starting points for determining appropriate loads. If there is a need to convert pounds to kilograms or kilograms to pounds, refer to the conversion chart in the back of the book.
You will notice that for the first three exercises, the letters FW (for free weight), C (for cam), and M (for multi-unit machine—but it can apply to a single-unit machine too) identify the type of equipment that is used when performing them.
After you've located the name of the exercise you've selected, write your body weight in the appropriate space and multiply it by the number to the right of it (the coefficient). The coefficient is a number that has been derived from studies of males and females who, for the most part, do not have experience in weight training. When multiplied by your body weight, the coefficient can be used to estimate training loads, and using one-half of it provides an appropriate warm-up load. The use of body weight in determining appropriate loads is based on its relationship to strength. This is the same logic used for creating weight divisions in sports such as wrestling, boxing, and weightlifting.
Note that if you are a male who weighs more than 175 pounds (79.5 kg), you should record your body weight as 175 pounds (79.5 kg). If you are a female who weighs more than 140 pounds (63.6 kg), record your body weight as 140 pounds (63.6 kg).
To complete this procedure, round the number to the nearest 5-pound (2.3 kg) increment or to the closest weight-stack plate. This becomes your trial load. The example seen in figure 3.2 is of a female who weighs 120 pounds (54.5 kg) and has selected the free-weight bench press from the three chest exercises available. In this example, the rounded-off trial load equals 40 pounds (18.2 kg) and one-half of that equals a warm-up load of 20 pounds (9.1 kg).
Grip selection and location
Lifting Fundamentals Drill 1.
Grip Selection and Location
This drill involves lifting an empty bar or a dowel stick from the floor using the three types of grips in the three grip-width positions described on pages 17 and 18. When completing this drill, you should position your hands so that the bar is balanced when being pulled to the thighs.
Using the wide grip width (see figure 2.10) and an overhand grip (see figure 2.8a), lift the bar to the thighs and then lower it back to the floor using correct lifting techniques. Lift the bar twice more to your thighs, using first the underhand grip (see figure 2.8b) and then the alternated grip (see figure 2.8c).
Now move your hands to the common grip width and use the three different types of grips. Next move your hands to the narrow grip width and do the same. Perform all grips with your thumbs around the bar. Check off each correctly performed grip and grip width.
Success Check
- Establish the proper hand spacing.
- Keep your thumbs around the bar.
- Remember the names of the grips.
Score Your Success
Complete three overhand grips with correct technique = 3 points
Complete three underhand grips with correct technique = 3 points
Complete three alternated grips with correct technique = 3 points
Your score ___
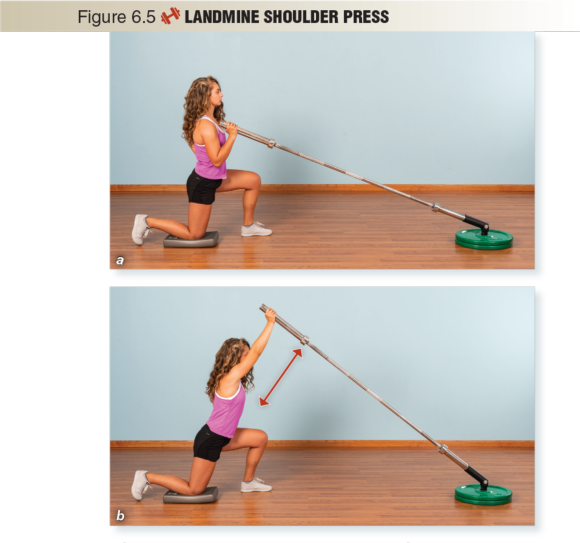
Landmine shoulder press
The *landmine shoulder press is designed to develop the shoulder muscles but will also develop the deltoids and triceps muscles. Because of the balance required to perform this exercise, it is more appropriate for experienced lifters. This exercise can be performed with a barbell while standing or kneeling and in a split or normal shoulder-width stance. It appears, however, that the best stance for isolating the shoulder muscles is the kneeling split stance, which is shown in figure 6.5.
Establish a split-stance kneeling position, with the back knee on a cushion and the forward knee flexed at 90 degrees with the forward foot firmly in contact with the floor. From this kneeling position, with one end of the barbell anchored to the floor and the free end of the barbell held with a pronated grip, lift the barbell to shoulder height. To start the exercise, position the barbell directly in front of the forearm, then lean forward and press the barbell to overhead position until the elbow is fully extended. At this point in the exercise, the back knee, the hip and shoulder on that side of the body, the head, and the overhead hand with the barbell should form a straight line. Exhale during the overhead pressing movement. To return to the starting position, allow the elbow to slowly flex until the hand reaches shoulder level. Inhale during the downward movement. After completing a set, reverse the knee stance positions and complete upward and downward movements with the opposite arm.
Determine warm-up and trial loads
This practice procedure explains how to use the formulas shown in figure 3.2 to determine the warm-up and trial loads for the basic exercises. If you select one of the first three exercises listed in steps 4 through 9, you will need to identify the coefficient (a number that represents a certain percent of the person's body weight) associated with that exercise to determine warm-up and trial loads. Each step includes exercises and coefficients that are specific to a certain muscle group. The example provided in figure 3.2 is associated with the chest muscle area from step 4. Realize that using the coefficients results in an estimated warm-up or trial load. Individual differences, combined with the variation in equipment design, make it difficult, if not impossible, to derive coefficients that are without error. Those presented in this text are starting points for determining appropriate loads. If there is a need to convert pounds to kilograms or kilograms to pounds, refer to the conversion chart in the back of the book.
You will notice that for the first three exercises, the letters FW (for free weight), C (for cam), and M (for multi-unit machine—but it can apply to a single-unit machine too) identify the type of equipment that is used when performing them.
After you've located the name of the exercise you've selected, write your body weight in the appropriate space and multiply it by the number to the right of it (the coefficient). The coefficient is a number that has been derived from studies of males and females who, for the most part, do not have experience in weight training. When multiplied by your body weight, the coefficient can be used to estimate training loads, and using one-half of it provides an appropriate warm-up load. The use of body weight in determining appropriate loads is based on its relationship to strength. This is the same logic used for creating weight divisions in sports such as wrestling, boxing, and weightlifting.
Note that if you are a male who weighs more than 175 pounds (79.5 kg), you should record your body weight as 175 pounds (79.5 kg). If you are a female who weighs more than 140 pounds (63.6 kg), record your body weight as 140 pounds (63.6 kg).
To complete this procedure, round the number to the nearest 5-pound (2.3 kg) increment or to the closest weight-stack plate. This becomes your trial load. The example seen in figure 3.2 is of a female who weighs 120 pounds (54.5 kg) and has selected the free-weight bench press from the three chest exercises available. In this example, the rounded-off trial load equals 40 pounds (18.2 kg) and one-half of that equals a warm-up load of 20 pounds (9.1 kg).
Grip selection and location
Lifting Fundamentals Drill 1.
Grip Selection and Location
This drill involves lifting an empty bar or a dowel stick from the floor using the three types of grips in the three grip-width positions described on pages 17 and 18. When completing this drill, you should position your hands so that the bar is balanced when being pulled to the thighs.
Using the wide grip width (see figure 2.10) and an overhand grip (see figure 2.8a), lift the bar to the thighs and then lower it back to the floor using correct lifting techniques. Lift the bar twice more to your thighs, using first the underhand grip (see figure 2.8b) and then the alternated grip (see figure 2.8c).
Now move your hands to the common grip width and use the three different types of grips. Next move your hands to the narrow grip width and do the same. Perform all grips with your thumbs around the bar. Check off each correctly performed grip and grip width.
Success Check
- Establish the proper hand spacing.
- Keep your thumbs around the bar.
- Remember the names of the grips.
Score Your Success
Complete three overhand grips with correct technique = 3 points
Complete three underhand grips with correct technique = 3 points
Complete three alternated grips with correct technique = 3 points
Your score ___
Landmine shoulder press
The *landmine shoulder press is designed to develop the shoulder muscles but will also develop the deltoids and triceps muscles. Because of the balance required to perform this exercise, it is more appropriate for experienced lifters. This exercise can be performed with a barbell while standing or kneeling and in a split or normal shoulder-width stance. It appears, however, that the best stance for isolating the shoulder muscles is the kneeling split stance, which is shown in figure 6.5.
Establish a split-stance kneeling position, with the back knee on a cushion and the forward knee flexed at 90 degrees with the forward foot firmly in contact with the floor. From this kneeling position, with one end of the barbell anchored to the floor and the free end of the barbell held with a pronated grip, lift the barbell to shoulder height. To start the exercise, position the barbell directly in front of the forearm, then lean forward and press the barbell to overhead position until the elbow is fully extended. At this point in the exercise, the back knee, the hip and shoulder on that side of the body, the head, and the overhead hand with the barbell should form a straight line. Exhale during the overhead pressing movement. To return to the starting position, allow the elbow to slowly flex until the hand reaches shoulder level. Inhale during the downward movement. After completing a set, reverse the knee stance positions and complete upward and downward movements with the opposite arm.
Related Books


