
- Home
- Sports and Activities
- Archery
- Archery

If you’re serious about improving accuracy, increasing consistency, and achieving competitive success, Archery is your guide.
Featuring the in-depth instruction, insight, and advice from the world’s top coaches and archers, Archery sets a new standard in resources for those who compete with the recurve or compound bow.
Archery includes a wealth of information on perfecting stance, body alignment, muscle recruitment, and shot sequence. You’ll master the skills and techniques taught at the U.S. Olympic Training Center by legendary coach KiSik Lee. Then you’ll prepare for competition:
• Select and properly tune equipment.
• Develop a winning shot sequence.
• Set up, draw, and complete the shot.
• Maximize practice time.
• Train physically and mentally for competition.
• Develop a successful tournament strategy.
Developed by USA Archery, Archery is an invaluable resource you’ll refer to again and again.
Chapter 1 Becoming a Competitive Archer
Butch Johnson
Chapter 2 Equipment and Tuning Tips
Mel Nichols
Chapter 3 Developing the Athlete’s Shot Sequence
Guy Krueger
Chapter 4 Recurve Shooting: Setting Up
KiSik Lee
Chapter 5 Recurve Shooting: Drawing the Shot
KiSik Lee
Chapter 6 Recurve Shooting: Completing the Shot
KiSik Lee
Chapter 7 Compound Shooting: Setting Up and Completing the Shot
Mel Nichols
Chapter 8 Making Practice More Effective
KiSik Lee
Chapter 9 Nutrition and Physical Training for Archers
Guy Krueger
Chapter 10 Mental Training for Archers
KiSik Lee
Chapter 11 Planning to Win
Butch Johnson
Chapter 12 Preparing and Peaking for Competition
Sheri Rhodes
Chapter 13 Developing Young Archers
Diane Watson
Chapter 14 Developing an Athlete’s Support Team
Robby K. Beyer
USA Archery (USAA) is the national governing body for the sport of archery in the United States. It is also a member association of World Archery, the international governing body for archery as recognized by the International Olympic Committee. The mission of USA Archery is to provide the necessary resources for fostering athletes’ participation, competition, and training in the sport.
USAA facilitates target archery competition in the United States, sanctioning hundreds of local, state, regional, and national events each year. The organization also facilitates Junior Olympic archery development and other grassroots archery programs across the United States. USA Archery oversees the selection and training of archers for international events such as the Archery World Cup; World Archery Championships; World Archery Para Championships; and the Pan Am, Parapan Am, Paralympic, and Olympic Games.
USA Archery is headquartered in Colorado Springs, Colorado.
A well-defined shot sequence increases the probability of a consistent outcome
A well-defined shot sequence, consistently followed, increases the probability that you will have a more consistent outcome. As a beginner, just learning the basic step-by-step process of shooting the arrow can be complicated because the intricate details of each step of the shot process are still unfamiliar to you and your focus is on the many details of each step of the shot.
The Importance of a Shot Sequence
A well-defined shot sequence, consistently followed, increases the probability that you will have a more consistent outcome. As a beginner, just learning the basic step-by-step process of shooting the arrow can be complicated because the intricate details of each step of the shot process are still unfamiliar to you and your focus is on the many details of each step of the shot. You might have difficulty performing all steps correctly and consistently. Initially, the entire shot sequence might take 20 to 30 seconds. As you become more comfortable and coordinated, the shot sequence might decrease from 12 to 15 seconds because some of these details will have become automatic subconscious actions. However, you need to have a well-defined shot process with specific steps to excel to the next level. Each step has a specific goal, and you must continue to focus on these steps of the process, especially in competition.
In intense competitions, such as in national championships, world championships, and the Olympic Games, your level of awareness can be different from that during training. Oftentimes the pressure creates a drastic change in awareness. Some athletes report feeling mentally “numb” and that they can easily forget what they are supposed to do, whereas others say they are aware of everything and feel overwhelmed. Having a well-defined shot process helps you stay focused in pressure situations and gives you a set of instructions to follow, thus allowing you to be more consistent and oftentimes to perform better in competition than in training.
The Shot Cycle
Biomechanical strength plays a role in your success in high-pressure competitions. Ideally, athletes who are stronger biomechanically have an advantage in competition. A shot sequence derived from biomechanics gives you an advantage because it allows you to practice more. Proper biomechanics also decreases your probability of being injured because you are using the correct motions throughout the shot cycle.
The shot cycle provides the major steps of shooting correctly and is the foundation of the National Training System. The shot cycle is a series of actions within phases of the shooting process developed with the use of biomechanics by world-renowned archery coach KiSik Lee and first introduced to the world in the book Total Archery, by KiSik Lee and Robert de Bondt. KiSik Lee is one of the most successful coaches in the international archery community and has been coaching professionally for over thirty years. He has developed successful national programs in South Korea and Australia, and now in the United States. Coach Lee's athletes have won nine Olympic gold medals and numerous other Olympic, World Championship, and international medals since 1981.
The purpose of the shot cycle is to give you a set of steps to follow to create a consistent shot process and to allow your body to shoot the bow in the most biomechanically efficient manner. The shot sequence also creates a solid foundation for the mental routine you need to follow to stay focused in competition. The most important goal of the shot cycle is to allow you to shoot every shot with holding. Holding is the feeling of being completely braced in the bow and able to withstand its force.
Figure 3.1 shows a basic diagram depicting the shot cycle and outlining the thirteen basic steps of shooting. The diagram shows how the basic steps of the shot cycle come together to flow into one complete action. During the shot cycle, Newton's laws of motion play a part in describing the forces you encounter. For example, the force the bow applies on you, pulling you forward during the shot and after the release, can be described by Newton's third law of motion. The third law of motion states that every force has an equal and opposite force reacting to it. As you continue to draw the bow back, the bow continues to exert a force on you, pulling you forward. This force is also directly related to the shot process, from holding to follow-through. Holding allows you to resist that force through bone alignment, and the follow-through is a reaction of losing the force that the bow exerts on you while you increase the force applied to the bow.

The thirteen basic steps of shooting follow:
- Stance
- Nocking the arrow
- Hooking and gripping
- Set position and mindset
- Setup
- Drawing
- Loading
- Anchoring
- Transfer
- Holding
- Expansion and aiming
- Release and follow-through
- Feedback and evaluation
Defining the Concepts
Some key concepts need to be covered before the shot cycle steps are described in detail because many of these concepts are used in this chapter and in many of the remaining chapters. The principles should be the same for everyone, but some of the details will vary for each archer because of body type, size, and strength.
A difference exists between focusing on movement as opposed to focusing on muscle contraction. Commonly, in technique sports, people focus on tightening a specific set of muscles and thus create too much tension in one area, making the movement more difficult. An excellent example can be seen in the ways you can move your forearm to your upper arm. First, focus on contracting the biceps to bring your forearm up to your upper arm. Notice this action takes a great deal of effort, causing your forearm to move to your upper arm in a slow and possibly shaky manner. Now focus on moving your forearm to your upper arm without focusing on contracting the biceps. Your forearm moves naturally to your upper arm and with less tension of the biceps. This more natural movement happens because many small muscles in your arm simultaneously contract and relax to create it.
The best archers make shooting a bow seem effortless because they are focused on the movement, not on a specific muscle contraction. Describing movement is therefore the main focus in explaining the steps of the shot cycle. Although movement is the key focus, feeling tension in specific areas is necessary for you to confirm you are in the correct position, thus allowing you to become more consistent and to coach yourself through each shot.

Figure 3.2 shows the major muscles of the back, which play a major role in many of your movements and provide you with the strength necessary to properly execute the shot. The middle and lower trapezius, the triceps, and the deltoids are the larger, stronger muscles of the back, shoulder, and arm. These muscles used in combination with the correct bone alignment give you the strength to shoot comfortably and consistently.
An important term in learning the correct shot cycle is LAN 2, a half dollar-sized area on the outside of the upper arm, halfway between the shoulder and elbow which you can see in figure 3.2. It is the back of the triceps, located about where the sleeve of a short sleeve shirt ends. Focusing on moving the LAN 2 area during the shot cycle allows you to use the stronger muscles of your body and facilitates the body's smooth movement.
Your stance and hip, chest, and head positions work together to create correct posture and a foundation for shooting
Set can also be described as the A spot of each shot (see figure 4.17) because it is the end of the preparation portion of the shot cycle before any major movements occur.
Achieving Set Position, Posture, and Mindset
 Finally, after setting the hook and grip, you are ready to complete the set position. Set can also be described as the A spot of each shot (see figure 4.17) because it is the end of the preparation portion of the shot cycle before any major movements occur. After you set the hook and grip, look up, prepare your torso, and confirm that your stance and posture are correct. Set your head position and shoulder alignment so that your shoulder is approximately 60 to 80 percent in line with the target. Your head should sit over the ball of your back foot, thus helping to provide the 60/40 ratio of weight distribution on the balls of your feet, and must not sit over your spine, helping you to maintain a flat back and some tension in your lower abdominal muscles. It is also important that you feel a small amount of tension in the lower trapezius at the final set position.
Now that you have set the physical foundation, make the final preparations before raising the bow. Mindset refers to the final mental preparations you make prior to committing to the shot process and is the final part of the set position. Now, select the point of eye focus (i.e., location on the target at which to aim). During windy or rainy conditions, aim at a location on the target other than the center. In these weather conditions you must judge how much to aim off based on your experiences. Once you have fully committed to taking the shot, move to the setup position.
Achieving the Setup Position
 Setting up refers to the movements you make to achieve the setup position. Once the set and mindset are complete, raise the bow to setup position. The main goal of the setup is to set the barrel of the gun while maintaining the grip and hook positions and having your drawing scapula close to your spine. To raise the bow to setup position, initiate the movement at your bow hand. At the very beginning of raising the bow, your bow hand must raise the bow in an arcing fashion, with your bow arm extended as far away as possible from your body (see figure 4.18). Your drawing arm is merely connected to the string and is raised by this connection and not by your manually raising it or your drawing hand. Raising the bow in this manner causes the stabilizer to point up and your drawing hand to be at a lower vertical position than your bow hand at setup. As you raise up, the sight should not be in line with the target. If you are a right-handed archer, your sight should be pointed to the left of the target at the final setup position, thus preparing you for angular drawing (the position will be the opposite for a left-handed archer). You should be able to see the target slightly through the riser and string.
As you raise to setup, maintain the position of your drawing forearm and wrist, and the hook and feeling of the steel chain. You should feel an increase in the tension in your lower trapezius as you rotate your chest to set the barrel of the gun. While you raise to this final setup position, take an “extra set” to create the bone alignment to achieve a perfect barrel of the gun. The extra set motion requires you to twist more at your midsection, above your waist, to get your shoulders and chest to set the barrel of the gun. Do not roll your bow shoulder forward or try to set your drawing shoulder back to set the barrel of the gun. The alignment from the pressure point of the grip through your bow shoulder to your drawing shoulder should be set from rotating only the torso away from the target. The torso rotation sets the barrel of the gun (see figure 4.18). The most important philosophy behind these steps is to create a foundation for angular drawing and loading. With angular movement, you use more efficient torque of your body's pivot point. If you are new to this setup you might have a tendency to exaggerate the position and movement. It is important to remember that the motion from set to setup should be a smooth, natural movement and not be exaggerated. If you exaggerate the motion too much, you might not be able to easily set the barrel of the gun. See figure 4.19a for an example of correctly setting the gun and figure 4.19b for an incorrect example.

Execution plays an important role in the direction the arrow goes
Developing a clean execution is very important because execution plays such an important role in the direction the arrow goes.
Execution Improvement Drills and Activities
Developing a clean execution is very important because execution plays such an important role in the direction the arrow goes. All the steps of the shot cycle are designed to allow you to execute the shot as clean as possible. The actual execution and release should be subconscious actions. There are a few activities and drills that help in developing clean execution.
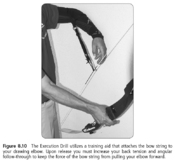
Execution Drill
One drill involves using a training aid such as a Formaster (by Range-O-Matic) or the Shot Trainer (by Astra Archery). This training aid attaches the bow string to your drawing elbow (see figure 8.10). When you release, you must continue to expand and increase your back tension to resist the force of the bow and cord from pulling you forward. It can be used with or without an arrow. This type of training aid is excellent in improving reaction time of the release when using a clicker, and it is preferred to use this training aid while aiming at a target. This training aid can also be used indoors without using an arrow and is an excellent way to train when weather or time prevents outdoor target training.
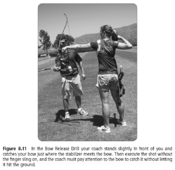
Bow Release Drill
The Bow Release Drill teaches you how to correctly release the bow. A correct release requires you to release both the bow string and bow grip simultaneously to consistently put a constant amount and direction of momentum into each arrow and to maintain the barrel of the gun through the release. The Bow Release Drill can be practiced first without a bow or stretch band. Mimic the action of the steps of the shot cycle. At release, try to synchronize the release of your drawing hand and bow hand. Notice that your thumb and index finger are pointed straight down. After you have developed the ability to synchronize the release of your drawing hand and bow hand without using a stretch band, you can start doing the same drill with a stretch band. Next perform this drill with the bow. To perform this drill with a bow, shoot without a finger sling; have your coach catch the bow where the stabilizer connects to the riser (see figure 8.11). Caution: Do this drill only with a qualified coach and take all necessary precautions.
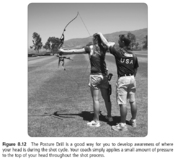
Posture Drill
The Posture Drill is excellent for helping you maintain your head position and posture throughout the shot and can be used while you are using a stretch band or shooting. To perform this drill, your coach rests her hand slightly on your head while you are going through all the steps of the shot cycle (see figure 8.12). If your coach feels your head move, he presses down firmly on your head, enough to prevent you from moving your head throughout the entire shot process for a few shots. After a few shots, your coach then presses down firmly on your head just from set to setup position. After setup your coach removes his hand to see whether you can better control your body and head. Do this drill only if you are having trouble controlling your head and posture during the shooting process.
A well-defined shot sequence increases the probability of a consistent outcome
A well-defined shot sequence, consistently followed, increases the probability that you will have a more consistent outcome. As a beginner, just learning the basic step-by-step process of shooting the arrow can be complicated because the intricate details of each step of the shot process are still unfamiliar to you and your focus is on the many details of each step of the shot.
The Importance of a Shot Sequence
A well-defined shot sequence, consistently followed, increases the probability that you will have a more consistent outcome. As a beginner, just learning the basic step-by-step process of shooting the arrow can be complicated because the intricate details of each step of the shot process are still unfamiliar to you and your focus is on the many details of each step of the shot. You might have difficulty performing all steps correctly and consistently. Initially, the entire shot sequence might take 20 to 30 seconds. As you become more comfortable and coordinated, the shot sequence might decrease from 12 to 15 seconds because some of these details will have become automatic subconscious actions. However, you need to have a well-defined shot process with specific steps to excel to the next level. Each step has a specific goal, and you must continue to focus on these steps of the process, especially in competition.
In intense competitions, such as in national championships, world championships, and the Olympic Games, your level of awareness can be different from that during training. Oftentimes the pressure creates a drastic change in awareness. Some athletes report feeling mentally “numb” and that they can easily forget what they are supposed to do, whereas others say they are aware of everything and feel overwhelmed. Having a well-defined shot process helps you stay focused in pressure situations and gives you a set of instructions to follow, thus allowing you to be more consistent and oftentimes to perform better in competition than in training.
The Shot Cycle
Biomechanical strength plays a role in your success in high-pressure competitions. Ideally, athletes who are stronger biomechanically have an advantage in competition. A shot sequence derived from biomechanics gives you an advantage because it allows you to practice more. Proper biomechanics also decreases your probability of being injured because you are using the correct motions throughout the shot cycle.
The shot cycle provides the major steps of shooting correctly and is the foundation of the National Training System. The shot cycle is a series of actions within phases of the shooting process developed with the use of biomechanics by world-renowned archery coach KiSik Lee and first introduced to the world in the book Total Archery, by KiSik Lee and Robert de Bondt. KiSik Lee is one of the most successful coaches in the international archery community and has been coaching professionally for over thirty years. He has developed successful national programs in South Korea and Australia, and now in the United States. Coach Lee's athletes have won nine Olympic gold medals and numerous other Olympic, World Championship, and international medals since 1981.
The purpose of the shot cycle is to give you a set of steps to follow to create a consistent shot process and to allow your body to shoot the bow in the most biomechanically efficient manner. The shot sequence also creates a solid foundation for the mental routine you need to follow to stay focused in competition. The most important goal of the shot cycle is to allow you to shoot every shot with holding. Holding is the feeling of being completely braced in the bow and able to withstand its force.
Figure 3.1 shows a basic diagram depicting the shot cycle and outlining the thirteen basic steps of shooting. The diagram shows how the basic steps of the shot cycle come together to flow into one complete action. During the shot cycle, Newton's laws of motion play a part in describing the forces you encounter. For example, the force the bow applies on you, pulling you forward during the shot and after the release, can be described by Newton's third law of motion. The third law of motion states that every force has an equal and opposite force reacting to it. As you continue to draw the bow back, the bow continues to exert a force on you, pulling you forward. This force is also directly related to the shot process, from holding to follow-through. Holding allows you to resist that force through bone alignment, and the follow-through is a reaction of losing the force that the bow exerts on you while you increase the force applied to the bow.
The thirteen basic steps of shooting follow:
- Stance
- Nocking the arrow
- Hooking and gripping
- Set position and mindset
- Setup
- Drawing
- Loading
- Anchoring
- Transfer
- Holding
- Expansion and aiming
- Release and follow-through
- Feedback and evaluation
Defining the Concepts
Some key concepts need to be covered before the shot cycle steps are described in detail because many of these concepts are used in this chapter and in many of the remaining chapters. The principles should be the same for everyone, but some of the details will vary for each archer because of body type, size, and strength.
A difference exists between focusing on movement as opposed to focusing on muscle contraction. Commonly, in technique sports, people focus on tightening a specific set of muscles and thus create too much tension in one area, making the movement more difficult. An excellent example can be seen in the ways you can move your forearm to your upper arm. First, focus on contracting the biceps to bring your forearm up to your upper arm. Notice this action takes a great deal of effort, causing your forearm to move to your upper arm in a slow and possibly shaky manner. Now focus on moving your forearm to your upper arm without focusing on contracting the biceps. Your forearm moves naturally to your upper arm and with less tension of the biceps. This more natural movement happens because many small muscles in your arm simultaneously contract and relax to create it.
The best archers make shooting a bow seem effortless because they are focused on the movement, not on a specific muscle contraction. Describing movement is therefore the main focus in explaining the steps of the shot cycle. Although movement is the key focus, feeling tension in specific areas is necessary for you to confirm you are in the correct position, thus allowing you to become more consistent and to coach yourself through each shot.
Figure 3.2 shows the major muscles of the back, which play a major role in many of your movements and provide you with the strength necessary to properly execute the shot. The middle and lower trapezius, the triceps, and the deltoids are the larger, stronger muscles of the back, shoulder, and arm. These muscles used in combination with the correct bone alignment give you the strength to shoot comfortably and consistently.
An important term in learning the correct shot cycle is LAN 2, a half dollar-sized area on the outside of the upper arm, halfway between the shoulder and elbow which you can see in figure 3.2. It is the back of the triceps, located about where the sleeve of a short sleeve shirt ends. Focusing on moving the LAN 2 area during the shot cycle allows you to use the stronger muscles of your body and facilitates the body's smooth movement.
Your stance and hip, chest, and head positions work together to create correct posture and a foundation for shooting
Set can also be described as the A spot of each shot (see figure 4.17) because it is the end of the preparation portion of the shot cycle before any major movements occur.
Achieving Set Position, Posture, and Mindset
Finally, after setting the hook and grip, you are ready to complete the set position. Set can also be described as the A spot of each shot (see figure 4.17) because it is the end of the preparation portion of the shot cycle before any major movements occur. After you set the hook and grip, look up, prepare your torso, and confirm that your stance and posture are correct. Set your head position and shoulder alignment so that your shoulder is approximately 60 to 80 percent in line with the target. Your head should sit over the ball of your back foot, thus helping to provide the 60/40 ratio of weight distribution on the balls of your feet, and must not sit over your spine, helping you to maintain a flat back and some tension in your lower abdominal muscles. It is also important that you feel a small amount of tension in the lower trapezius at the final set position.
Now that you have set the physical foundation, make the final preparations before raising the bow. Mindset refers to the final mental preparations you make prior to committing to the shot process and is the final part of the set position. Now, select the point of eye focus (i.e., location on the target at which to aim). During windy or rainy conditions, aim at a location on the target other than the center. In these weather conditions you must judge how much to aim off based on your experiences. Once you have fully committed to taking the shot, move to the setup position.
Achieving the Setup Position
Setting up refers to the movements you make to achieve the setup position. Once the set and mindset are complete, raise the bow to setup position. The main goal of the setup is to set the barrel of the gun while maintaining the grip and hook positions and having your drawing scapula close to your spine. To raise the bow to setup position, initiate the movement at your bow hand. At the very beginning of raising the bow, your bow hand must raise the bow in an arcing fashion, with your bow arm extended as far away as possible from your body (see figure 4.18). Your drawing arm is merely connected to the string and is raised by this connection and not by your manually raising it or your drawing hand. Raising the bow in this manner causes the stabilizer to point up and your drawing hand to be at a lower vertical position than your bow hand at setup. As you raise up, the sight should not be in line with the target. If you are a right-handed archer, your sight should be pointed to the left of the target at the final setup position, thus preparing you for angular drawing (the position will be the opposite for a left-handed archer). You should be able to see the target slightly through the riser and string.
As you raise to setup, maintain the position of your drawing forearm and wrist, and the hook and feeling of the steel chain. You should feel an increase in the tension in your lower trapezius as you rotate your chest to set the barrel of the gun. While you raise to this final setup position, take an “extra set” to create the bone alignment to achieve a perfect barrel of the gun. The extra set motion requires you to twist more at your midsection, above your waist, to get your shoulders and chest to set the barrel of the gun. Do not roll your bow shoulder forward or try to set your drawing shoulder back to set the barrel of the gun. The alignment from the pressure point of the grip through your bow shoulder to your drawing shoulder should be set from rotating only the torso away from the target. The torso rotation sets the barrel of the gun (see figure 4.18). The most important philosophy behind these steps is to create a foundation for angular drawing and loading. With angular movement, you use more efficient torque of your body's pivot point. If you are new to this setup you might have a tendency to exaggerate the position and movement. It is important to remember that the motion from set to setup should be a smooth, natural movement and not be exaggerated. If you exaggerate the motion too much, you might not be able to easily set the barrel of the gun. See figure 4.19a for an example of correctly setting the gun and figure 4.19b for an incorrect example.
Execution plays an important role in the direction the arrow goes
Developing a clean execution is very important because execution plays such an important role in the direction the arrow goes.
Execution Improvement Drills and Activities
Developing a clean execution is very important because execution plays such an important role in the direction the arrow goes. All the steps of the shot cycle are designed to allow you to execute the shot as clean as possible. The actual execution and release should be subconscious actions. There are a few activities and drills that help in developing clean execution.
Execution Drill
One drill involves using a training aid such as a Formaster (by Range-O-Matic) or the Shot Trainer (by Astra Archery). This training aid attaches the bow string to your drawing elbow (see figure 8.10). When you release, you must continue to expand and increase your back tension to resist the force of the bow and cord from pulling you forward. It can be used with or without an arrow. This type of training aid is excellent in improving reaction time of the release when using a clicker, and it is preferred to use this training aid while aiming at a target. This training aid can also be used indoors without using an arrow and is an excellent way to train when weather or time prevents outdoor target training.
Bow Release Drill
The Bow Release Drill teaches you how to correctly release the bow. A correct release requires you to release both the bow string and bow grip simultaneously to consistently put a constant amount and direction of momentum into each arrow and to maintain the barrel of the gun through the release. The Bow Release Drill can be practiced first without a bow or stretch band. Mimic the action of the steps of the shot cycle. At release, try to synchronize the release of your drawing hand and bow hand. Notice that your thumb and index finger are pointed straight down. After you have developed the ability to synchronize the release of your drawing hand and bow hand without using a stretch band, you can start doing the same drill with a stretch band. Next perform this drill with the bow. To perform this drill with a bow, shoot without a finger sling; have your coach catch the bow where the stabilizer connects to the riser (see figure 8.11). Caution: Do this drill only with a qualified coach and take all necessary precautions.
Posture Drill
The Posture Drill is excellent for helping you maintain your head position and posture throughout the shot and can be used while you are using a stretch band or shooting. To perform this drill, your coach rests her hand slightly on your head while you are going through all the steps of the shot cycle (see figure 8.12). If your coach feels your head move, he presses down firmly on your head, enough to prevent you from moving your head throughout the entire shot process for a few shots. After a few shots, your coach then presses down firmly on your head just from set to setup position. After setup your coach removes his hand to see whether you can better control your body and head. Do this drill only if you are having trouble controlling your head and posture during the shooting process.
Related Books


