

Build a rock-solid set of foundational skills and knowledge and improve performance with Curling: Steps to Success.
Internationally renowned coach Sean Turriff brings his extensive experience and expertise to Curling: Steps to Success, providing players and coaches with a practical, step-by-step format that develops and improves curlers’ fundamental skill level and decision making. Supplemented by more than 90 photos and illustrations, the book covers essential curling skills such as throws, brushing, delivery, basic shots, and ice reading. Included are detailed explanations of the roles and responsibilities of each team member as well as practical check points for gauging players’ mastery of skills and determining when to progress to more complex tactics and game strategies.
Whether you are just beginning or have experience on the sheet, the book’s detailed photo sequences, expert instruction, and developmental drills will have you targeting the rock accurately and consistently in no time. Part of the popular Steps to Success series, which has sold more than two million copies worldwide, Curling: Steps to Success is your guide to on-the-sheet success.
Step 1 Brushing
Step 2 Curling Delivery: Approach
Step 3 Curling Delivery: Slide
Step 4 Curling Delivery: Release and Turns
Step 5 Shots
Step 6 Ice Reading
Step 7 Roles and Responsibilities
Step 8 Strategy
Step 9 Mental Preparation and Goal Setting
Step 10 Mixed Doubles
Sean Turriff is a National Coaching Certification Program (NCCP) Competition Development certified coach as well as a coach evaluator and learning facilitator through the Ontario Curling Association and Canadian Curling Association. He is also the men’s varsity curling coach at Humber College, Toronto, winners of the 2016 CCAA National Men's Curling Championship.
In 2015, Turriff had the distinction of being camp director for the Chinese National Junior Curling Camp in Shanghai on behalf of the World Curling Federation. Since 2011, Turriff has coached at the Trillium Junior Curling Camp in Ontario, working with the highest level of curling coaches in Canada. In addition, he coached the Brandon University (Brandon, Manitoba) women’s team in the Canadian University Championships in 2007-08, and he was coach of the 2016 Nunavut junior men’s team when they won their first game ever at a national competition at the Canadian Junior Curling Championships.
Off the sheet, Turriff has served as an on-air commentator for curling competitions broadcast on Rogers TV. Turriff’s unique background in coaching at all levels of competition, coach training and evaluation, international coaching, and television commentary make him a highly respected expert and ambassador of the sport.
“Sean Turriff is a curling coach! He lives it, breathes it, and is consumed by it. Even his social media hashtag is Love to Coach. He enjoys sharing his knowledge and having other coaches share with him. In Curling: Steps to Success, Sean has amassed a comprehensive drill book that every coach will find useful: those at the beginning stages of their curling careers and those at the highest levels of competition. Use Sean’s drills and your team will improve its skills—guaranteed. This is the eight-ender of coaching manuals.”
Jim Waite-- National Coach Curling Canada
“In Curling: Steps to Success, Coach Sean Turriff has provided a foundation for novice and competitive curlers looking to develop sound fundamentals as they learn and excel at the game. Coach Turriff pulls from his extensive experience coaching at the very highest levels of the sport to offer tips and techniques that will help any curler improve. It’s also a compelling read for those interested in understanding the sport, its history, and the skills. With the popularity of curling increasing, Sean’s book could not have come along at a better time—it’s a must-read for everyone.”
David Murdoch-- Two-Time World Champion, Olympic Silver Medalist, Three-Time European Champion, Skip Team Murdoch, Skip Great Britain Men's Curling Team 2006, 2010, 2014
“Whether you are a beginning or advanced curler, this book will help you get more out of your game. Curling made easy!”
Reid Carruthers-- 2011 Brier and World Champion, West St. Paul Curling Club Winnipeg, Manitoba
“Curling: Steps to Success is a tremendous resource for athletes and coaches alike looking to refine their skills. Turriff is both methodical and purposeful in his development of drills, providing variance and progressions to challenge all skill levels.”
Lori Olson-Johns-- 2014 Canada Cup Champion, 2015 Scotties Tournament of Hearts Runner-Up
Line of Delivery
Throwing your shots down the right line is the next critical component in developing your overall shot-making abilities. Sliding down the proper line starts with a good understanding of what the slide path actually looks like.
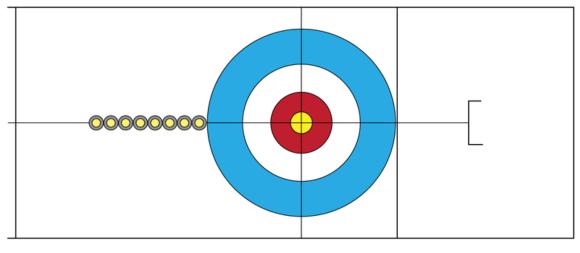
Throwing your shots down the right line is the next critical component in developing your overall shot-making abilities. Sliding down the proper line starts with a good understanding of what the slide path actually looks like. Being able to properly visualize the path is an important skill. Beginning curlers often don't understand that although the target can be practically anywhere across the sheet. At the throwing end, this translates into a fairly narrow range across which you will be required to slide. Figure 5.4 demonstrates this for a right-handed curler. A target variation of 12 feet (3.7 m), or the entire width of the house, results in a window of approximately 3 feet (1 m) at the throwing-end hog line and less than 2 feet (0.6 m) at the throwing-end tee line.

Slide window for right-handed curler.
By the time you get all the way back to the throwing hack, you can see that very slight line variations result in considerably different slide paths. We have already covered how to set up and slide toward a specific line, and now practice is required to build your skill in this regard.
Shot Drill 6 Cup Canyon
For this drill you will need eight plastic cups. Set up a target at the near hog line, and use pairs of cups as gates through which the line to the target travels. Place the first gate pair of cups on the back line, the second pair at the tee line, the third pair at the top of the 12-foot circle, and the final pair halfway between the hog line and the top of the 12-foot circle. The distance between the cups should be approximately 1.5 times the width of the stone.
Line up along the path and deliver the curling stone without touching any of the cups. Repeat this drill four times, changing the target setup each time.
To Increase Difficulty
- Place the gates closer together - just slightly wider than a stone for maximum difficulty.
- Place the target as wide as you would possibly need to throw rather than simply up the middle of the sheet.
To Decrease Difficulty
- Open the width of the gates, and keep the target closer to the center of the sheet.
Success Check
- Keep your head up and your eyes on the target rather than on the cups. Focus on where you want to slide rather than the path through which you are sliding.
- Keep your body square during your slide, with your stone positioned in front of you throughout the delivery.
- Slide as closely as possible through the center of the allowable opening.
Score Your Success
Score 1 point for each gate successfully navigated for a maximum of 16 points.
- Your score ___
Shot Drill 7 Pop Goes the Weasel
Set up one set of stones, as shown in figure 5.5, with all the stones in contact with each other. You will attempt to deliver a stone that contacts the lead stone directly on the nose. The objective is to promote all eight of the original stones into the rings. Each shooter is removed after each shot is completed, but the original stones are not moved from where they end up as a result of the shot. This can result in some fairly complicated situations if your line is not precise.
Stone setup for pop goes the weasel.
This can be played as a team drill, with each player throwing two stones each. The skip will call line, and the brushers will be involved to help manage the line.
To Increase Difficulty
- Do not remove shooters after each shot has been thrown. This makes the resulting situations much more complicated.
To Decrease Difficulty
- Reset the original stones that did not make it into the rings after each shot.
Success Check
- Slide square to your target brush, and trust that it is in the right place to make the shot requested.
- Throw the appropriate weight because this affects the amount of curl on your shots.
- Make sure you have a clean release and the appropriate turn on your shot.
Score Your Success
Score 1 point for every stone that is in the rings once you have thrown all eight stones.
- Your score ___
Save
Save
Learn more about Curling: Steps to Success.
Being Critical and Knowing the Break Point
A critical eye is also extremely important when reading the ice. Weight and line have a great impact on the curl for any given shot; however, another major factor that affects the curl is the release and rotation applied to a stone.
Being Critical
A critical eye is also extremely important when reading the ice. Weight and line have a great impact on the curl for any given shot; however, another major factor that affects the curl is the release and rotation applied to a stone. A player may slide down a particular line, for instance, but give the stone a slight sideways push upon release that propels it down a different line than intended. This type of motion is often referred to as setting the stone. Players can set the stone out, meaning away from the body during the release (figure 6.2a), or they can set the stone in, meaning closer to the body (figure 6.2b).This is often related to which handle has been thrown on the stone. Setting a stone puts it on a different path than the one you are sliding down, and if you do not realize you have done it, it can give you a false impression about what is happening on the ice. At the top levels, players will practice purposely setting the stone in order to get different effects or amounts of curl. This is a very-high level skill that should not be considered at the beginner level. Players watching the shot need to observe the release to make sure nothing from the release affected the line.

Setting the stone in the delivery: (a) setting the stone out; (b) setting the stone in.
Another factor in the release that can affect the curl is the amount of rotation on the stone. Stones with little rotation will curl more than stones with more rotation. If a shot has less than the desired rotation on it, there will be an exaggerated curl. If a shot has more than the desired rotation, then it will have less curl than expected. If you do not observe this portion of the delivery, then you may get a false impression of the actual amount of curl. It may sound tempting to try to manipulate the amount of curl by changing the amount of rotation you put on the stone. In theory, this can be done, and at the highest levels it occasionally is, often to try to get curl on ice that is otherwise very straight. Again, this requires an extremely high skill level and should not be attempted by beginners. Instead, you should strive for consistency.
On most ice surfaces, rotations of more or less than 2 1/2 to 3 1/2 rotations will give you unpredictable curl. This is the reason we strive to hit that sweet spot of rotation on our shots - that amount of rotation yields the most consistent curl.
As a thrower, you need to be honest with yourself and critical of your performance so you can give the rest of the team an accurate impression of how well you threw your shot. If you know, for instance, that you shoved a rock off the line but no one else on your team detected it, you need to relay that information as soon as possible to your brushers, then let your skip know so she can factor that information into the result observed on your shot.
The impact of the release is one reason that players should be critical of the information they observe when watching their opposition throw. It can be misleading to watch your opponents throw if you are not familiar with their releases. Teams will be quite familiar with their own releases and so will be used to the idiosyncrasies in curl that result from their deliveries. Unless you have a critical eye, you may miss these small movements that have a big impact.
Misstep
You don't observe the release when watching a shot.
Correction
Establish a habit of specifically watching as the rock leaves the player's hand and then counting the rock's rotations. Also get into the habit of standing in line with the shot as you watch it rather than to the side. Both will give you clues about how clean the release was.
Break Point
Another factor that players need to understand is the nature of the path the stone takes. You know the path is a curve, but the exact nature of that arc is not always the same. Sometimes a stone will begin to curl immediately upon release, but most commonly, the stone will travel in a straight line extending from the slide path for a certain distance, then break into a curve. It is very important to understand where this break point is.
The impact of brushers needs to be considered in order to accurately read the ice. Brushing reduces the amount of curl on a given shot, although how much depends heavily on how good the brushers are. However, the straightening effect that brushers have on a shot is usually higher before the break point. Once the stone begins to curl significantly, it is harder to reduce the curl with brushing.
Again, this is another factor that can be influenced by the release. If one stone is released much earlier than another, the break point will come earlier. For this reason, teams often work to develop a common release point to reduce the factors that skips need to keep in mind when calling ice for shots. Figure 6.3 demonstrates how a different release point will have a different result even with the same initial target.
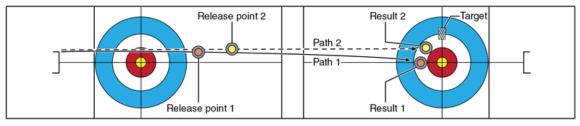
Break point and the effect of release.
Save
Save
Learn more about Curling: Steps to Success.
Curling Rules and How to Play
A mixed doubles curling team consists of a pair of players, one male and the other female. Standard curling sheets are used, and normal delivery rules apply. Typically games are eight ends in length. Thankfully, the skills you have learned up to this point still apply in the game of mixed doubles.
A mixed doubles curling team consists of a pair of players, one male and the other female. Standard curling sheets are used, and normal delivery rules apply. Typically games are eight ends in length. Thankfully, the skills you have learned up to this point still apply in the game of mixed doubles. The real changes are in how the game proceeds.
Each team throws five rocks rather than eight. One player throws the first and fifth stones, and the other player throws the second, third, and fourth stones. Teams may choose to change which of the pair throws the first and fifth stones from end to end. This is one major difference from the four-person game, where players cannot rotate positions within a game.
Each team has one additional stone placed within the playing area at one of two specific spots on the sheet. To be clear, each team gets six stones that can potentially be in play. They throw only five of those stones, since both teams have one stone in play before the endbegins.
The first placement option is behind the tee line at the center line, touching the 4-foot circle as shown in figure 10.1. The second option is a center guard, the depth of which is predetermined before the game and depends on the amount of curl on the sheet. If conditions allow for more curl, the guard placement is closer to the rings. Standard placement is about halfway between the rings and the hog line. Figure 10.1 shows the three possible placements for the yellow stone, only one of which will be used throughout the game.
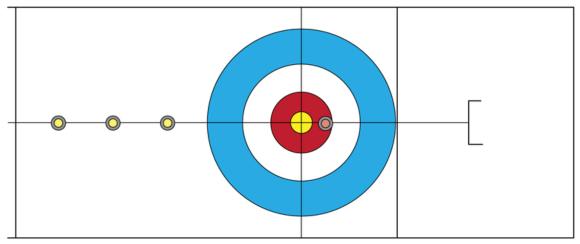
Initial setup.
In the traditional team game, the team with the hammer throws the second stone of the end. In mixed doubles, however, the team with the hammer gets to choose rock placement, which in turn determines who throws last rock. The team whose rock is placed out front of the house must throw the first rock of the end. The result of this rule is that the team with the hammer may choose to throw the first rock of the next end if they choose to position their stone out front of the rings to start the end.
The next major difference between the mixed doubles game and the traditional team game is with respect to the free guard zone rule. Recall that in the traditional game, your team is not allowed to remove an opposing rock positioned within the free guard zone (FGZ) until the fifth shot of the end. Stones within the rings are allowed to be removed under this rule, and you can remove your own stones if you so desire even if they are in the free guard zone. The modified FGZ rule in mixed doubles states that no rocks, even the ones initially placed to start the end, may be removed before the fourth delivered rock of the end. This means rocks in the rings and guards are all protected until that shot. Also, it means you cannot remove your own guards or stones in the rings. If a violation of this rule occurs, the stones are repositioned at the discretion of the nonoffending team to where they were before the shot, and the shot is considered spent. To help clarify how this works, if team A throws first in the end, that shot cannot be a takeout of any stone. Team B's first shot, the second shot of the end, also cannot be a takeout. Team A's second shot, the third of the end, cannot be a takeout, but team B's second shot, being the fourth shot of the end, may be a takeout. Every shot from there on during the end may be a takeout if desired.
Scoring in mixed doubles is the same as it is in the traditional team game, and the two initial stones are eligible to be counted if they are moved into a scoring position. Hammer determination during game play is the same as for the four-person game; however, hammer has a slightly different meaning in that the team that scored gets a choice of rock placement and accompanying throwing order rather than automatic last-rock advantage. One other slight change to the scoring rules is that if an end is blanked (i.e., no team scores), then the hammer, or decision on initial rock placement, changes between teams. In the traditional game, blanking an end is a tactic that can be used to maintain last-rock advantage into a subsequent end. In mixed doubles, a blank means losing the advantage of hammer.
Save
Save
Learn more about Curling: Steps to Success.
Line of Delivery
Throwing your shots down the right line is the next critical component in developing your overall shot-making abilities. Sliding down the proper line starts with a good understanding of what the slide path actually looks like.
Throwing your shots down the right line is the next critical component in developing your overall shot-making abilities. Sliding down the proper line starts with a good understanding of what the slide path actually looks like. Being able to properly visualize the path is an important skill. Beginning curlers often don't understand that although the target can be practically anywhere across the sheet. At the throwing end, this translates into a fairly narrow range across which you will be required to slide. Figure 5.4 demonstrates this for a right-handed curler. A target variation of 12 feet (3.7 m), or the entire width of the house, results in a window of approximately 3 feet (1 m) at the throwing-end hog line and less than 2 feet (0.6 m) at the throwing-end tee line.
Slide window for right-handed curler.
By the time you get all the way back to the throwing hack, you can see that very slight line variations result in considerably different slide paths. We have already covered how to set up and slide toward a specific line, and now practice is required to build your skill in this regard.
Shot Drill 6 Cup Canyon
For this drill you will need eight plastic cups. Set up a target at the near hog line, and use pairs of cups as gates through which the line to the target travels. Place the first gate pair of cups on the back line, the second pair at the tee line, the third pair at the top of the 12-foot circle, and the final pair halfway between the hog line and the top of the 12-foot circle. The distance between the cups should be approximately 1.5 times the width of the stone.
Line up along the path and deliver the curling stone without touching any of the cups. Repeat this drill four times, changing the target setup each time.
To Increase Difficulty
- Place the gates closer together - just slightly wider than a stone for maximum difficulty.
- Place the target as wide as you would possibly need to throw rather than simply up the middle of the sheet.
To Decrease Difficulty
- Open the width of the gates, and keep the target closer to the center of the sheet.
Success Check
- Keep your head up and your eyes on the target rather than on the cups. Focus on where you want to slide rather than the path through which you are sliding.
- Keep your body square during your slide, with your stone positioned in front of you throughout the delivery.
- Slide as closely as possible through the center of the allowable opening.
Score Your Success
Score 1 point for each gate successfully navigated for a maximum of 16 points.
- Your score ___
Shot Drill 7 Pop Goes the Weasel
Set up one set of stones, as shown in figure 5.5, with all the stones in contact with each other. You will attempt to deliver a stone that contacts the lead stone directly on the nose. The objective is to promote all eight of the original stones into the rings. Each shooter is removed after each shot is completed, but the original stones are not moved from where they end up as a result of the shot. This can result in some fairly complicated situations if your line is not precise.
Stone setup for pop goes the weasel.
This can be played as a team drill, with each player throwing two stones each. The skip will call line, and the brushers will be involved to help manage the line.
To Increase Difficulty
- Do not remove shooters after each shot has been thrown. This makes the resulting situations much more complicated.
To Decrease Difficulty
- Reset the original stones that did not make it into the rings after each shot.
Success Check
- Slide square to your target brush, and trust that it is in the right place to make the shot requested.
- Throw the appropriate weight because this affects the amount of curl on your shots.
- Make sure you have a clean release and the appropriate turn on your shot.
Score Your Success
Score 1 point for every stone that is in the rings once you have thrown all eight stones.
- Your score ___
Save
Save
Learn more about Curling: Steps to Success.
Being Critical and Knowing the Break Point
A critical eye is also extremely important when reading the ice. Weight and line have a great impact on the curl for any given shot; however, another major factor that affects the curl is the release and rotation applied to a stone.
Being Critical
A critical eye is also extremely important when reading the ice. Weight and line have a great impact on the curl for any given shot; however, another major factor that affects the curl is the release and rotation applied to a stone. A player may slide down a particular line, for instance, but give the stone a slight sideways push upon release that propels it down a different line than intended. This type of motion is often referred to as setting the stone. Players can set the stone out, meaning away from the body during the release (figure 6.2a), or they can set the stone in, meaning closer to the body (figure 6.2b).This is often related to which handle has been thrown on the stone. Setting a stone puts it on a different path than the one you are sliding down, and if you do not realize you have done it, it can give you a false impression about what is happening on the ice. At the top levels, players will practice purposely setting the stone in order to get different effects or amounts of curl. This is a very-high level skill that should not be considered at the beginner level. Players watching the shot need to observe the release to make sure nothing from the release affected the line.
Setting the stone in the delivery: (a) setting the stone out; (b) setting the stone in.
Another factor in the release that can affect the curl is the amount of rotation on the stone. Stones with little rotation will curl more than stones with more rotation. If a shot has less than the desired rotation on it, there will be an exaggerated curl. If a shot has more than the desired rotation, then it will have less curl than expected. If you do not observe this portion of the delivery, then you may get a false impression of the actual amount of curl. It may sound tempting to try to manipulate the amount of curl by changing the amount of rotation you put on the stone. In theory, this can be done, and at the highest levels it occasionally is, often to try to get curl on ice that is otherwise very straight. Again, this requires an extremely high skill level and should not be attempted by beginners. Instead, you should strive for consistency.
On most ice surfaces, rotations of more or less than 2 1/2 to 3 1/2 rotations will give you unpredictable curl. This is the reason we strive to hit that sweet spot of rotation on our shots - that amount of rotation yields the most consistent curl.
As a thrower, you need to be honest with yourself and critical of your performance so you can give the rest of the team an accurate impression of how well you threw your shot. If you know, for instance, that you shoved a rock off the line but no one else on your team detected it, you need to relay that information as soon as possible to your brushers, then let your skip know so she can factor that information into the result observed on your shot.
The impact of the release is one reason that players should be critical of the information they observe when watching their opposition throw. It can be misleading to watch your opponents throw if you are not familiar with their releases. Teams will be quite familiar with their own releases and so will be used to the idiosyncrasies in curl that result from their deliveries. Unless you have a critical eye, you may miss these small movements that have a big impact.
Misstep
You don't observe the release when watching a shot.
Correction
Establish a habit of specifically watching as the rock leaves the player's hand and then counting the rock's rotations. Also get into the habit of standing in line with the shot as you watch it rather than to the side. Both will give you clues about how clean the release was.
Break Point
Another factor that players need to understand is the nature of the path the stone takes. You know the path is a curve, but the exact nature of that arc is not always the same. Sometimes a stone will begin to curl immediately upon release, but most commonly, the stone will travel in a straight line extending from the slide path for a certain distance, then break into a curve. It is very important to understand where this break point is.
The impact of brushers needs to be considered in order to accurately read the ice. Brushing reduces the amount of curl on a given shot, although how much depends heavily on how good the brushers are. However, the straightening effect that brushers have on a shot is usually higher before the break point. Once the stone begins to curl significantly, it is harder to reduce the curl with brushing.
Again, this is another factor that can be influenced by the release. If one stone is released much earlier than another, the break point will come earlier. For this reason, teams often work to develop a common release point to reduce the factors that skips need to keep in mind when calling ice for shots. Figure 6.3 demonstrates how a different release point will have a different result even with the same initial target.
Break point and the effect of release.
Save
Save
Learn more about Curling: Steps to Success.
Curling Rules and How to Play
A mixed doubles curling team consists of a pair of players, one male and the other female. Standard curling sheets are used, and normal delivery rules apply. Typically games are eight ends in length. Thankfully, the skills you have learned up to this point still apply in the game of mixed doubles.
A mixed doubles curling team consists of a pair of players, one male and the other female. Standard curling sheets are used, and normal delivery rules apply. Typically games are eight ends in length. Thankfully, the skills you have learned up to this point still apply in the game of mixed doubles. The real changes are in how the game proceeds.
Each team throws five rocks rather than eight. One player throws the first and fifth stones, and the other player throws the second, third, and fourth stones. Teams may choose to change which of the pair throws the first and fifth stones from end to end. This is one major difference from the four-person game, where players cannot rotate positions within a game.
Each team has one additional stone placed within the playing area at one of two specific spots on the sheet. To be clear, each team gets six stones that can potentially be in play. They throw only five of those stones, since both teams have one stone in play before the endbegins.
The first placement option is behind the tee line at the center line, touching the 4-foot circle as shown in figure 10.1. The second option is a center guard, the depth of which is predetermined before the game and depends on the amount of curl on the sheet. If conditions allow for more curl, the guard placement is closer to the rings. Standard placement is about halfway between the rings and the hog line. Figure 10.1 shows the three possible placements for the yellow stone, only one of which will be used throughout the game.
Initial setup.
In the traditional team game, the team with the hammer throws the second stone of the end. In mixed doubles, however, the team with the hammer gets to choose rock placement, which in turn determines who throws last rock. The team whose rock is placed out front of the house must throw the first rock of the end. The result of this rule is that the team with the hammer may choose to throw the first rock of the next end if they choose to position their stone out front of the rings to start the end.
The next major difference between the mixed doubles game and the traditional team game is with respect to the free guard zone rule. Recall that in the traditional game, your team is not allowed to remove an opposing rock positioned within the free guard zone (FGZ) until the fifth shot of the end. Stones within the rings are allowed to be removed under this rule, and you can remove your own stones if you so desire even if they are in the free guard zone. The modified FGZ rule in mixed doubles states that no rocks, even the ones initially placed to start the end, may be removed before the fourth delivered rock of the end. This means rocks in the rings and guards are all protected until that shot. Also, it means you cannot remove your own guards or stones in the rings. If a violation of this rule occurs, the stones are repositioned at the discretion of the nonoffending team to where they were before the shot, and the shot is considered spent. To help clarify how this works, if team A throws first in the end, that shot cannot be a takeout of any stone. Team B's first shot, the second shot of the end, also cannot be a takeout. Team A's second shot, the third of the end, cannot be a takeout, but team B's second shot, being the fourth shot of the end, may be a takeout. Every shot from there on during the end may be a takeout if desired.
Scoring in mixed doubles is the same as it is in the traditional team game, and the two initial stones are eligible to be counted if they are moved into a scoring position. Hammer determination during game play is the same as for the four-person game; however, hammer has a slightly different meaning in that the team that scored gets a choice of rock placement and accompanying throwing order rather than automatic last-rock advantage. One other slight change to the scoring rules is that if an end is blanked (i.e., no team scores), then the hammer, or decision on initial rock placement, changes between teams. In the traditional game, blanking an end is a tactic that can be used to maintain last-rock advantage into a subsequent end. In mixed doubles, a blank means losing the advantage of hammer.
Save
Save
Learn more about Curling: Steps to Success.
Related Books


