

Textbook for lifeguards studying to achieve Starfish Aquatics Institute lifeguard certification. Foundational resource for other lifeguard training programs before in-water training occurs. Reference for individuals seeking lifeguarding certification and essential information on the responsibilities and skill sets of lifeguards.
Part I Prevention Strategy
Chapter 1 Foundation of Best Practices
Chapter 2 Reducing Risks at an Aquatic Facility
Chapter 3 Managing Bodily Fluids and Fecal Matter Contamination
Part II Surveillance
Chapter 4 Recognizing Distress and Drowning
Chapter 5 Looking for Distress and Drowning
Part III Response and Rescue
Chapter 6 Deciding to Act and Emergency Response
Chapter 7 Assists and Rescues
Part IV Emergency Care
Chapter 8 Managing Suspected Spinal Injuries
Chapter 9 Basic First Aid
Chapter 10 CPR for Professional Rescuers
Chapter 11 Rescue Breathing and CPR for Unresponsive Drowning Persons
Part V Workplace Environment
Chapter 12 Facilitating Workplace Safety
Chapter 13 Meeting Workplace Expectations
Chapter 14 Considering Site- and Situation-Specific Circumstances
Chapter 15 Lifeguarding at Waterparks and Similar Spaces
Chapter 16 Lifeguarding at Nonsurf Waterfronts
Jill White founded the Starfish Aquatics Institute (SAI) in 1999 and cofounded StarGuard Elite in 2016 with the mission to reduce drowning and save lives. She has consistently been named one of the Top 25 Most Influential People in Aquatics by Aquatics International magazine and has been the recipient of the prestigious Al Turner Memorial Commitment to Excellence Award from the World Waterpark Association. In the fall of 2014, White was inducted into the World Waterpark Hall of Fame.
She has authored textbooks on lifeguarding, lifeguarding instruction, water safety, and swim instruction and served as the aquatic education division director for Human Kinetics. She has firsthand experience in training, supervising, and managing lifeguards and has personally taught thousands of lifeguards and hundreds of lifeguarding instructors. White has collaborated in drowning prevention and standards development initiatives and is a frequent speaker at national and international conferences.
White lives in Savannah, Georgia.
Scanning Strategies
Effective scanning is a combination of eye movement, head movement, body position, alertness, and engagement.
Effective scanning is a combination of eye movement, head movement, body position, alertness, and engagement.
- When to scan. Sweeps of your entire zone with your eyes every 10 seconds will be effective in most circumstances. The timing of your scans may vary based on the zone, the number of people you look at as you sweep your eyes, and other factors such as the need to stop scanning for brief periods to enforce rules or other interventions. In general, effective scanning should be timed to allow you to be engaged in searching for signs of life and symptoms of distress or drowning when you can't see that a person is alive and breathing above the surface of the water. If you scan too fast, you will not be able to assess what you see.
- Where to scan. Scanning should be 3-dimensional. Look at every area of water in your zone - bottom, middle, surface, in corners, below your feet. Your job is to scan the water in the zone, not just watch the people. Triage your scanning by first looking for anything out of the ordinary on the bottom and under the surface (vitally urgent). Then scan the surface looking for distress or drowning indications (urgent) and for behavior that may require rule enforcement (important).
- How to scan. Move your eyes and your head when you scan. As you sweep your eyes, pause occasionally to focus on a segment of the zone and target (focus on) anything out of the ordinary.
- What to look for. While you are scanning, look for life! Active swimmers with faces above the water are OK. Target anyone whose face is under the water, either at the surface, just below, or along the bottom. Verify that the person comes to the surface within a few seconds, including anyone who is bobbing up and down, appears to be swimming or playing underwater, or appears to be floating facedown.
Scanning is simply searching the water in a systematic way. Strategies for Maintaining Vigilance
Vigilance means to be watchful, attentive, alert, and aware. When you are vigilant you have a sense of urgency and understand why it is important to focus on your task. You are expected to be vigilant when you are on station, but maintaining vigilance can be difficult, especially in conditions of heat and during times of low activity in your zone. Consider these strategies to help you remain vigilant and keep your attention from drifting.
- Make frequent changes (about every 5 minutes) in posture or position (Griffiths 2007). The goal is to keep you alert through physical movement and variation. The exact timing and the changes you make are not as important as the fact that you are doing something. One way to make significant position and posture changes is by switching from sitting to standing or strolling. For example, during the first 5 minutes of your rotation, sit. During the next 5 minutes, stand. Then stroll for the next 5 minutes. The goal is to do some type of movement rather than sit in the same place and position for a long period.
If your facility has elevated lifeguard stands with only a small step for your feet, standing or strolling may not be practical. In this instance, you will have to identify other ways to meet the objective of keeping alert through physical movement.
- Keep your mind fully engaged in active scanning, targeting, and assessing during your time on station. If you are moving your head and sweeping your eyes but your mind is thinking about things other than the behaviors of the patrons, you may not be vigilant enough to effectively search your zone.
- Rotate frequently to get a break from surveillance. Research from other professions that require high vigilance, such as air traffic control and the military, has shown that the ability to remain focused starts to decrease significantly after about 30 minutes (United States Lifeguard Coalition 2011). When feasible, the rotation schedule at your facility should be established so that you are not in any one location for a long time. The short break from surveillance to move from station to station will help you be vigilant. Alternating periods of nonsurveillance duties helps as well, as does taking breaks when you can get out of the sun or go to the bathroom.
- Use the vigilance voice technique. Vigilance voice is a method to help you explore your zone by putting a voice to what you see (Smith 2006). It is similar to commentary drive techniques used by emergency response teams when teaching driving skills. By talking through every detail of what you see while you scan, you will remain focused and be able to identify problem areas you may not have noticed before.
- Get adequate sleep, stay hydrated, and try to stay cool. Not being fully rested, being dehydrated, and being exposed to hot temperatures can all impair vigilance (United States Lifeguard Coalition 2011).
- Participate in victim recognition training (VRT) assessments. Another common method that facilities use to maintain lifeguard vigilance and help you learn to identify a submerged drowning victim is mannequin or shadow drops. This type of site-specific training activity is feasible at facilities where a small waterproof training mannequin or a body outline that lies flat on the pool bottom can be placed into the water without attracting the notice of a lifeguard (see figure 5.2). These unexpected scenarios help you to practice actually seeing something on the bottom. They are also a good way to test and develop zones by verifying that the item can be seen in any location within the zone. Besides doing assessments that simulate a victim on the bottom, management staff should create a way to assess VRT by having a person simulate an unresponsive drowning victim floating on the surface.
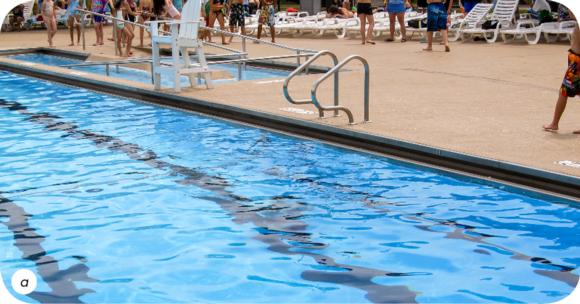
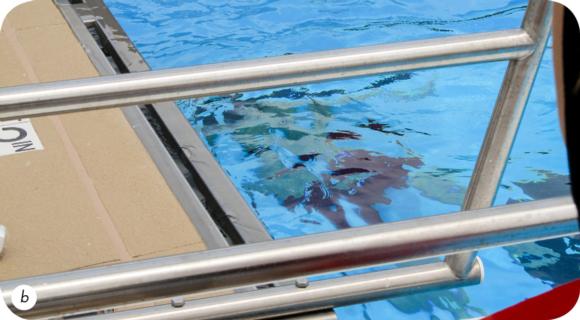
A silhouette in the shape of a drowning victim can be used to help you learn what a body on the bottom of the water may look like. (a) View from a distance. (b) View from right above.
- Participate in shadow guarding. Learning from others is sometimes helpful. Shadow guarding pairs up two lifeguards, one usually more experienced than the other. The less experienced lifeguard shadows the other and learns by observing and discussing (such as through the vigilance voice activity) the best strategies for scanning the zone. If you are assigned to a shadow guard position, remember that your conversations and attention should remain on being vigilant, not on socializing.
- Participate in a lifeguard audit program.Your facility may have a system in place to conduct unannounced lifeguard reviews, also known as audits. These reviews may be conducted by a member of the management staff (internal) or by someone not affiliated with your facility (external). Reviews keep your vigilance high because you never know whether someone is watching and documenting your performance while you are on station.
You can't provide constant and dedicated surveillance for one zone for an extended period because doing so becomes physically and mentally too difficult. To give you breaks from surveillance responsibilities, your facility should have a system for frequently moving lifeguards from one location to another. When another lifeguard comes to take over your zone, the change is called a rotation.
Chest compressions
External compressions of the chest increases pressure inside the chest and directly compresses the heart, forcing blood to move from the chest to the lungs, brain, and the rest of the body. Creating and maintaining this pressure not only keeps vital organs alive but also increases the chances that defibrillation will be successful.
External compressions of the chest increases pressure inside the chest and directly compresses the heart, forcing blood to move from the chest to the lungs, brain, and the rest of the body. Creating and maintaining this pressure not only keeps vital organs alive but also increases the chances that defibrillation will be successful.
After chest compressions are started, it takes time to build up enough pressure to make blood flow. When chest compressions are stopped, the pressure and blood flow drop quickly. Thus, frequent interruption of chest compressions may contribute to poor survival rates. For that reason, minimize interruptions in chest compressions during CPR.
Adult or Child
- Position the person faceup on a flat, firm surface. Kneel close to the side of the person. You may find it helpful to raise the person's arm overhead to allow your knees to get in close to the body (a).
- Place the heel of one hand on the center of the chest, on the lower half of the breastbone. Place the heel of your other hand on top of the first. You can interlace your fingers to keep them off the chest. For a child, you may use one or two hands (b).
- Bring your body up and over the chest so your shoulders are directly above your hands. Straighten your arms and lock your elbows (c).
- Bending at the waist, use your body weight to push straight down to a depth of at least 2 inches (5 cm), but not much more. For a child, compress at least 1/3 the full depth of the chest.
- Lift your hands enough to release the pressure on the chest and allow it to recoil fully to its normal position. Do not lean on the person's chest.
- Without interruption, immediately move into the next compression. Continue compressions at a rate between 100 to 120 times per minute.


Quality matters! The better you compress, the greater the influence on survival. Focus on high-quality techniques. Avoid leaning on the person's chest between compressions.
Infant
- Position the infant faceup on a flat, firm surface. Place two fingertips on the breastbone just below the nipple line (a).
- Compress at least one-third the diameter of the chest, or about 1 1/2 inches (4 cm). Lift your fingers and allow the chest to recoil fully to its normal position. Without pausing, continue into the down stroke of the next compression. Without interruption, continue compressing at a rate between 100 to 120 times per minute. Keep up the force and speed of compressions, but be sure to allow the chest to fully recoil to its normal position between compressions.
- When two or more rescuers are present, compress the breastbone using two thumbs, with your fingers encircling the chest. This position allows for more effective compressions. The other rescuer will be providing rescue breaths (b).


Prevention Strategy at Waterparks
The waterpark industry has an overall excellent track record of providing safe recreation. The most effective way to reduce the risk of injury to guests enjoying waterpark attractions is to enforce the rules for proper usage consistently and regularly inspect the attraction.
The waterpark industry has an overall excellent track record of providing safe recreation. The most effective way to reduce the risk of injury to guests enjoying waterpark attractions is to enforce the rules for proper usage consistently and regularly inspect the attraction.
Safety and Use Instructions
Each area or attraction should have safety and use instructions clearly posted for guests. These instructions should answer the following questions for each attraction:
- Must guests be a maximum or minimum height before using this attraction?
- Must guests be a maximum or minimum weight before using this attraction?
- Are certain types of apparel prohibited?
- Must guests use a certain body position (such as feet-first) with this attraction? Are certain body positions prohibited?
- Is there a time or distance requirement between users?
- Is equipment such as tubes or mats required for use of this attraction? Is equipment prohibited from use on this attraction?
The attraction manufacturer usually provides guidelines for use that answer these questions. Site-specific facility policies and procedures and industry best practices support these guidelines. In addition to signs, audio scripts played to guests in line can be an effective backup prevention strategy. You need to know the restrictions and rules for each area or attraction that you lifeguard and enforce these rules with all guests.
Consistency in rule enforcement is important. Consider an example from a guest's point of view: A child does not meet the height requirement, but the dispatcher allows him or her to go down a waterslide. The family plays in the waterpark and returns to the ride when a different dispatcher is on duty. The dispatcher checks the height and tells the child he or she cannot ride. What happens? The guest is upset, the rules seem not to matter, and the lifeguard doing her or his job looks like the bad guy - all of which could have been prevented by consistency. If you are unsure of what a rule is or how to enforce it, call for a supervisor.
Use of Life Jackets
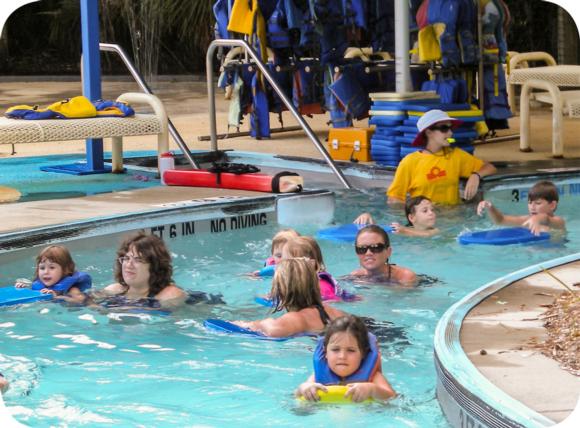
Many waterparks require that children under a certain age or height, as well as all nonswimmers, wear life jackets in wave pools, lazy rivers, and deep-water areas. Laws in some locations require life jacket use. If you work at a facility with a life jacket requirement, you will need to be trained in the site-specific policy and procedure for life jacket sizing, distribution, and monitoring.
Sizing guidance may vary slightly depending upon the style and manufacturer recommendations, but basic sizing instructions include the following:
- First select the right size based on the person's weight. The lifejacket should have a weight range printed on the inside.
- Put the jacket on the person and clip all the buckles or close zippers.
- Adjust any straps, starting at the bottom to obtain a snug, but not too tight fit.
- Pull up on the shoulders. If the lifejacket rides up more than the width of two fingers, readjust the straps or select a smaller size.
A loaner life jacket program can be an effective prevention strategy.
Inspections
The facility where you work should have checklist forms for you to use if you are responsible for inspecting a water attraction. Inspections are usually conducted each morning before opening. Even if you know that the attraction has been inspected, stay alert for problems that may develop during the day. Look for and report to your supervisor any of the following:
- Cracks
- Loose bolts
- Missing or broken pieces
- Nonfunctioning parts
- Unusual noises
- Increased frequency of injury or patron complaints
- Anything different or unusual
The inspection may also include other items such as test riding the attraction to check water-flow levels, confirming working communication systems, and verifying that the attraction is operating correctly.
Besides knowing the rules for using waterpark attractions and inspecting them, you must also adjust your surveillance techniques when guarding in a waterpark.
Attraction Standard Operating Procedures (SOPs)
SOPs should be available to you for each attraction at your facility. The SOP outlines important information including but not limited to these requirements:
- Rider restrictions or requirements (physical and mental)
- Staffing
- Training
- Water flow
- Rider vehicles
- Signage and rules
- Inspections
- Safety procedures
- Emergency procedures
This information will usually be communicated to you through a facility handbook or site-specific training manual.
Scanning Strategies
Effective scanning is a combination of eye movement, head movement, body position, alertness, and engagement.
Effective scanning is a combination of eye movement, head movement, body position, alertness, and engagement.
- When to scan. Sweeps of your entire zone with your eyes every 10 seconds will be effective in most circumstances. The timing of your scans may vary based on the zone, the number of people you look at as you sweep your eyes, and other factors such as the need to stop scanning for brief periods to enforce rules or other interventions. In general, effective scanning should be timed to allow you to be engaged in searching for signs of life and symptoms of distress or drowning when you can't see that a person is alive and breathing above the surface of the water. If you scan too fast, you will not be able to assess what you see.
- Where to scan. Scanning should be 3-dimensional. Look at every area of water in your zone - bottom, middle, surface, in corners, below your feet. Your job is to scan the water in the zone, not just watch the people. Triage your scanning by first looking for anything out of the ordinary on the bottom and under the surface (vitally urgent). Then scan the surface looking for distress or drowning indications (urgent) and for behavior that may require rule enforcement (important).
- How to scan. Move your eyes and your head when you scan. As you sweep your eyes, pause occasionally to focus on a segment of the zone and target (focus on) anything out of the ordinary.
- What to look for. While you are scanning, look for life! Active swimmers with faces above the water are OK. Target anyone whose face is under the water, either at the surface, just below, or along the bottom. Verify that the person comes to the surface within a few seconds, including anyone who is bobbing up and down, appears to be swimming or playing underwater, or appears to be floating facedown.
Scanning is simply searching the water in a systematic way. Strategies for Maintaining Vigilance
Vigilance means to be watchful, attentive, alert, and aware. When you are vigilant you have a sense of urgency and understand why it is important to focus on your task. You are expected to be vigilant when you are on station, but maintaining vigilance can be difficult, especially in conditions of heat and during times of low activity in your zone. Consider these strategies to help you remain vigilant and keep your attention from drifting.
- Make frequent changes (about every 5 minutes) in posture or position (Griffiths 2007). The goal is to keep you alert through physical movement and variation. The exact timing and the changes you make are not as important as the fact that you are doing something. One way to make significant position and posture changes is by switching from sitting to standing or strolling. For example, during the first 5 minutes of your rotation, sit. During the next 5 minutes, stand. Then stroll for the next 5 minutes. The goal is to do some type of movement rather than sit in the same place and position for a long period.
If your facility has elevated lifeguard stands with only a small step for your feet, standing or strolling may not be practical. In this instance, you will have to identify other ways to meet the objective of keeping alert through physical movement.
- Keep your mind fully engaged in active scanning, targeting, and assessing during your time on station. If you are moving your head and sweeping your eyes but your mind is thinking about things other than the behaviors of the patrons, you may not be vigilant enough to effectively search your zone.
- Rotate frequently to get a break from surveillance. Research from other professions that require high vigilance, such as air traffic control and the military, has shown that the ability to remain focused starts to decrease significantly after about 30 minutes (United States Lifeguard Coalition 2011). When feasible, the rotation schedule at your facility should be established so that you are not in any one location for a long time. The short break from surveillance to move from station to station will help you be vigilant. Alternating periods of nonsurveillance duties helps as well, as does taking breaks when you can get out of the sun or go to the bathroom.
- Use the vigilance voice technique. Vigilance voice is a method to help you explore your zone by putting a voice to what you see (Smith 2006). It is similar to commentary drive techniques used by emergency response teams when teaching driving skills. By talking through every detail of what you see while you scan, you will remain focused and be able to identify problem areas you may not have noticed before.
- Get adequate sleep, stay hydrated, and try to stay cool. Not being fully rested, being dehydrated, and being exposed to hot temperatures can all impair vigilance (United States Lifeguard Coalition 2011).
- Participate in victim recognition training (VRT) assessments. Another common method that facilities use to maintain lifeguard vigilance and help you learn to identify a submerged drowning victim is mannequin or shadow drops. This type of site-specific training activity is feasible at facilities where a small waterproof training mannequin or a body outline that lies flat on the pool bottom can be placed into the water without attracting the notice of a lifeguard (see figure 5.2). These unexpected scenarios help you to practice actually seeing something on the bottom. They are also a good way to test and develop zones by verifying that the item can be seen in any location within the zone. Besides doing assessments that simulate a victim on the bottom, management staff should create a way to assess VRT by having a person simulate an unresponsive drowning victim floating on the surface.
A silhouette in the shape of a drowning victim can be used to help you learn what a body on the bottom of the water may look like. (a) View from a distance. (b) View from right above.
- Participate in shadow guarding. Learning from others is sometimes helpful. Shadow guarding pairs up two lifeguards, one usually more experienced than the other. The less experienced lifeguard shadows the other and learns by observing and discussing (such as through the vigilance voice activity) the best strategies for scanning the zone. If you are assigned to a shadow guard position, remember that your conversations and attention should remain on being vigilant, not on socializing.
- Participate in a lifeguard audit program.Your facility may have a system in place to conduct unannounced lifeguard reviews, also known as audits. These reviews may be conducted by a member of the management staff (internal) or by someone not affiliated with your facility (external). Reviews keep your vigilance high because you never know whether someone is watching and documenting your performance while you are on station.
You can't provide constant and dedicated surveillance for one zone for an extended period because doing so becomes physically and mentally too difficult. To give you breaks from surveillance responsibilities, your facility should have a system for frequently moving lifeguards from one location to another. When another lifeguard comes to take over your zone, the change is called a rotation.
Chest compressions
External compressions of the chest increases pressure inside the chest and directly compresses the heart, forcing blood to move from the chest to the lungs, brain, and the rest of the body. Creating and maintaining this pressure not only keeps vital organs alive but also increases the chances that defibrillation will be successful.
External compressions of the chest increases pressure inside the chest and directly compresses the heart, forcing blood to move from the chest to the lungs, brain, and the rest of the body. Creating and maintaining this pressure not only keeps vital organs alive but also increases the chances that defibrillation will be successful.
After chest compressions are started, it takes time to build up enough pressure to make blood flow. When chest compressions are stopped, the pressure and blood flow drop quickly. Thus, frequent interruption of chest compressions may contribute to poor survival rates. For that reason, minimize interruptions in chest compressions during CPR.
Adult or Child
- Position the person faceup on a flat, firm surface. Kneel close to the side of the person. You may find it helpful to raise the person's arm overhead to allow your knees to get in close to the body (a).
- Place the heel of one hand on the center of the chest, on the lower half of the breastbone. Place the heel of your other hand on top of the first. You can interlace your fingers to keep them off the chest. For a child, you may use one or two hands (b).
- Bring your body up and over the chest so your shoulders are directly above your hands. Straighten your arms and lock your elbows (c).
- Bending at the waist, use your body weight to push straight down to a depth of at least 2 inches (5 cm), but not much more. For a child, compress at least 1/3 the full depth of the chest.
- Lift your hands enough to release the pressure on the chest and allow it to recoil fully to its normal position. Do not lean on the person's chest.
- Without interruption, immediately move into the next compression. Continue compressions at a rate between 100 to 120 times per minute.
Quality matters! The better you compress, the greater the influence on survival. Focus on high-quality techniques. Avoid leaning on the person's chest between compressions.
Infant
- Position the infant faceup on a flat, firm surface. Place two fingertips on the breastbone just below the nipple line (a).
- Compress at least one-third the diameter of the chest, or about 1 1/2 inches (4 cm). Lift your fingers and allow the chest to recoil fully to its normal position. Without pausing, continue into the down stroke of the next compression. Without interruption, continue compressing at a rate between 100 to 120 times per minute. Keep up the force and speed of compressions, but be sure to allow the chest to fully recoil to its normal position between compressions.
- When two or more rescuers are present, compress the breastbone using two thumbs, with your fingers encircling the chest. This position allows for more effective compressions. The other rescuer will be providing rescue breaths (b).
Prevention Strategy at Waterparks
The waterpark industry has an overall excellent track record of providing safe recreation. The most effective way to reduce the risk of injury to guests enjoying waterpark attractions is to enforce the rules for proper usage consistently and regularly inspect the attraction.
The waterpark industry has an overall excellent track record of providing safe recreation. The most effective way to reduce the risk of injury to guests enjoying waterpark attractions is to enforce the rules for proper usage consistently and regularly inspect the attraction.
Safety and Use Instructions
Each area or attraction should have safety and use instructions clearly posted for guests. These instructions should answer the following questions for each attraction:
- Must guests be a maximum or minimum height before using this attraction?
- Must guests be a maximum or minimum weight before using this attraction?
- Are certain types of apparel prohibited?
- Must guests use a certain body position (such as feet-first) with this attraction? Are certain body positions prohibited?
- Is there a time or distance requirement between users?
- Is equipment such as tubes or mats required for use of this attraction? Is equipment prohibited from use on this attraction?
The attraction manufacturer usually provides guidelines for use that answer these questions. Site-specific facility policies and procedures and industry best practices support these guidelines. In addition to signs, audio scripts played to guests in line can be an effective backup prevention strategy. You need to know the restrictions and rules for each area or attraction that you lifeguard and enforce these rules with all guests.
Consistency in rule enforcement is important. Consider an example from a guest's point of view: A child does not meet the height requirement, but the dispatcher allows him or her to go down a waterslide. The family plays in the waterpark and returns to the ride when a different dispatcher is on duty. The dispatcher checks the height and tells the child he or she cannot ride. What happens? The guest is upset, the rules seem not to matter, and the lifeguard doing her or his job looks like the bad guy - all of which could have been prevented by consistency. If you are unsure of what a rule is or how to enforce it, call for a supervisor.
Use of Life Jackets
Many waterparks require that children under a certain age or height, as well as all nonswimmers, wear life jackets in wave pools, lazy rivers, and deep-water areas. Laws in some locations require life jacket use. If you work at a facility with a life jacket requirement, you will need to be trained in the site-specific policy and procedure for life jacket sizing, distribution, and monitoring.
Sizing guidance may vary slightly depending upon the style and manufacturer recommendations, but basic sizing instructions include the following:
- First select the right size based on the person's weight. The lifejacket should have a weight range printed on the inside.
- Put the jacket on the person and clip all the buckles or close zippers.
- Adjust any straps, starting at the bottom to obtain a snug, but not too tight fit.
- Pull up on the shoulders. If the lifejacket rides up more than the width of two fingers, readjust the straps or select a smaller size.
A loaner life jacket program can be an effective prevention strategy.
Inspections
The facility where you work should have checklist forms for you to use if you are responsible for inspecting a water attraction. Inspections are usually conducted each morning before opening. Even if you know that the attraction has been inspected, stay alert for problems that may develop during the day. Look for and report to your supervisor any of the following:
- Cracks
- Loose bolts
- Missing or broken pieces
- Nonfunctioning parts
- Unusual noises
- Increased frequency of injury or patron complaints
- Anything different or unusual
The inspection may also include other items such as test riding the attraction to check water-flow levels, confirming working communication systems, and verifying that the attraction is operating correctly.
Besides knowing the rules for using waterpark attractions and inspecting them, you must also adjust your surveillance techniques when guarding in a waterpark.
Attraction Standard Operating Procedures (SOPs)
SOPs should be available to you for each attraction at your facility. The SOP outlines important information including but not limited to these requirements:
- Rider restrictions or requirements (physical and mental)
- Staffing
- Training
- Water flow
- Rider vehicles
- Signage and rules
- Inspections
- Safety procedures
- Emergency procedures
This information will usually be communicated to you through a facility handbook or site-specific training manual.
Related Books


