
- Home
- Strength Training and Conditioning
- Fitness and Health
- Athletic Training and Therapy
- Strength Ball Training

Who says the best can’t get better? The third edition of Strength Ball Training delivers more exercises, programs, assessments, and videos for better results.
Preferred by elite athletes, fitness experts, and strength and conditioning specialists, stability and medicine ball exercises are essential to developing core power, strength, balance, coordination, and stability. Strength Ball Training presents those exercises along with instruction and advice on achieving results.
Inside you will find assessments to help you determine your current ability level and corrective exercises that address deficiencies. The exercises can be sequenced to create individual programs that target specific regions or enhance total-body performance. You’ll learn to incorporate equipment such as cables, bands, and dumbbells for added versatility and increased resistance. And you’ll be granted exclusive access to online videos demonstrating the most complex and advanced exercises.
Strength Ball Training includes a sample program with an array of strength, flexibility, and balance challenges that will test you to your very core.
Chapter 1 The Strength Ball Advantage
Chapter 2 Training With the Strength Ball
Chapter 3 Assessment
Chapter 4 Core Stabilization
Chapter 5 Core Rotation
Chapter 6 Legs and Hips
Chapter 7 Chest
Chapter 8 Shoulders and Upper Back
Chapter 9 Abdominals, Lower Back, and Glutes
Chapter 10 Biceps, Triceps, and Forearms
Chapter 11 Whole Body
Chapter 12 Flexibility
Chapter 13 Programs
Lorne Goldenberg is the director of the UPMC Sports Performance Complex in Pittsburgh, Pennsylvania. The Sports Performance Complex provides services to athletes of all ages, skill levels, and sports along with nonathletes and others seeking to improve their fitness. He works with athletes in all sports, making them total-body strong and breaking new ground in targeted injury prevention, surgery, rehabilitation, training, and performance. Goldenberg is the former owner of the Athletic Conditioning Center and Strength Tek Fitness and Wellness Consultants, which provides service to more than 20,000 people throughout North America in Ottawa, Toronto, Montreal, and Boston.
Goldenberg has been active in the field of sport performance for over 30 years. Having worked in the National Hockey League (NHL) and Canadian Football League (CFL), he has served the Montreal Canadiens, Florida Panthers, Ottawa Senators, Ottawa Rough Riders, St. Louis Blues, Chicago Blackhawks, Quebec Nordiques, Colorado Avalanche, Windsor Spitfires, Owen Sound Attack, Ottawa 67’s, and the University of Ottawa football team. Players such as Daniel Alfredsson, Daniel Briere, Zach Bogosian, Steven Stamkos, and Matt Bradley are just a few who seek out his expertise.
Goldenberg graduated from the University of Ottawa with an honors degree in physical education and is certified by the National Strength and Conditioning Association as a strength and conditioning specialist. He is also a certified exercise physiologist (CEP) through the Canadian Society for Exercise Physiology.
Goldenberg has published numerous articles in journals and magazines, including Men’s Journal, Physical, and Ironman. As a conference presenter, he has established himself as one of the key sources for the major fitness and health conferences in North America. He has presented for organizations such as the National Strength and Conditioning Coaches Association, IDEA Health & Fitness Association, CanFitPro, American Fitness Professionals & Associates, Perform Better, Twist Conditioning, Yale University, and Dalhousie University.
Peter Twist is the president and CEO of Twist Conditioning, an athlete conditioning company with franchised centers in the United States and Canada. His company offers one-on-one and team training, a line of 350 sport fitness products, and sport conditioning specialist certifications delivered by Twist master coaches throughout Canada, the United States, Australia, and the United Kingdom. A frequent guest lecturer at international fitness conferences and coaching clinics, Twist delivers workshops on sport conditioning to personal trainers, conditioning coaches, sport coaches, teachers, and medical professionals.
Twist has coached more than 700 professional athletes, including Hakeem Olajuwon, Mark Messier, and Justin Morneau, and was the NHL conditioning coach and exercise physiologist for the Vancouver Canucks (Stanley Cup finalists 1994) for 11 years. An NSCA-certified strength and conditioning specialist and CanFitPro personal training specialist with a master's degree in coaching science from the University of British Columbia, Twist served as president of the Hockey Conditioning Coaches Association, editor of the Journal of Hockey Conditioning, and NSCA provincial director for British Columbia.
Twist and his team have been selected by the Chinese Olympic Committee too lead the performance training and rehabilitation for Team China in upcoming summer and winter Olympics. He will work with athletes competing in the Rio 2016 Olympics, the 2017 China National Games, the PyeongChang 2018 Olympics, and will offer long-term athlete development programs aimed at the Beijing 2022 Olympics.
Twist has authored 10 books, 16 DVDs, and more than 400 articles on sport-specific conditioning. A previous honoree of the CanFitPro Specialty Presenter of the Year and recipient of the Business Excellence Award as Business Person of the Year, Twist was the 2013 IDEA World Fitness Inspiration Award honoree for his leading example of living life to its fullest.
Choosing Exercises and Progressions
When starting any new fitness program, begin at a level that will reinforce proper technique and movement patterns. This is especially important with strength ball training, which also challenges stability.
When starting any new fitness program, begin at a level that will reinforce proper technique and movement patterns. This is especially important with strength ball training, which also challenges stability. Once you have mastered a particular move, then you should continually challenge yourself with the appropriate exercise progressions to ensure progressive levels of success in your program.
Selecting Exercises
To get you started in your first full workout, include exercises from all chapters. Build from the center of the body out, preferentially training the core first and then the periphery (arms and legs). All of the exercises in this book stimulate good core activation, so an equal representation from all chapters works well because it ensures you check off all the prime movers and body parts to train the complete body.
To keep primary core exercise safe, work on abdominal and core stability exercises for several weeks as a foundation before training core rotation. Chest exercises using supine and prone positions are good examples of prime mover strength exercises that also build core stability with a neutral spine. Look for exercises that keep the hips square and aligned with the shoulders to build strength around the spine before progressing to exercises that rotate the torso or shift the hips' center of mass.
Preworkout Testing
The most accurate and individualized way to use strength ball training is to complete the battery of tests in chapter 3. These help you determine which muscle groups need most attention and your strengths and weaknesses. The focus is primarily on core strength and stability because this is the area that is most often injured or weak in more than 80 percent of people. Without a doubt, more intensive assessments are available to you, and you should certainly seek them out if you require them. These assessments can provide a more in-depth view of all joints and movements in your body. For example, someone may show evidence of high strength in prime movers (such as push, pull, legs) but lack stability and core control. Someone else may have high strength but poor mobility, while another may have low strength but excellent mobility. You should still begin by selecting an exercise from each chapter; however, the way in which you do the exercises is tailored to what the tests unveil as weaknesses. Restricted mobility? Use a fuller range of motion. Low strength? Use a slower tempo and wide base of support to achieve more time under tension and build greater strength. Low core control? Use a narrow base of support and select more primary abdominal exercises.
Remember that before even beginning strength ball training, and if you are new to strength training in general, you should develop some base-level strength with stability training, as described later in the section Precautions in this chapter. Once you are ready to begin strength ball training, note that the exercises in each chapter are listed in order from easiest to most difficult. This ranking is determined by the intensity of the physical exertion required as well as the complexity of the coordination needed for successful completion of the exercise. Skipping ahead will only cause your body to compensate and cheat to get an exercise done, setting you up for injury. Take your time and practice a group of exercises before progressing to new exercises of greater difficulty.
Keep in mind that within most exercises are tips on regressing to make an exercise easier and progressing an exercise to make it more challenging. Regressions are often applied on the spot, when you try an exercise and find it too difficult. A quick adjustment can make it more achievable. Progressions are often applied toward planning the next workout after you notice certain exercises have become easier to complete. Each workout should be a challenge to you. If you have achieved your repetition goal, you should consider a slight increase in your medicine ball weight, the addition of two or three repetitions per set, or an adjustment to the body mechanics to make the exercise more challenging. For example, during supine exercises, a longer torso off the ball and small base of support at the feet increase the requirement of muscle activation, strength, and control. Specific methods to increase the difficulty of an exercise are listed for each exercise. General rules for progressing an exercise are detailed in the following sections.
One of the most underused yet most effective ways to step-change progress is to regress something so you can progress something else. For example, increasing the width of the base of support is a regression that permits you to handle greater weight loading in a one-arm dumbbell supine press. The regression permits you to advance the loading and build more strength. In the same exercise, regressing the weight to a lighter load may permit you to adopt a single-leg base of support, progressing the difficulty of the core stability and muscle recruitment in the hamstrings and glutes.
A keen understanding of the rules will help you refine your workout to the precise difficulty level each time - not too easy, not resulting in mechanical breakdown, but challenging enough to produce the best results. Your goal is to be better in each successive workout.
Stability Ball Progressions
There are numerous methods of progressing the level of difficulty when using stability ball exercises. Specific structured progressions are included in the text of each exercise. But knowing several guidelines for simplifying or advancing an exercise will allow you to modify each exercise many times over to define the most appropriate level of challenge for you. If you are uncertain, you should choose regressions to ensure that you complete the exercise safely within your current abilities. However, when you are experienced with an exercise and begin to find it easy, adopt progressions to make sure you are challenged. If an exercise is not challenging, you will not stimulate improvement. With this in mind, the following are points that you can consider when regressing or progressing your exercises.
Change the base of support.
By decreasing the base of support for an exercise, you can increase the challenge of balance, which makes leg, glute, and torso musculature work much harder. You can accomplish this by increasing the inflation of the ball, which will result in a smaller base of ball support. You can also change the base of support by moving from a four-point support to a three- or two-point support. An example of a four-point support is a stability ball push-up in which you have both hands on the ball and both feet on the floor. To increase the level of difficulty in the push-up, you can use a three-point base of support by raising one foot off the floor. You can also decrease your base of support by placing your hands and feet closer together. Although you are still in a four-point base of support, this move results in a decreased overall base of support.
Change the length of the lever.
As you alter the length of your lever arm from short to long, you increase the difficulty of the exercise, as with the abdominal crunch medicine ball throw. Throwing from the chest is easier than using a longer lever and throwing from overhead. Your trunk can also be the lever arm between the floor and where you make contact with the ball. Rollouts (chapter 4) connect the toes or knees on the floor, with the hands on the ball, by stiffening the torso and arms. A short rollout is easier than a longer rollout. Supine bridges (chapter 4) place feet on the floor as a base of support and upper back atop the ball. Legs, glutes, and torso keep the hips up and connect the feet and upper back. A short ball bridge is easier than a longer one. Minor changes in these body positions can make a dramatic difference in level of difficulty by changing the coordination, effort, or force required. Notice even changing an inch or two dramatically increases the muscle tension. Good mechanics and minor changes to body position can magnify the muscle response and amplify your results.
Increase range of motion.
By increasing movements from a smaller to a larger range of motion, you can increase the difficulty of the exercise, as with the push-up with hands on ball. You can progress from partial push-ups to full-range push-ups.
Change the speed of movement.
Changing the tempo of an exercise changes the result. Very slow movements keep the muscle loaded under tension longer and help build strength and stability. Fast dynamic movements tend to build power. The tempo of movement also makes the exercise easier or more difficult. Most experts suggest that moving faster is more difficult. But there is no general rule here. Some exercises done more quickly are much more difficult. Still other exercises done very slowly require much more strength and balance. Know that speed of movement alters the demands. You will need to adjust your tempo on an exercise to learn whether it results in an easier or more difficult execution. The surprise may be that slower is harder.
Add resistance.
You can increase the intensity of an exercise by adding some form of loaded resistance, such as a medicine ball, an external free-weight, cable, or elastic tubing, as with the jackknife exercise with a cable attached to the legs (chapter 4). Strength tubing needs to be long enough to accommodate whole-body moves in strength ball training. It also needs to be strong enough to offer enough resistance. It should come with a protective sleeve to make the tubing more durable and, if it does eventually break, to ensure it coils inside the sleeve instead of snapping back and hitting you.
Close the eyes.
By closing your eyes, you increase the proprioceptive demand in the body, flooding other sensors and receptors positioned to give feedback on changes to muscles, ligaments, tendons, and joint position. Removing visual feedback overloads your proprioceptive system, forcing those "minibrains" to work harder and improve. This adds a level of difficulty, but you should take caution. Some exercises, such as kneeling on the ball, will require spotting by a strength coach.
Learn more about Strength Ball Training, Third Edition.
Three Exercises
This is a good warm-up exercise that gently works the legs, hips, torso, and upper body. With more powerful passes, it is a great torso rotation strength exercise, pertinent to so many sports.
Side-to-Side Rotation Pass
This is a good warm-up exercise that gently works the legs, hips, torso, and upper body. With more powerful passes, it is a great torso rotation strength exercise, pertinent to so many sports.
Setup
Partners are four strides apart, both facing the same wall. One partner has a medicine ball. Feet are positioned shoulder-width apart, knees flexed, abdominals set, head turned to see partner.
Movement
All parts of the body work together to produce the rotation pass. Push off your outside foot, and transfer the force through the hips and into torso rotation while the arms draw the ball across your body. Release the ball with a full follow-through, aiming the ball so your partner can catch it in front of the body.
Finish
Catch the ball with a strong core to protect the lower back. Absorb the catch by flexing the knee of the outside leg, rotating the torso to the outside, and allowing the arms to travel across the body to an exaggerated position off to the side. Stop and reverse the process to return the pass to your partner.
Tips and Progressions
- Static catch: Flex the knees a little more to prepare to catch the ball in front of your body, and use the abdominals to completely brake the path of the ball.
- Catch the ball and stop its travel right in front of your body.
- Once stationary, move back into the normal catch reception movement to prepare to throw the ball back to your partner.


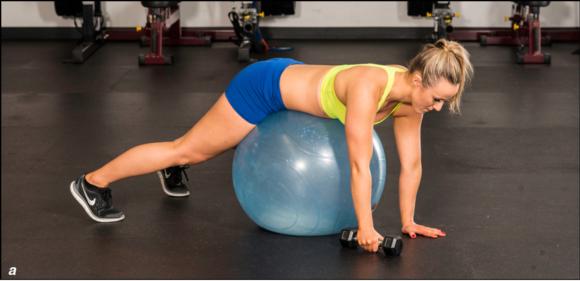
Strength Ball Prone Thoracic Rotation
From a perspective of spinal health, thoracic rotation is an area that many people can improve on. Mobility in this region will result in more effective movement patterns in your sport and daily activities.
Setup
Place a strength ball under your pelvis with feet and hands planted on the ground and head in a neutral position.
Movement
Take a dumbbell in one hand and stabilize yourself over the ball with your three points of contact. With a straight arm, begin to rotate your body in a rotary fashion without your pelvis breaking contact with the ball.
Finish
Rotate all the way around until you feel some tightness at the end of the range of motion. Pause in this position and return. Complete repetitions on the opposite side.
Tips and Progressions
If you allow your pelvis to lose contact with the ball during the movement, it will negate the effect you are hoping to achieve in the thoracic area.

Standing Overhead Medicine Ball Rotation
This exercise focuses on full body extension while rotating in a circular fashion from the hips.
Setup
Your feet should be placed about shoulder-width apart and a medicine ball held in the hands overhead. Focus on full body extension with knees slightly bent and legs loaded into a good athletic position.
Movement
Engage your core and begin by making a circular movement while maintaining the ball overhead. Movement needs to be slow and controlled.
Finish
Complete a set amount of rotations in each direction.
Tips and Progressions
- Start with small circular movements and progress to larger movements.
- Make sure you maintain your spinal position without overextending or flexing your low back.
 |
|  |
Save
Save
Save
Save
Learn more about Strength Ball Training, Third Edition.
Improve Strength, Flexibility, and Balance with 16-Week Program
In the 16-week program you are progressively introduced to the exercises described in the book. If you are just starting out, there will certainly be a temptation to jump ahead to some of the more difficult exercises, especially if you find some of the beginner-level exercises too easy. But stay on course.
16-Week Program
In the 16-week program you are progressively introduced to the exercises described in the book. If you are just starting out, there will certainly be a temptation to jump ahead to some of the more difficult exercises, especially if you find some of the beginner-level exercises too easy. But stay on course. Take the time to build your foundation with the prescribed progressions, and your result will be a successful program. The time you put into the program in the first 4 to 6 weeks will ensure your success by helping you avoid soft-tissue injuries and reinforcing the techniques as described.
The exercises in the 16-week program provide an excellent array of strength, balance, and flexibility challenges. After the tables of most of the 4-week cycles are explanations of why specific combinations of exercises are used. After you have completed this program, you will be ready to design your own strength ball program.
Tempo and rest are two components that can dictate the direction of your program. The numbers in the tempo column are defined first. For example, 3:2:2 means that you lower the weight in 3 seconds, hold the middle position for 2 seconds, and raise the weight in 2 seconds. When a muscle causes a joint to move, it always results in shortening or lengthening of the working muscle. The first digit indicates lowering of the weight, which generally means you put a specific muscle through an eccentric contraction, or lengthening. The last digit indicates that you perform a concentric contraction, or shortening of the muscle.
The number in the rest column represents how much time you should take after a particular exercise. The exercises provide a number of supersets, where one exercise is followed immediately by a second exercise, then followed by a specific rest interval. This concept of supersetting is a means of making your workout efficient. Instead of working each muscle individually, you use an opposite muscle group (such as chest and upper back) or an upper-body and lower-body combination (such as chest and hamstrings). As you adapt to your program, you can apply the concept of progression to your rest periods to continually increase the intensity of your workouts. By attempting to shorten your rest time you will increase the metabolic intensity of the program, thereby imposing a greater challenge to your body and improving your endurance. You can also increase your rest time, especially if you want to lift very heavy loads. Increasing the rest time will provide you with greater recovery, which is an important component of high-level strength.

Finish with the following flexibility exercises, holding each position for 20 to 30 seconds for one or two sets:
- Spinal extension
- Lateral side stretch
- Standing hamstring stretch
- Standing lat and pec stretch
- Kneeling posterior shoulder stretch
Note: In combos 1 and 5 we keep the grouping close together. Superset 1 focuses on legs and glutes in the wall squat and glutes, hamstrings, and spinal erectors in the back extension. This focus on the core and legs is a superset of the same muscle group to enhance hypertrophy and strength of this area. This is a foundation that you need to focus on for later progressions.
In superset 5 the focus is similar to the previous supersets except that we target the abdominals in a sagittal plane followed by a rotary stability challenge - same grouping, different planes.
Save
Save
Save
Learn more about Strength Ball Training, Third Edition.
Choosing Exercises and Progressions
When starting any new fitness program, begin at a level that will reinforce proper technique and movement patterns. This is especially important with strength ball training, which also challenges stability.
When starting any new fitness program, begin at a level that will reinforce proper technique and movement patterns. This is especially important with strength ball training, which also challenges stability. Once you have mastered a particular move, then you should continually challenge yourself with the appropriate exercise progressions to ensure progressive levels of success in your program.
Selecting Exercises
To get you started in your first full workout, include exercises from all chapters. Build from the center of the body out, preferentially training the core first and then the periphery (arms and legs). All of the exercises in this book stimulate good core activation, so an equal representation from all chapters works well because it ensures you check off all the prime movers and body parts to train the complete body.
To keep primary core exercise safe, work on abdominal and core stability exercises for several weeks as a foundation before training core rotation. Chest exercises using supine and prone positions are good examples of prime mover strength exercises that also build core stability with a neutral spine. Look for exercises that keep the hips square and aligned with the shoulders to build strength around the spine before progressing to exercises that rotate the torso or shift the hips' center of mass.
Preworkout Testing
The most accurate and individualized way to use strength ball training is to complete the battery of tests in chapter 3. These help you determine which muscle groups need most attention and your strengths and weaknesses. The focus is primarily on core strength and stability because this is the area that is most often injured or weak in more than 80 percent of people. Without a doubt, more intensive assessments are available to you, and you should certainly seek them out if you require them. These assessments can provide a more in-depth view of all joints and movements in your body. For example, someone may show evidence of high strength in prime movers (such as push, pull, legs) but lack stability and core control. Someone else may have high strength but poor mobility, while another may have low strength but excellent mobility. You should still begin by selecting an exercise from each chapter; however, the way in which you do the exercises is tailored to what the tests unveil as weaknesses. Restricted mobility? Use a fuller range of motion. Low strength? Use a slower tempo and wide base of support to achieve more time under tension and build greater strength. Low core control? Use a narrow base of support and select more primary abdominal exercises.
Remember that before even beginning strength ball training, and if you are new to strength training in general, you should develop some base-level strength with stability training, as described later in the section Precautions in this chapter. Once you are ready to begin strength ball training, note that the exercises in each chapter are listed in order from easiest to most difficult. This ranking is determined by the intensity of the physical exertion required as well as the complexity of the coordination needed for successful completion of the exercise. Skipping ahead will only cause your body to compensate and cheat to get an exercise done, setting you up for injury. Take your time and practice a group of exercises before progressing to new exercises of greater difficulty.
Keep in mind that within most exercises are tips on regressing to make an exercise easier and progressing an exercise to make it more challenging. Regressions are often applied on the spot, when you try an exercise and find it too difficult. A quick adjustment can make it more achievable. Progressions are often applied toward planning the next workout after you notice certain exercises have become easier to complete. Each workout should be a challenge to you. If you have achieved your repetition goal, you should consider a slight increase in your medicine ball weight, the addition of two or three repetitions per set, or an adjustment to the body mechanics to make the exercise more challenging. For example, during supine exercises, a longer torso off the ball and small base of support at the feet increase the requirement of muscle activation, strength, and control. Specific methods to increase the difficulty of an exercise are listed for each exercise. General rules for progressing an exercise are detailed in the following sections.
One of the most underused yet most effective ways to step-change progress is to regress something so you can progress something else. For example, increasing the width of the base of support is a regression that permits you to handle greater weight loading in a one-arm dumbbell supine press. The regression permits you to advance the loading and build more strength. In the same exercise, regressing the weight to a lighter load may permit you to adopt a single-leg base of support, progressing the difficulty of the core stability and muscle recruitment in the hamstrings and glutes.
A keen understanding of the rules will help you refine your workout to the precise difficulty level each time - not too easy, not resulting in mechanical breakdown, but challenging enough to produce the best results. Your goal is to be better in each successive workout.
Stability Ball Progressions
There are numerous methods of progressing the level of difficulty when using stability ball exercises. Specific structured progressions are included in the text of each exercise. But knowing several guidelines for simplifying or advancing an exercise will allow you to modify each exercise many times over to define the most appropriate level of challenge for you. If you are uncertain, you should choose regressions to ensure that you complete the exercise safely within your current abilities. However, when you are experienced with an exercise and begin to find it easy, adopt progressions to make sure you are challenged. If an exercise is not challenging, you will not stimulate improvement. With this in mind, the following are points that you can consider when regressing or progressing your exercises.
Change the base of support.
By decreasing the base of support for an exercise, you can increase the challenge of balance, which makes leg, glute, and torso musculature work much harder. You can accomplish this by increasing the inflation of the ball, which will result in a smaller base of ball support. You can also change the base of support by moving from a four-point support to a three- or two-point support. An example of a four-point support is a stability ball push-up in which you have both hands on the ball and both feet on the floor. To increase the level of difficulty in the push-up, you can use a three-point base of support by raising one foot off the floor. You can also decrease your base of support by placing your hands and feet closer together. Although you are still in a four-point base of support, this move results in a decreased overall base of support.
Change the length of the lever.
As you alter the length of your lever arm from short to long, you increase the difficulty of the exercise, as with the abdominal crunch medicine ball throw. Throwing from the chest is easier than using a longer lever and throwing from overhead. Your trunk can also be the lever arm between the floor and where you make contact with the ball. Rollouts (chapter 4) connect the toes or knees on the floor, with the hands on the ball, by stiffening the torso and arms. A short rollout is easier than a longer rollout. Supine bridges (chapter 4) place feet on the floor as a base of support and upper back atop the ball. Legs, glutes, and torso keep the hips up and connect the feet and upper back. A short ball bridge is easier than a longer one. Minor changes in these body positions can make a dramatic difference in level of difficulty by changing the coordination, effort, or force required. Notice even changing an inch or two dramatically increases the muscle tension. Good mechanics and minor changes to body position can magnify the muscle response and amplify your results.
Increase range of motion.
By increasing movements from a smaller to a larger range of motion, you can increase the difficulty of the exercise, as with the push-up with hands on ball. You can progress from partial push-ups to full-range push-ups.
Change the speed of movement.
Changing the tempo of an exercise changes the result. Very slow movements keep the muscle loaded under tension longer and help build strength and stability. Fast dynamic movements tend to build power. The tempo of movement also makes the exercise easier or more difficult. Most experts suggest that moving faster is more difficult. But there is no general rule here. Some exercises done more quickly are much more difficult. Still other exercises done very slowly require much more strength and balance. Know that speed of movement alters the demands. You will need to adjust your tempo on an exercise to learn whether it results in an easier or more difficult execution. The surprise may be that slower is harder.
Add resistance.
You can increase the intensity of an exercise by adding some form of loaded resistance, such as a medicine ball, an external free-weight, cable, or elastic tubing, as with the jackknife exercise with a cable attached to the legs (chapter 4). Strength tubing needs to be long enough to accommodate whole-body moves in strength ball training. It also needs to be strong enough to offer enough resistance. It should come with a protective sleeve to make the tubing more durable and, if it does eventually break, to ensure it coils inside the sleeve instead of snapping back and hitting you.
Close the eyes.
By closing your eyes, you increase the proprioceptive demand in the body, flooding other sensors and receptors positioned to give feedback on changes to muscles, ligaments, tendons, and joint position. Removing visual feedback overloads your proprioceptive system, forcing those "minibrains" to work harder and improve. This adds a level of difficulty, but you should take caution. Some exercises, such as kneeling on the ball, will require spotting by a strength coach.
Learn more about Strength Ball Training, Third Edition.
Three Exercises
This is a good warm-up exercise that gently works the legs, hips, torso, and upper body. With more powerful passes, it is a great torso rotation strength exercise, pertinent to so many sports.
Side-to-Side Rotation Pass
This is a good warm-up exercise that gently works the legs, hips, torso, and upper body. With more powerful passes, it is a great torso rotation strength exercise, pertinent to so many sports.
Setup
Partners are four strides apart, both facing the same wall. One partner has a medicine ball. Feet are positioned shoulder-width apart, knees flexed, abdominals set, head turned to see partner.
Movement
All parts of the body work together to produce the rotation pass. Push off your outside foot, and transfer the force through the hips and into torso rotation while the arms draw the ball across your body. Release the ball with a full follow-through, aiming the ball so your partner can catch it in front of the body.
Finish
Catch the ball with a strong core to protect the lower back. Absorb the catch by flexing the knee of the outside leg, rotating the torso to the outside, and allowing the arms to travel across the body to an exaggerated position off to the side. Stop and reverse the process to return the pass to your partner.
Tips and Progressions
- Static catch: Flex the knees a little more to prepare to catch the ball in front of your body, and use the abdominals to completely brake the path of the ball.
- Catch the ball and stop its travel right in front of your body.
- Once stationary, move back into the normal catch reception movement to prepare to throw the ball back to your partner.
Strength Ball Prone Thoracic Rotation
From a perspective of spinal health, thoracic rotation is an area that many people can improve on. Mobility in this region will result in more effective movement patterns in your sport and daily activities.
Setup
Place a strength ball under your pelvis with feet and hands planted on the ground and head in a neutral position.
Movement
Take a dumbbell in one hand and stabilize yourself over the ball with your three points of contact. With a straight arm, begin to rotate your body in a rotary fashion without your pelvis breaking contact with the ball.
Finish
Rotate all the way around until you feel some tightness at the end of the range of motion. Pause in this position and return. Complete repetitions on the opposite side.
Tips and Progressions
If you allow your pelvis to lose contact with the ball during the movement, it will negate the effect you are hoping to achieve in the thoracic area.
Standing Overhead Medicine Ball Rotation
This exercise focuses on full body extension while rotating in a circular fashion from the hips.
Setup
Your feet should be placed about shoulder-width apart and a medicine ball held in the hands overhead. Focus on full body extension with knees slightly bent and legs loaded into a good athletic position.
Movement
Engage your core and begin by making a circular movement while maintaining the ball overhead. Movement needs to be slow and controlled.
Finish
Complete a set amount of rotations in each direction.
Tips and Progressions
- Start with small circular movements and progress to larger movements.
- Make sure you maintain your spinal position without overextending or flexing your low back.
|
| |
Save
Save
Save
Save
Learn more about Strength Ball Training, Third Edition.
Improve Strength, Flexibility, and Balance with 16-Week Program
In the 16-week program you are progressively introduced to the exercises described in the book. If you are just starting out, there will certainly be a temptation to jump ahead to some of the more difficult exercises, especially if you find some of the beginner-level exercises too easy. But stay on course.
16-Week Program
In the 16-week program you are progressively introduced to the exercises described in the book. If you are just starting out, there will certainly be a temptation to jump ahead to some of the more difficult exercises, especially if you find some of the beginner-level exercises too easy. But stay on course. Take the time to build your foundation with the prescribed progressions, and your result will be a successful program. The time you put into the program in the first 4 to 6 weeks will ensure your success by helping you avoid soft-tissue injuries and reinforcing the techniques as described.
The exercises in the 16-week program provide an excellent array of strength, balance, and flexibility challenges. After the tables of most of the 4-week cycles are explanations of why specific combinations of exercises are used. After you have completed this program, you will be ready to design your own strength ball program.
Tempo and rest are two components that can dictate the direction of your program. The numbers in the tempo column are defined first. For example, 3:2:2 means that you lower the weight in 3 seconds, hold the middle position for 2 seconds, and raise the weight in 2 seconds. When a muscle causes a joint to move, it always results in shortening or lengthening of the working muscle. The first digit indicates lowering of the weight, which generally means you put a specific muscle through an eccentric contraction, or lengthening. The last digit indicates that you perform a concentric contraction, or shortening of the muscle.
The number in the rest column represents how much time you should take after a particular exercise. The exercises provide a number of supersets, where one exercise is followed immediately by a second exercise, then followed by a specific rest interval. This concept of supersetting is a means of making your workout efficient. Instead of working each muscle individually, you use an opposite muscle group (such as chest and upper back) or an upper-body and lower-body combination (such as chest and hamstrings). As you adapt to your program, you can apply the concept of progression to your rest periods to continually increase the intensity of your workouts. By attempting to shorten your rest time you will increase the metabolic intensity of the program, thereby imposing a greater challenge to your body and improving your endurance. You can also increase your rest time, especially if you want to lift very heavy loads. Increasing the rest time will provide you with greater recovery, which is an important component of high-level strength.
Finish with the following flexibility exercises, holding each position for 20 to 30 seconds for one or two sets:
- Spinal extension
- Lateral side stretch
- Standing hamstring stretch
- Standing lat and pec stretch
- Kneeling posterior shoulder stretch
Note: In combos 1 and 5 we keep the grouping close together. Superset 1 focuses on legs and glutes in the wall squat and glutes, hamstrings, and spinal erectors in the back extension. This focus on the core and legs is a superset of the same muscle group to enhance hypertrophy and strength of this area. This is a foundation that you need to focus on for later progressions.
In superset 5 the focus is similar to the previous supersets except that we target the abdominals in a sagittal plane followed by a rotary stability challenge - same grouping, different planes.
Save
Save
Save
Learn more about Strength Ball Training, Third Edition.
Related Books


