
- Home
- Sports and Activities
- Hockey
- Coaching and Officiating
- Hockey Goaltending

Awareness, anticipation, physical conditioning . . . these are just some of the qualities a goaltender needs to bring onto the ice at game time. Excellence requires practice, consistency, and understanding—of the position, the situation, and your talents.
No one knows this better than Eli Wilson does. Widely recognized as the leading authority on goaltending, he has worked alongside 30 NHL goaltenders, including Carey Price, Ray Emery, Tuukka Rask, and Brian Elliott.
In Hockey Goaltending, Eli Wilson and Brian van Vliet have created the definitive guide to stopping more pucks, winning more games, and lowering your goals against average. Inside, you will find coverage on every facet of the position:
• Selection of the right equipment for fit and functionality
• Stance and presence in the net, including footwork, stick placement, and body positioning
• Puck stopping, from save selection to execution
• Postsave recovery strategies, including controlling and directing rebounds
• Tactics for breakaways, odd-man rushes, and wraparounds
• Focus and visualization methods to improve the mental game
• On- and off-ice drills and training programs for year-round conditioning to increase strength, stamina, speed, and agility
• Suggestions for building productive relationships between head coaches, goaltending coaches, and goaltenders
From skills to strategies, equipment to exercises, Hockey Goaltending covers the position like no other. Packed with drills, step-by-step instructions, photos, diagrams, and coaching tips, this book touches on every aspect of the game so you can compete at the highest level.
Chapter 1. Selecting and Fitting Gear
Chapter 2. Stance and Movement
Chapter 3. Save Execution
Chapter 4. Postsave Recovery
Chapter 5. Puck Handling
Chapter 6. Tactics
Chapter 7. Off-Ice Training
Chapter 8. The Mental Game
Chapter 9. The Complete Goaltender
Eli Wilson has established himself as one of the premier goaltending coaches in the world. He has worked with dozens of goaltenders in the National Hockey League (NHL), including Carey Price, Ray Emery, Tim Thomas, Tuukka Rask, Brian Elliott, Jason LaBarbera, and Devan Dubnyk.
Under his tutelage, Eli's camps have produced more than 50 NHL draft picks, over 60 Division I or Canadian University goaltenders, and more than 200 players drafted by Major Junior teams. His goaltenders have gone on to win numerous prestigious awards and championships: Stanley Cups, Conn Smythe Trophies, Venzina Trophies, World Junior Gold Medals, American Hockey League (AHL) championships, AHL Playoff MVPs, WHL Goaltender of the Year, Ontario Hockey League (OHL) Goaltender of the Year, and Canadian Hockey League (CHL) Goaltender of the Year.
In 2004, Eli founded World Pro Goaltending and singlehandedly developed it into one of the largest goaltending schools and training facilities in Canada. When he departed from the company in 2009, World Pro Goaltending was performing more than 5,000 one-on-one training sessions annually, along with numerous camps, including the world-renowned Elite Prospects and Professional (NHL) camps.
In 2004, Eli was also named to Hockey Canada's goaltending consultant group, along with Francois Allaire, David Marcoux, and Sean Burke. Since 2004, he has consulted with Creative Artists Agency (CAA) Sports during their summer development camps for top young prospects in Los Angeles, California. In 2007, Eli traveled to South Korea to work with the Kangwon Land Ice Hockey team and other young goaltenders in the country.
From 2007 through 2010, Eli was the goaltending coach for the Ottawa Senators, where he was responsible for the Ottawa Senators goaltenders as well as for the goalies playing for their AHL affiliate, the Binghamton Senators. In February 2011, Eli was hired by the Anaheim Ducks to work as the goaltending consultant for their affiliate, the Syracuse Crunch. The Crunch had their strongest run of the season while Eli was on staff, and it pushed Ray Emery's return to the NHL.
In 2010, Eli established Eli Wilson Goaltending. Today, Eli Wilson Goaltending is a world leader in goaltending development. Eli runs goaltending camps, clinics, and consults worldwide. In 2016, Eli introduced a number of specialty camps, including the popular 24/7, where goaltenders actually live and train with Eli over a three-day weekend. He has skill-specific camps, including puck-handling camps, and in 2017 teamed up with world-renowned skills coach Darryl Belfry, bringing together top prospect forwards and goaltenders to create a high-intensity training environment. A main staple of Eli's year-round training is advanced video technology, whereby he and his staff can analyze video remotely to further goaltending development.
Brian van Vliet has a diverse sporting background. He played competitive soccer for six years and competed in numerous bodybuilding competitions, including the prestigious 1993 Canadian Bodybuilding Championships in Montreal, Quebec. Having studied the position of goaltending for many years, Brian was a member of the board of directors for a local hockey association and served as the goalie coordinator for three years. He was responsible for the evaluation and placement of over 70 goaltenders annually.
Brian was an associate writer of Eli Wilson''s In the Crease column for the Alberta edition of Hockey Now magazine and later went on to author his own monthly opinion piece for the same publication. His experience as a continuous improvement professional in the oil and gas industry gives him a unique and analytical approach to the game of hockey. Having attained a business management degree from Davenport University, Brian is currently the vice president of business operations for Eli Wilson Goaltending and works as a real estate agent in Calgary.
“Eli Wilson’s approach and mindset helped me break into the best league in the world with confidence. Both are on display for you in Hockey Goaltending.”
—Brian Elliott, NHL Goaltender, 2006-present, NHL All Star, 2012, 2015
“Eli is sharing a lifetime’s worth of learned secrets in Hockey Goaltending. I am happy to know that the next Patrick Roy, Martin Brodeur, or Carey Price will have taken part of their game from my good friend Eli.”
—Ray Emery, NHL Goaltender, 2005-2016
“I have worked with Eli pretty much since I started playing goal as a kid. The things that have always stood out to me are his intensity on the ice and his genuine passion for the position. I continue to enjoy working with him and talking with him about goaltending to this day.”
—Devan Dubnyk, Goaltender for the Minnesota Wild
“Eli Wilson is always exploring and instituting new ways and ideas to help goaltenders become more proficient and consistent in their position. Our goaltending world is an ever-changing environment where technical modifications occur almost yearly, and the dialogue he and I have shared over the past decade has been invaluable to me as a coach.”
—Bob Essensa, Goaltending Coach for the Boston Bruins
Using the tall stance and the low stance in play
The tall stance (figure 2.3) is used when the play does not pose an immediate threat. The goaltender stays in a more upright position than in the regular stance.
The Tall Stance
The tall stance (figure 2.3) is used when the play does not pose an immediate threat. The goaltender stays in a more upright position than in the regular stance. The idea behind this stance is that you can conserve energy and at the same time have a greater field of vision. There are several instances when the tall stance is optimal:
- When you first leave the goal line to meet a rush, or when the puck is close to the walls or at the blue line so there is no immediate danger of a scoring opportunity.
- When you face a shorthanded situation, the play often stays in the zone for a long time. This stance allows you to regain composure as the puck moves back to the blue line.
- Any time there is a lot of traffic in front of the net.
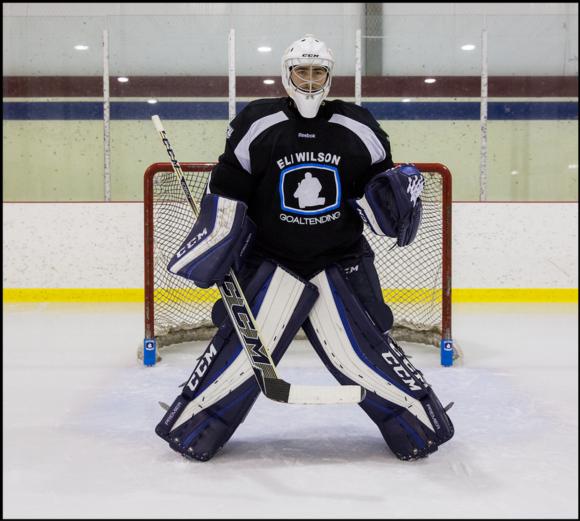
Figure 2.3 The tall stance.
The main technical difference between the regular and tall stances is foot positioning. The goaltender places his feet shoulder-width apart in the tall stance, whereas in the regular stance, he places his feet slightly wider than shoulder width. By bringing the feet closer together, the goaltender can now straighten his body and bring his hips forward. The arms and gloves should not move. The goaltender's stick will come up off the ice.
The key to utilizing the tall stance is that the goalie can get back into his regular stance in a split second. He must slightly push his feet to the outside, allowing them to go beyond shoulder width. He must then draw his hips back. The arms and gloves should already be set in the proper position. As the goaltender gets lower, his stick should be back on the ice in optimal position. Although the goaltender is not in an optimal ready position when using the tall stance, he is only a split second away from assuming that position. Here are a few more advantages of using the tall stance:
- You can easily stay square to the puck. In a tall and narrow position, you can be precise at lining up the middle of your body with the puck.
- A tall stance increases your mobility. If the opposition performs cross-ice D-to-D passes, you can follow the play by executing long, hard pushes. When the puck comes in tight, you are just a split second away from adjusting back to your regular stance and performing a butterfly movement.
- When in the tall stance, you have a greater field of view. You can track the puck by looking over and around players when there is a lot of traffic in front. In most circumstances, it is easier to watch the puck while standing up higher than it is from a low, crouched position. You must have the ability to quickly drop back into your regular stance and be able to go down to make the save.
The Low Stance
In contrast to the tall stance, the low stance (figure 2.4) is used for situations in tight to the goaltender, where he is required to bring his center of gravity down. To drop into the low stance, you must completely do the opposite of the tall stance by pushing your feet out into a wider position and bringing your hips back.
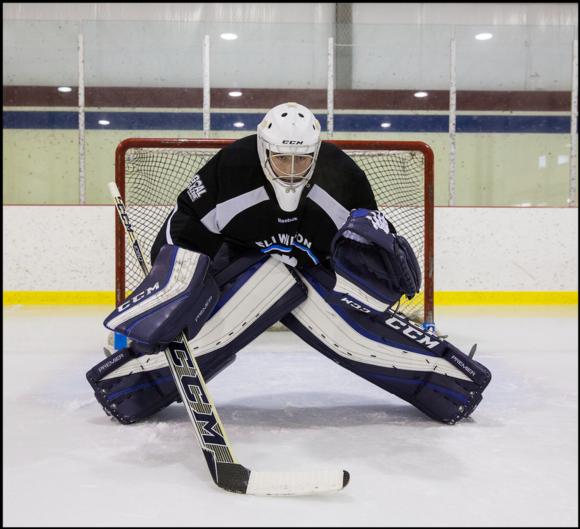
Figure 2.4 The low stance.
This will bring your body closer to the ice and thus put you in a position where you can react faster. Again, your arms and hands should not be moving. Your elbows should be kept close to your ribs, and you should be in full control of your forearms. Occasionally, you might have to push your arms slightly forward to adjust your upper body to the new, lower position. By doing so, you will be able to keep your arms close to your body, hips, and thighs.
When the play is in tight, the goaltender's reaction time to make a save is greatly reduced. Following are some of the advantages of dropping into the low stance:
- Bringing your knees closer to the ice makes the transition to the butterfly position much quicker.
- Having your knees close to the ice when the play is in close is advantageous, as chances for a shot to the lower part of the net are very high.
- Although being in a wider stance decreases your power and mobility, the fact that the play is in tight means you will be deeper in your crease. If you must move, your pushes will not need to be as long as when you are at the top of your crease, so you can still get across to make the save.
Save
Strategies for coaching goaltenders effectively
As stated earlier, some head coaches build relationships with their goaltenders, whereas others communicate to their goaltenders through the goalie coach.
The Head Coach
As stated earlier, some head coaches build relationships with their goaltenders, whereas others communicate to their goaltenders through the goalie coach. Eli Wilson believes that a positive relationship between the goaltenders and all the coaches on the team will result in better production from the goaltenders. Whichever style the head coach believes in, the following principles should apply.
Be Positive With Your Goaltenders
It is essential that you stay positive with the goaltenders. Give the goaltenders some leeway to work through challenging times. It is never a good idea to keep your goaltenders on a short string. If the goalie believes he will be pulled after every bad goal, then his focus becomes attached to worrying more about not getting scored on than stopping pucks. There is a big difference in the mindset between the two (see chapter 8). If your goaltender struggles early in the game, it is never a bad idea to pull him for a short time and then put him back in the net. This allows the goaltender to regain his composure while letting him know that you still have faith in him to win the game.
If you have concerns about your goaltender, you should express those thoughts to the goalie coach, who in turn can relate them to the goaltender. This allows the goalie coach time to prepare his drills with the goaltender for the next practice. The environment that you as head coach need to create in the dressing room is one of continuous improvement. Things are not always going to go as planned, and it is important that you understand that and work to improve not only the goaltenders but all the players on the team. Threatening the goaltender or directly blaming him for certain goals allowed will only heighten the goaltender's anxiety level and surely lead to even worse results. If you want to get the best production out of your goaltenders, be patient and stay positive.
Confer With Goalie Coach When Choosing Starting Goalie
Decide with your goalie coach who is going to get what starts. Involve your goalie coach in that decision-making process because he is the one working with the goaltenders daily and he should have a better feel for each goaltender's current mindset.
Give Starting Goalie Time to Prepare
It is not a good idea to wait until game time to let a goalie know that he is starting. Goalies should be made aware about a day before the game. Similarly, there is no advantage to telling a goalie too far in advance that he is playing. Twenty-four hours is ideal. In a tournament situation where you may have two games in one day, let the goalies know who will be starting as soon as possible following the end of the first game. The backup goaltender must be ready to go if called upon. However, understand that the pregame preparation as a backup is different from that of the starter.
Incorporate Goaltenders Into Team Practices
Most of a team practice should be designed for the skaters. You need to run your team through such things as breakout drills, penalty killing, power plays, and defensive zone coverage. However, goaltenders need time in practice to work on their game. The concept that a goalie will improve because he will see a lot of shots in a practice is not altogether true. As a head coach, you can design your drills to incorporate the goaltenders into more realistic gamelike scenarios. There is no such thing as a drill that is "for the goalies only" when shooters are involved. If you make drills competitive for both the goaltenders and the shooters, it helps to build camaraderie on the team. Be open minded to having certain handed shooters in positions to make the drill most effective; don't just line shooters up indiscriminately. Drills should be set up to give both the goaltenders and the shooters optimal opportunity to improve.
If you run a drill that is more goaltender specific, you can add a component to it that allows the shooter to improve his game at the same time, such as incorporating a second shot whereby the shooter tries to score. That way the shooter stays fully engaged in the drills. Make your drills shot specific. If you want a goaltender to recover to his blocker side, make sure the shooter puts the puck to that side. You don't want the skater arbitrarily picking a side to shoot and then expect the goaltender to recover to a predetermined side. However, as previously mentioned, you can make the second shot a "shoot-to-score" scenario, allowing the shooter some freedom in where he wants to direct the shot.
If you feel that an ice session has lost intensity, you may choose to have the whole team perform wind sprints at the end of practice. Wind sprints occur when the team skates the length of the ice and back numerous times. If you skate the team as a group, then the goaltenders must join in. If the goaltenders do not participate, then a division is created between the goaltenders and the rest of the team.
Also, remember to give your team days off. Rest is important because it allows players to refocus and overcome any small, nagging injuries.
Learn How to Compromise
It is always a balancing act for head coaches when it comes to incorporating goaltender training into team practices. The following suggestions help to alleviate this issue. You can allow 15 minutes at the start of each practice for the goalie coach to work with the goalies. Once the time is up, the goaltenders join the rest of the team for the duration of the practice. Another option is if there are multiple practices each week, you can take one of those ice times and hold a skills session with your skaters on three-quarters of the ice while the goalie coach works with the goalies at the other end. Shooters can come in and out as needed to assist the goalie coach. However you decide to structure your practices, it is important to find a balance whereby the goaltender is getting the training he requires while also being available to help the rest of his team improve. This is discussed in more detail in the next section of this chapter.
Characteristics of an effective puck-handling goaltender
There are five main components that make an effective puck-handling goaltender.
There are five main components that make an effective puck-handling goaltender. As a goaltender, you must be able to do the following:
Think and move your feet at the same time.
In many instances, you will come out to play the puck. You will scan the ice and decide on your best option. Being able to combine hard focus, soft focus, and decision making, all while moving your feet, can be a challenge. An inefficient puck-handling goaltender freezes his feet when making a play to move the puck up ice. As the goaltender approaches the puck, he starts to think about what he is going to do with it. While thinking, he stops moving his feet, and opposition forecheckers can then disrupt the play. It is important to look up ice and keep your feet moving in the same direction. This allows you to see the entire ice and make the best play with the puck. Repeating skating pattern drills allow you to react to a play without thinking about it. Skating patterns are discussed later in this chapter.
Point and move your feet up ice.
It is essential that you always have your feet pointed up ice. This allows you a full view of the ice surface and the ability to look for the best play option and potential threats. You should always attempt to make plays up ice. Playing the puck backward can lead to disastrous and sometimes embarrassing results.
Transition efficiently to two hands on the stick.
For most puck playing, you need to be adept at getting both hands on your stick prior to making a play. Having both hands on the stick provides both power and control. You can utilize the overhand or underhand grip to make a pass or shoot the puck out of the defensive zone. Overhand and underhand grips are described later in this chapter. In either case, the transition from one hand to two hands on the stick should be seamless.
Move the puck to the forehand whenever possible.
Although there are times when you will be forced to make a backhand play, most of the time it is best to transition the puck from the backhand to the forehand. The puck is easier to control on the forehand, and often, passes are more accurate because you can see the play in front of you. Backhand passes can be made, but remember you may be blind to the developments on one-half of the ice. For this reason, we emphasize that you should try to make plays on the forehand whenever possible. When you make a forehand pass, you're facing the play; on a backhand pass, your back is to the play, and you can see only the ice in the direction you're making the pass to. You are blind to the one side of the ice when you are making passes off the backhand, and that's why it is better to play off the forehand.
Communicate with teammates.
Skaters give goalies instructions on what to do with the puck while goalies alert the skaters to potential threats behind them. It is important for you to get comfortable with your teammates and learn their tendencies and preferences. You should learn which players want to come behind the net to pick up the puck and which ones want to receive passes in the corners or up the ice. It is important to know whether your players want passes on their forehands or backhands. Verbal communication and eye contact between you and the players are key. Language used between defensemen and goalies should be as simple as possible, for example, leave it, over, or rim.
Defend against common plays off the opposition rush
There are so many variations of offensive attacks that you need to be prepared for. The opposition attack is nonstatic.
There are so many variations of offensive attacks that you need to be prepared for. The opposition attack is nonstatic. The players are coming at you, and you need to prepare yourself as the play develops in front of you. You need to have laser-like focus on the play coming off the rush and be prepared to defend it. Following, we discuss the most common plays that occur off the opposition rush and some techniques on how to defend them.
One-on-One
In a one-on-one situation, the opposing forward has two options. He can either shoot or try to go around the defenseman. Often, the opposing forward will try to use your defenseman as a screen and then shoot the puck with the intention of catching you off guard while your vision on the puck is impaired. If the opposition forward beats the defenseman wide, a breakaway situation will occur, and you will utilize the tactics discussed previously. Here are a few other key points for you in a one-on-one situation:
- Be aware of the shooter's options. Is he going to pull wide or shoot straight on through the screen?
- Don't let up. Often, the goaltender will think a shot won't take place because the defenseman has the play covered. You can be beaten with an unexpected shot.
- Make sure you have enough backward momentum in case the shooter pulls you across the crease.
- Make sure you maintain good gap control and do not get caught flat-footed.
Two-on-One
For many years, it was taught that when facing a two-on-one, the defenseman should take away the pass and leave the shot for the goaltender. With goaltenders now able to move post to post with much more efficiency, this coaching tactic is not always applicable. If facing a two-on-one, the opposing player coming down the wing has three options: he can shoot to score, shoot it off the goaltender to create a rebound, or pass it to his teammate.
You need to have discussions with your defenseman in practice about how you are going to position yourselves on a two-on-one. Is the defenseman going to play more in the middle or to the puck carrier's side? You should play slightly stronger to the puck carrier's side but be ready to play the pass (figure 6.4). Some coaches prefer their defenseman to play strong to the puck carrier, whereas others prefer the defenseman to play more toward the middle of the ice. There are still those who prefer the defenseman to take away the pass. As a goaltender, the coaching tactic chosen is out of your control. You need to hold your ground and be aware of the nonpuck carrier's position. If the nonpuck carrier is heading back door, then be ready to butterfly slide and take away the pass play. If the puck carrier shoots far side, you are already in a good position to make the save. If the opposition forward shoots far side, activate your stick to make the save. Here are a few other key points for you in a two-on-one situation:
- Maintain your angle on the shooter. If there is a pass option, play a little deeper in your net in preparation for a butterfly slide.
- Gauge the speed of the opposition skaters early. Know which hand the shooters are.
- Be ready to activate your stick on far-side shots to eliminate any potential rebound.
Figure 6.4 Two-on-one: The goaltender plays slightly stronger to the shooter's side.
Save
Using the tall stance and the low stance in play
The tall stance (figure 2.3) is used when the play does not pose an immediate threat. The goaltender stays in a more upright position than in the regular stance.
The Tall Stance
The tall stance (figure 2.3) is used when the play does not pose an immediate threat. The goaltender stays in a more upright position than in the regular stance. The idea behind this stance is that you can conserve energy and at the same time have a greater field of vision. There are several instances when the tall stance is optimal:
- When you first leave the goal line to meet a rush, or when the puck is close to the walls or at the blue line so there is no immediate danger of a scoring opportunity.
- When you face a shorthanded situation, the play often stays in the zone for a long time. This stance allows you to regain composure as the puck moves back to the blue line.
- Any time there is a lot of traffic in front of the net.
Figure 2.3 The tall stance.
The main technical difference between the regular and tall stances is foot positioning. The goaltender places his feet shoulder-width apart in the tall stance, whereas in the regular stance, he places his feet slightly wider than shoulder width. By bringing the feet closer together, the goaltender can now straighten his body and bring his hips forward. The arms and gloves should not move. The goaltender's stick will come up off the ice.
The key to utilizing the tall stance is that the goalie can get back into his regular stance in a split second. He must slightly push his feet to the outside, allowing them to go beyond shoulder width. He must then draw his hips back. The arms and gloves should already be set in the proper position. As the goaltender gets lower, his stick should be back on the ice in optimal position. Although the goaltender is not in an optimal ready position when using the tall stance, he is only a split second away from assuming that position. Here are a few more advantages of using the tall stance:
- You can easily stay square to the puck. In a tall and narrow position, you can be precise at lining up the middle of your body with the puck.
- A tall stance increases your mobility. If the opposition performs cross-ice D-to-D passes, you can follow the play by executing long, hard pushes. When the puck comes in tight, you are just a split second away from adjusting back to your regular stance and performing a butterfly movement.
- When in the tall stance, you have a greater field of view. You can track the puck by looking over and around players when there is a lot of traffic in front. In most circumstances, it is easier to watch the puck while standing up higher than it is from a low, crouched position. You must have the ability to quickly drop back into your regular stance and be able to go down to make the save.
The Low Stance
In contrast to the tall stance, the low stance (figure 2.4) is used for situations in tight to the goaltender, where he is required to bring his center of gravity down. To drop into the low stance, you must completely do the opposite of the tall stance by pushing your feet out into a wider position and bringing your hips back.
Figure 2.4 The low stance.
This will bring your body closer to the ice and thus put you in a position where you can react faster. Again, your arms and hands should not be moving. Your elbows should be kept close to your ribs, and you should be in full control of your forearms. Occasionally, you might have to push your arms slightly forward to adjust your upper body to the new, lower position. By doing so, you will be able to keep your arms close to your body, hips, and thighs.
When the play is in tight, the goaltender's reaction time to make a save is greatly reduced. Following are some of the advantages of dropping into the low stance:
- Bringing your knees closer to the ice makes the transition to the butterfly position much quicker.
- Having your knees close to the ice when the play is in close is advantageous, as chances for a shot to the lower part of the net are very high.
- Although being in a wider stance decreases your power and mobility, the fact that the play is in tight means you will be deeper in your crease. If you must move, your pushes will not need to be as long as when you are at the top of your crease, so you can still get across to make the save.
Save
Strategies for coaching goaltenders effectively
As stated earlier, some head coaches build relationships with their goaltenders, whereas others communicate to their goaltenders through the goalie coach.
The Head Coach
As stated earlier, some head coaches build relationships with their goaltenders, whereas others communicate to their goaltenders through the goalie coach. Eli Wilson believes that a positive relationship between the goaltenders and all the coaches on the team will result in better production from the goaltenders. Whichever style the head coach believes in, the following principles should apply.
Be Positive With Your Goaltenders
It is essential that you stay positive with the goaltenders. Give the goaltenders some leeway to work through challenging times. It is never a good idea to keep your goaltenders on a short string. If the goalie believes he will be pulled after every bad goal, then his focus becomes attached to worrying more about not getting scored on than stopping pucks. There is a big difference in the mindset between the two (see chapter 8). If your goaltender struggles early in the game, it is never a bad idea to pull him for a short time and then put him back in the net. This allows the goaltender to regain his composure while letting him know that you still have faith in him to win the game.
If you have concerns about your goaltender, you should express those thoughts to the goalie coach, who in turn can relate them to the goaltender. This allows the goalie coach time to prepare his drills with the goaltender for the next practice. The environment that you as head coach need to create in the dressing room is one of continuous improvement. Things are not always going to go as planned, and it is important that you understand that and work to improve not only the goaltenders but all the players on the team. Threatening the goaltender or directly blaming him for certain goals allowed will only heighten the goaltender's anxiety level and surely lead to even worse results. If you want to get the best production out of your goaltenders, be patient and stay positive.
Confer With Goalie Coach When Choosing Starting Goalie
Decide with your goalie coach who is going to get what starts. Involve your goalie coach in that decision-making process because he is the one working with the goaltenders daily and he should have a better feel for each goaltender's current mindset.
Give Starting Goalie Time to Prepare
It is not a good idea to wait until game time to let a goalie know that he is starting. Goalies should be made aware about a day before the game. Similarly, there is no advantage to telling a goalie too far in advance that he is playing. Twenty-four hours is ideal. In a tournament situation where you may have two games in one day, let the goalies know who will be starting as soon as possible following the end of the first game. The backup goaltender must be ready to go if called upon. However, understand that the pregame preparation as a backup is different from that of the starter.
Incorporate Goaltenders Into Team Practices
Most of a team practice should be designed for the skaters. You need to run your team through such things as breakout drills, penalty killing, power plays, and defensive zone coverage. However, goaltenders need time in practice to work on their game. The concept that a goalie will improve because he will see a lot of shots in a practice is not altogether true. As a head coach, you can design your drills to incorporate the goaltenders into more realistic gamelike scenarios. There is no such thing as a drill that is "for the goalies only" when shooters are involved. If you make drills competitive for both the goaltenders and the shooters, it helps to build camaraderie on the team. Be open minded to having certain handed shooters in positions to make the drill most effective; don't just line shooters up indiscriminately. Drills should be set up to give both the goaltenders and the shooters optimal opportunity to improve.
If you run a drill that is more goaltender specific, you can add a component to it that allows the shooter to improve his game at the same time, such as incorporating a second shot whereby the shooter tries to score. That way the shooter stays fully engaged in the drills. Make your drills shot specific. If you want a goaltender to recover to his blocker side, make sure the shooter puts the puck to that side. You don't want the skater arbitrarily picking a side to shoot and then expect the goaltender to recover to a predetermined side. However, as previously mentioned, you can make the second shot a "shoot-to-score" scenario, allowing the shooter some freedom in where he wants to direct the shot.
If you feel that an ice session has lost intensity, you may choose to have the whole team perform wind sprints at the end of practice. Wind sprints occur when the team skates the length of the ice and back numerous times. If you skate the team as a group, then the goaltenders must join in. If the goaltenders do not participate, then a division is created between the goaltenders and the rest of the team.
Also, remember to give your team days off. Rest is important because it allows players to refocus and overcome any small, nagging injuries.
Learn How to Compromise
It is always a balancing act for head coaches when it comes to incorporating goaltender training into team practices. The following suggestions help to alleviate this issue. You can allow 15 minutes at the start of each practice for the goalie coach to work with the goalies. Once the time is up, the goaltenders join the rest of the team for the duration of the practice. Another option is if there are multiple practices each week, you can take one of those ice times and hold a skills session with your skaters on three-quarters of the ice while the goalie coach works with the goalies at the other end. Shooters can come in and out as needed to assist the goalie coach. However you decide to structure your practices, it is important to find a balance whereby the goaltender is getting the training he requires while also being available to help the rest of his team improve. This is discussed in more detail in the next section of this chapter.
Characteristics of an effective puck-handling goaltender
There are five main components that make an effective puck-handling goaltender.
There are five main components that make an effective puck-handling goaltender. As a goaltender, you must be able to do the following:
Think and move your feet at the same time.
In many instances, you will come out to play the puck. You will scan the ice and decide on your best option. Being able to combine hard focus, soft focus, and decision making, all while moving your feet, can be a challenge. An inefficient puck-handling goaltender freezes his feet when making a play to move the puck up ice. As the goaltender approaches the puck, he starts to think about what he is going to do with it. While thinking, he stops moving his feet, and opposition forecheckers can then disrupt the play. It is important to look up ice and keep your feet moving in the same direction. This allows you to see the entire ice and make the best play with the puck. Repeating skating pattern drills allow you to react to a play without thinking about it. Skating patterns are discussed later in this chapter.
Point and move your feet up ice.
It is essential that you always have your feet pointed up ice. This allows you a full view of the ice surface and the ability to look for the best play option and potential threats. You should always attempt to make plays up ice. Playing the puck backward can lead to disastrous and sometimes embarrassing results.
Transition efficiently to two hands on the stick.
For most puck playing, you need to be adept at getting both hands on your stick prior to making a play. Having both hands on the stick provides both power and control. You can utilize the overhand or underhand grip to make a pass or shoot the puck out of the defensive zone. Overhand and underhand grips are described later in this chapter. In either case, the transition from one hand to two hands on the stick should be seamless.
Move the puck to the forehand whenever possible.
Although there are times when you will be forced to make a backhand play, most of the time it is best to transition the puck from the backhand to the forehand. The puck is easier to control on the forehand, and often, passes are more accurate because you can see the play in front of you. Backhand passes can be made, but remember you may be blind to the developments on one-half of the ice. For this reason, we emphasize that you should try to make plays on the forehand whenever possible. When you make a forehand pass, you're facing the play; on a backhand pass, your back is to the play, and you can see only the ice in the direction you're making the pass to. You are blind to the one side of the ice when you are making passes off the backhand, and that's why it is better to play off the forehand.
Communicate with teammates.
Skaters give goalies instructions on what to do with the puck while goalies alert the skaters to potential threats behind them. It is important for you to get comfortable with your teammates and learn their tendencies and preferences. You should learn which players want to come behind the net to pick up the puck and which ones want to receive passes in the corners or up the ice. It is important to know whether your players want passes on their forehands or backhands. Verbal communication and eye contact between you and the players are key. Language used between defensemen and goalies should be as simple as possible, for example, leave it, over, or rim.
Defend against common plays off the opposition rush
There are so many variations of offensive attacks that you need to be prepared for. The opposition attack is nonstatic.
There are so many variations of offensive attacks that you need to be prepared for. The opposition attack is nonstatic. The players are coming at you, and you need to prepare yourself as the play develops in front of you. You need to have laser-like focus on the play coming off the rush and be prepared to defend it. Following, we discuss the most common plays that occur off the opposition rush and some techniques on how to defend them.
One-on-One
In a one-on-one situation, the opposing forward has two options. He can either shoot or try to go around the defenseman. Often, the opposing forward will try to use your defenseman as a screen and then shoot the puck with the intention of catching you off guard while your vision on the puck is impaired. If the opposition forward beats the defenseman wide, a breakaway situation will occur, and you will utilize the tactics discussed previously. Here are a few other key points for you in a one-on-one situation:
- Be aware of the shooter's options. Is he going to pull wide or shoot straight on through the screen?
- Don't let up. Often, the goaltender will think a shot won't take place because the defenseman has the play covered. You can be beaten with an unexpected shot.
- Make sure you have enough backward momentum in case the shooter pulls you across the crease.
- Make sure you maintain good gap control and do not get caught flat-footed.
Two-on-One
For many years, it was taught that when facing a two-on-one, the defenseman should take away the pass and leave the shot for the goaltender. With goaltenders now able to move post to post with much more efficiency, this coaching tactic is not always applicable. If facing a two-on-one, the opposing player coming down the wing has three options: he can shoot to score, shoot it off the goaltender to create a rebound, or pass it to his teammate.
You need to have discussions with your defenseman in practice about how you are going to position yourselves on a two-on-one. Is the defenseman going to play more in the middle or to the puck carrier's side? You should play slightly stronger to the puck carrier's side but be ready to play the pass (figure 6.4). Some coaches prefer their defenseman to play strong to the puck carrier, whereas others prefer the defenseman to play more toward the middle of the ice. There are still those who prefer the defenseman to take away the pass. As a goaltender, the coaching tactic chosen is out of your control. You need to hold your ground and be aware of the nonpuck carrier's position. If the nonpuck carrier is heading back door, then be ready to butterfly slide and take away the pass play. If the puck carrier shoots far side, you are already in a good position to make the save. If the opposition forward shoots far side, activate your stick to make the save. Here are a few other key points for you in a two-on-one situation:
- Maintain your angle on the shooter. If there is a pass option, play a little deeper in your net in preparation for a butterfly slide.
- Gauge the speed of the opposition skaters early. Know which hand the shooters are.
- Be ready to activate your stick on far-side shots to eliminate any potential rebound.
Figure 6.4 Two-on-one: The goaltender plays slightly stronger to the shooter's side.
Save
Related Books


