
- Home
- Sports and Activities
- Dance
- Yoga
- Breathing for Peak Performance

Breathing for Peak Performance
Functional Exercises for Dance, Yoga, and Pilates
72 Pages
Most people give little thought to how they breathe—but if they want to have more energy, be more alert, and improve their exercise and sport performance, they should, says renowned author, dancer, and movement educator Eric Franklin.
“Breathing is essential to our survival, it is necessary for energy production, and it is something we do about 20,000 times a day,” says Franklin, who has taught at various universities and ballets and coached world champions and Cirque du Soleil artists in his Franklin Method. “We stand to benefit if we improve our breathing.”
In Breathing for Peak Performance, you will learn how to improve your own breathing and the breathing of those you coach and work with. This concise, heavily illustrated text will help you do the following:
• Learn to improve your breathing function to benefit your health and improve your sport performance and daily living
• Understand the anatomy of breathing—all the muscles and joints involved and how they work together
• Practice 35 breathing exercises to improve functional breathing technique and performance in dance, yoga, and Pilates
• Study and train the vital muscle of breathing—the diaphragm—grasping how it interacts with the abdominal muscles and other muscles associated with breathing
• Comprehend the function and movement of the rib cage as it pertains to breathing
• Integrate all the elements involved in breathing, including the lungs and inner organs, for optimal breathing function
“The ideas and exercises in this book are tried and tested over 30 years of teaching, and they have been used by dancers, yoga practitioners, Pilates instructors, actors, vocal coaches, singing coaches, physiotherapists, swimmers, runners, and many others,” says Franklin. “When you perform the exercises, you will feel more energetic, focused, and relaxed. You will also gain an understanding of how to integrate imagery into your breathing practice.”
Franklin presents the exercises—many accompanied by full-color illustrations—through his famed Franklin Method, which combines movement, imagery, and touch. His method helps practitioners relearn, in this case, correct breathing procedure to maximize breathing function.
“To improve your breathing or to coach someone who needs to improve, first you need that solid understanding of anatomy,” Franklin says. “And you need to understand the habits that can hinder efficient breathing—tension, poor posture, and negative thinking, among others.”
Franklin presents a recommended daily practice at the end of the book, which is ideal for individuals, professionals, coaches, practitioners, and students of dance, yoga, and Pilates. His detailed description of the anatomy, his presentation of the exercises, and his ability to integrate this information and make it very practical through his Franklin Method make this text an important reference for those who are looking to reach their peak performance in sport and in life.
Eric Franklin is director and founder of the Institute for Franklin Method in Wetzikon, Switzerland. He has more than 35 years of experience as a dancer and choreographer, and he has shared imagery techniques in his teaching since 1986.
Franklin has taught extensively throughout the United States and Europe at the Juilliard School in New York, Royal Ballet School in London, Danish Ballet in Copenhagen, Dance Academy of Rome, and Institute for Psychomotor Therapy in Zurich. He was also a guest lecturer at the University of Vienna. He has provided training to Olympic and world-champion athletes and professional dance troupes such as Cirque du Soleil and the Forum de Dance in Monte Carlo. Franklin earned a BFA degree from New York University's Tisch School of the Arts and a BS degree from the University of Zurich. He has been on the faculty of the American Dance Festival since 1991.
Franklin is coauthor of the best-selling book Breakdance, which received a New York City Public Library Prize in 1984, and author of 100 Ideen für Beweglichkeit and Dance Imagery for Technique and Performance (both books about imagery in dance and movement). He is a member of the International Association for Dance Medicine and Science.
Franklin lives near Zurich, Switzerland.
How your upper body is designed for breathing
The first water-living animals breathed through their skin. This method worked fine if they were small enough and plenty of flowing water was available.
The Evolution of Breathing
The first water-living animals breathed through their skin. This method worked fine if they were small enough and plenty of flowing water was available. Some early animals that lived in fresh water started to move around a lot, so breathing through the skin was not sufficient. Multiple folded flaps (gills) developed to increase the surface area for absorption of oxygen. These gills were enhanced by primitive expansions of the pharynx (the part of the throat behind the nose and mouth) into early lungs. However, gills are not suited for breathing in air, and primitive air-breathing animals such as frogs had to rely on swallowing movements to gulp in air (figure I.1).

The breakthrough came with the advent of negative-pressure breathing, called thoracic breathing. The ribs attached themselves to the sternum in front, creating an expandable rib cage. This adaptation allowed the ribs to rotate and swivel toward the head for inhalation and reverse this action for exhalation. This movement, which is like lifting a bucket handle, increased the side-to-side diameter of the rib cage, creating a vacuum in the lungs and causing the air to rush in.
This evolution was a great improvement over gulping air, but it came at a price. The negative pressure in the thorax not only appeared to suck in air, it also pulled the belly organs upward, and much of the space that could have been used for breathing was occupied. Primitive reptiles solved the problem by stretching a sheet of connective tissue across the bottom of the rib cage, preventing the organs from moving upward. This sheet still exists as the modern central tendon of the diaphragm (figure I.2).
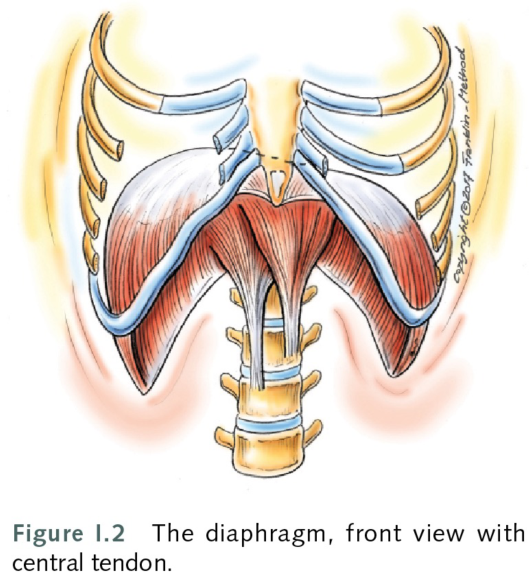
Mammals, who were warm blooded, needed a higher oxygen intake. Their breathing had to become more effective at drawing oxygen into the lungs with the purpose of increasing their metabolism. Having warm blood was an advantage. They did not need to live in a warm climate for the sun to heat the body until the muscles could start functioning; the body could warm itself even in a cold environment.
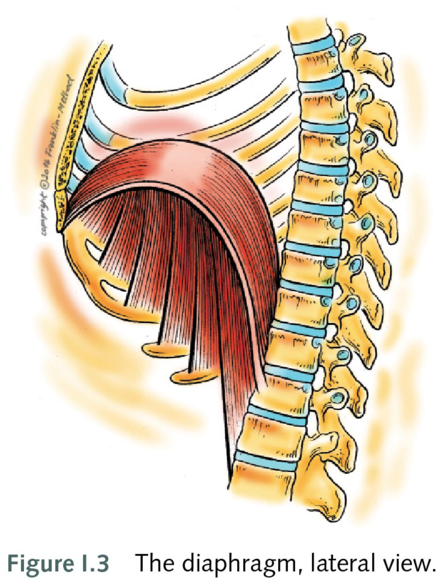
Muscles were attached to the rim of the central tendon and stretched down to the lower edge of the thorax, creating a muscular dome with a tendinous roof. This diaphragm could now move downward and flatten out, allowing for a large downward expansion in the lungs and greatly increasing the capacity to absorb oxygen. In fact, resting mammals can breathe with minimal movement of the ribs. As you are reading this book—unless you are running on a treadmill—you will probably not notice much movement of the rib cage. This kind of breathing, called abdominal breathing, probably explains why mammals lack ribs below the 12th thoracic vertebra. As you inhale, the organs below the diaphragm are pushed downward by the descending diaphragm. The abdominal wall moves outward to accommodate their movement, something that would not be possible with a bony wall of ribs (see figure I.3).
Strengthening and Stretching Routine for the Diaphragm
The diaphragm needs its own designated stretching and strengthening routine, just like any other muscle. The diaphragm moves downward when you inhale, expanding the lungs and creating a vacuum.
Stretching Your Diaphragm
The diaphragm needs its own designated stretching and strengthening routine, just like any other muscle. The diaphragm moves downward when you inhale, expanding the lungs and creating a vacuum. This vacuum causes air to rush into the lungs and oxygen to transfer through the thin walls of the lungs into the bloodstream. (For more information on the lungs, see chapter 2.)
What makes the diaphragm move downward? The diaphragm is a muscle, and muscles can shorten and lengthen between the origin and the insertion of the muscle. The origin is considered the fixed point, while the insertion is the part that is moved by the muscle.
If you want to stretch the diaphragm, you need to increase the distance between the origin and insertion, as in the following exercise. This exercise stretches other muscles, such as the intercostals (between the ribs) and the oblique abdominals, which in turn increases the benefit for the diaphragm.
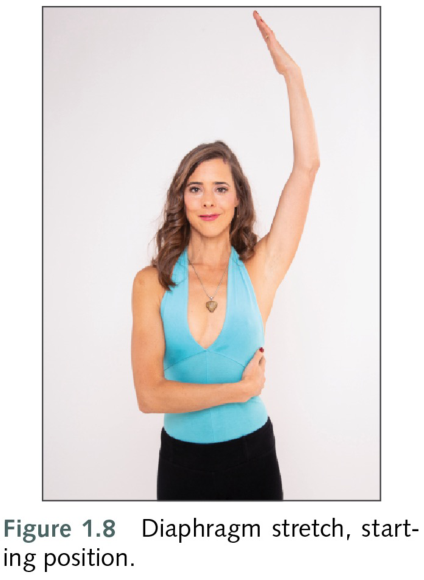
- Stand in a comfortable position. You will begin by stretching the left side of the diaphragm. These fibers are mostly located between the 12th rib and the central tendon along the inside of the rib cage, which is called the zone of opposition. Lift your left arm over your head, and place your right hand on your lower ribs on the left side (figure 1.8).
- As you exhale, laterally flex your spine to the right (figure 1.9). Two factors are causing the diaphragm to lengthen as you perform this movement—the fact that you are exhaling, and the increase in distance between the 12th rib and the top of the diaphragm.

- Inhale as you return to the upright position. Repeat the movement for five breath cycles. Exhale as you move to the right; inhale as you return to the upright position.
- Imagine the muscle fibers of the diaphragm lengthening underneath your ribs. To increase the stretch, gently push down on the left lower ribs (7-12) with your right hand.
- Return your left arm to the side of the body and rest for a moment. Notice any differences between the two sides of the body. The entire right side of your body may feel more relaxed. Imagine breathing into your right lung, then your left lung. Does it feel as if your right lung takes in much more air than the left? That is because the right hemisphere got stretched and is more flexible, allowing for more movement of the diaphragm and ribs.
- Perform the same exercise on the other side. Lift your right arm up above your head, place your left hand on the right side of the rib cage, and flex your spine to the left while exhaling. Repeat the movement for five cycles of breath. As you move to the left, exhale; as you return to the upright position, inhale.
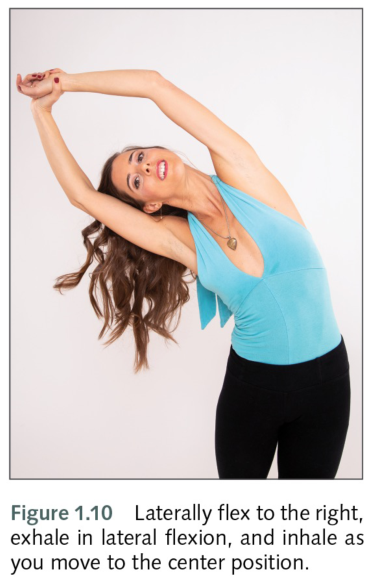
- To finish the exercise, reach up with both arms and clasp your hands. Laterally flex your spine to the right and left (figure 1.10). During lateral flexion, exhale; when you return to center, inhale. Move to the right and left four times.
- Drop your arms down to your sides, and rest in the standing position for a moment. You may notice that your posture has improved, your lungs feel as though they are lifting you upward like balloons, and your sternum is higher. Working with your breath is good for your posture and general sense of well-being.
- Be aware of the stretch of the diaphragm when you exercise. Notice how movement of the thorax and spine affect the length of the fibers of the diaphragm. Use this awareness to increase the stretching of your diaphragm, even when you are focusing also on other aspects of the exercise.
Visualize lung movement to improve your breathing
Visualizing how and where the lungs move when you inhale helps improve your breathing. The lungs expand outward during inhalation, but they also slide into available space between folded layers of parietal pleura.
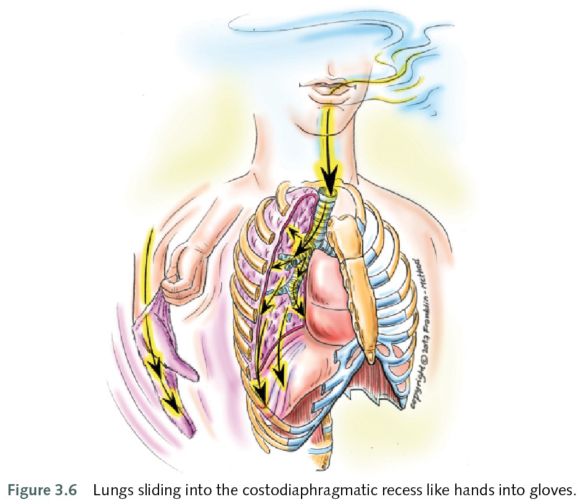
Costodiaphragmatic Recess
Visualizing how and where the lungs move when you inhale helps improve your breathing. The lungs expand outward during inhalation, but they also slide into available space between folded layers of parietal pleura. One of the largest of these layers lies between the lowest ribs and the back of the diaphragm at the junction of the costal and diaphragmatic pleura. This area is called the costodiaphragmatic recess.
- In a comfortable upright sitting or standing position, place your hands on the back and bottom of the rib cage, and visualize the area between the ribs and the diaphragm.
- As you inhale, imagine the lungs sliding into this area. They are opening the space between two folds of parietal pleura—one covering the diaphragm, the other covering the inside of the rib cage.
- Compare the feeling to sliding your hands into a glove. As you exhale, the lungs slide out of this area and the costal and diaphragmatic pleura close.
- Inhale and exhale several times, and imagine the lungs sliding into the costodiaphragmatic recess (figure 3.6). Use the metaphor of sliding your hands into gloves to help you with embodying this anatomical function.
How your upper body is designed for breathing
The first water-living animals breathed through their skin. This method worked fine if they were small enough and plenty of flowing water was available.
The Evolution of Breathing
The first water-living animals breathed through their skin. This method worked fine if they were small enough and plenty of flowing water was available. Some early animals that lived in fresh water started to move around a lot, so breathing through the skin was not sufficient. Multiple folded flaps (gills) developed to increase the surface area for absorption of oxygen. These gills were enhanced by primitive expansions of the pharynx (the part of the throat behind the nose and mouth) into early lungs. However, gills are not suited for breathing in air, and primitive air-breathing animals such as frogs had to rely on swallowing movements to gulp in air (figure I.1).
The breakthrough came with the advent of negative-pressure breathing, called thoracic breathing. The ribs attached themselves to the sternum in front, creating an expandable rib cage. This adaptation allowed the ribs to rotate and swivel toward the head for inhalation and reverse this action for exhalation. This movement, which is like lifting a bucket handle, increased the side-to-side diameter of the rib cage, creating a vacuum in the lungs and causing the air to rush in.
This evolution was a great improvement over gulping air, but it came at a price. The negative pressure in the thorax not only appeared to suck in air, it also pulled the belly organs upward, and much of the space that could have been used for breathing was occupied. Primitive reptiles solved the problem by stretching a sheet of connective tissue across the bottom of the rib cage, preventing the organs from moving upward. This sheet still exists as the modern central tendon of the diaphragm (figure I.2).
Mammals, who were warm blooded, needed a higher oxygen intake. Their breathing had to become more effective at drawing oxygen into the lungs with the purpose of increasing their metabolism. Having warm blood was an advantage. They did not need to live in a warm climate for the sun to heat the body until the muscles could start functioning; the body could warm itself even in a cold environment.
Muscles were attached to the rim of the central tendon and stretched down to the lower edge of the thorax, creating a muscular dome with a tendinous roof. This diaphragm could now move downward and flatten out, allowing for a large downward expansion in the lungs and greatly increasing the capacity to absorb oxygen. In fact, resting mammals can breathe with minimal movement of the ribs. As you are reading this book—unless you are running on a treadmill—you will probably not notice much movement of the rib cage. This kind of breathing, called abdominal breathing, probably explains why mammals lack ribs below the 12th thoracic vertebra. As you inhale, the organs below the diaphragm are pushed downward by the descending diaphragm. The abdominal wall moves outward to accommodate their movement, something that would not be possible with a bony wall of ribs (see figure I.3).
Strengthening and Stretching Routine for the Diaphragm
The diaphragm needs its own designated stretching and strengthening routine, just like any other muscle. The diaphragm moves downward when you inhale, expanding the lungs and creating a vacuum.
Stretching Your Diaphragm
The diaphragm needs its own designated stretching and strengthening routine, just like any other muscle. The diaphragm moves downward when you inhale, expanding the lungs and creating a vacuum. This vacuum causes air to rush into the lungs and oxygen to transfer through the thin walls of the lungs into the bloodstream. (For more information on the lungs, see chapter 2.)
What makes the diaphragm move downward? The diaphragm is a muscle, and muscles can shorten and lengthen between the origin and the insertion of the muscle. The origin is considered the fixed point, while the insertion is the part that is moved by the muscle.
If you want to stretch the diaphragm, you need to increase the distance between the origin and insertion, as in the following exercise. This exercise stretches other muscles, such as the intercostals (between the ribs) and the oblique abdominals, which in turn increases the benefit for the diaphragm.
- Stand in a comfortable position. You will begin by stretching the left side of the diaphragm. These fibers are mostly located between the 12th rib and the central tendon along the inside of the rib cage, which is called the zone of opposition. Lift your left arm over your head, and place your right hand on your lower ribs on the left side (figure 1.8).
- As you exhale, laterally flex your spine to the right (figure 1.9). Two factors are causing the diaphragm to lengthen as you perform this movement—the fact that you are exhaling, and the increase in distance between the 12th rib and the top of the diaphragm.
- Inhale as you return to the upright position. Repeat the movement for five breath cycles. Exhale as you move to the right; inhale as you return to the upright position.
- Imagine the muscle fibers of the diaphragm lengthening underneath your ribs. To increase the stretch, gently push down on the left lower ribs (7-12) with your right hand.
- Return your left arm to the side of the body and rest for a moment. Notice any differences between the two sides of the body. The entire right side of your body may feel more relaxed. Imagine breathing into your right lung, then your left lung. Does it feel as if your right lung takes in much more air than the left? That is because the right hemisphere got stretched and is more flexible, allowing for more movement of the diaphragm and ribs.
- Perform the same exercise on the other side. Lift your right arm up above your head, place your left hand on the right side of the rib cage, and flex your spine to the left while exhaling. Repeat the movement for five cycles of breath. As you move to the left, exhale; as you return to the upright position, inhale.
- To finish the exercise, reach up with both arms and clasp your hands. Laterally flex your spine to the right and left (figure 1.10). During lateral flexion, exhale; when you return to center, inhale. Move to the right and left four times.
- Drop your arms down to your sides, and rest in the standing position for a moment. You may notice that your posture has improved, your lungs feel as though they are lifting you upward like balloons, and your sternum is higher. Working with your breath is good for your posture and general sense of well-being.
- Be aware of the stretch of the diaphragm when you exercise. Notice how movement of the thorax and spine affect the length of the fibers of the diaphragm. Use this awareness to increase the stretching of your diaphragm, even when you are focusing also on other aspects of the exercise.
Visualize lung movement to improve your breathing
Visualizing how and where the lungs move when you inhale helps improve your breathing. The lungs expand outward during inhalation, but they also slide into available space between folded layers of parietal pleura.
Costodiaphragmatic Recess
Visualizing how and where the lungs move when you inhale helps improve your breathing. The lungs expand outward during inhalation, but they also slide into available space between folded layers of parietal pleura. One of the largest of these layers lies between the lowest ribs and the back of the diaphragm at the junction of the costal and diaphragmatic pleura. This area is called the costodiaphragmatic recess.
- In a comfortable upright sitting or standing position, place your hands on the back and bottom of the rib cage, and visualize the area between the ribs and the diaphragm.
- As you inhale, imagine the lungs sliding into this area. They are opening the space between two folds of parietal pleura—one covering the diaphragm, the other covering the inside of the rib cage.
- Compare the feeling to sliding your hands into a glove. As you exhale, the lungs slide out of this area and the costal and diaphragmatic pleura close.
- Inhale and exhale several times, and imagine the lungs sliding into the costodiaphragmatic recess (figure 3.6). Use the metaphor of sliding your hands into gloves to help you with embodying this anatomical function.
Related Books


